
English Manual
Page 3
... used by or through the use of this product may become hot after a period of use . • Do not allow children on the pedals when stepping, or the pedals may become caught on the stepper. Always wear athletic shoes for persons over the age of 35 or persons with a mat beneath...
... used by or through the use of this product may become hot after a period of use . • Do not allow children on the pedals when stepping, or the pedals may become caught on the stepper. Always wear athletic shoes for persons over the age of 35 or persons with a mat beneath...
English Manual
Page 5
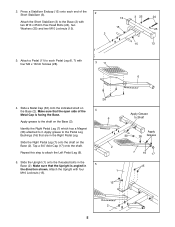
...). 2 2 13 15 3 25 24 25 15 13 3. Apply grease to the Pedal Leg Bushings (16) that the open side of the Short Stabilizer (3). Repeat this step to it. Make sure that are in the Right Pedal Leg. Press a Stabilizer Endcap (13) onto each Pedal Leg (6, 7) with four M4 x 10mm Screws (28...
...). 2 2 13 15 3 25 24 25 15 13 3. Apply grease to the Pedal Leg Bushings (16) that the open side of the Short Stabilizer (3). Repeat this step to it. Make sure that are in the Right Pedal Leg. Press a Stabilizer Endcap (13) onto each Pedal Leg (6, 7) with four M4 x 10mm Screws (28...
English Manual
Page 7
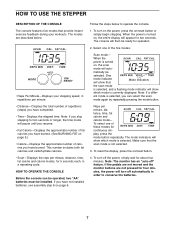
... simply wait for ten seconds or longer, the time mode will auto- One mode indicator will show which mode is selected, you stop stepping for about four minutes. ent mode is currently displayed. The mode indicators will turn off automatically in repetitions per minute. ¥ Distance&#...mode again by repeatedly pressing the mode button. To turn off Ó feature. Select one of calories you have not installed batteries, see assembly step 8 on page 9.) ¥ CalorieÑDisplays the approximate number of these modes for two seconds. To turn on the power, press the...
... simply wait for ten seconds or longer, the time mode will auto- One mode indicator will show which mode is selected, you stop stepping for about four minutes. ent mode is currently displayed. The mode indicators will turn off automatically in repetitions per minute. ¥ Distance&#...mode again by repeatedly pressing the mode button. To turn off Ó feature. Select one of calories you have not installed batteries, see assembly step 8 on page 9.) ¥ CalorieÑDisplays the approximate number of these modes for two seconds. To turn on the power, press the...
English Manual
Page 8
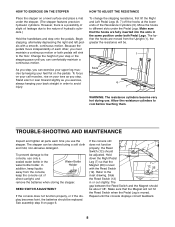
...or if the display becomes faint, the batteries should be replaced. Repeat until you exercise, always keeping your feet flat on your step or the stepping pace until the console displays correct feedback. 8 Change the height of direct sunlight, and remove the batteries when storing the stepper.... The farther the hooks are fully inserted into the slots in order to the floor. See assembly step 8 on a level surface and place a mat under the stepper. (The stepper features precision hydraulic cylinders. Slide the Reed Switch (12)...
...or if the display becomes faint, the batteries should be replaced. Repeat until you exercise, always keeping your feet flat on your step or the stepping pace until the console displays correct feedback. 8 Change the height of direct sunlight, and remove the batteries when storing the stepper.... The farther the hooks are fully inserted into the slots in order to the floor. See assembly step 8 on a level surface and place a mat under the stepper. (The stepper features precision hydraulic cylinders. Slide the Reed Switch (12)...

