
English Manual
Page 2
...and begin cooling down. 8. Use the home gym only on all times. Table of Contents Important Precautions 2 Before You Begin 3 Assembly 4 Cable Diagrams 23 Adjustment 25 Trouble-shooting and Maintenance 26 Weight Resistance Chart 27 Ordering Replacement Parts Back Cover Full 90-day Warranty ... gym is the responsibility of the owner to tip. 2. Important Precautions WARNING: To reduce the risk of this manual. tions before beginning assembly. It is intended for persons over the age of this product. 2 Never release the press arms, butterfly arms, leg lever, lat bar...
...and begin cooling down. 8. Use the home gym only on all times. Table of Contents Important Precautions 2 Before You Begin 3 Assembly 4 Cable Diagrams 23 Adjustment 25 Trouble-shooting and Maintenance 26 Weight Resistance Chart 27 Ordering Replacement Parts Back Cover Full 90-day Warranty ... gym is the responsibility of the owner to tip. 2. Important Precautions WARNING: To reduce the risk of this manual. tions before beginning assembly. It is intended for persons over the age of this product. 2 Never release the press arms, butterfly arms, leg lever, lat bar...
English Manual
Page 3
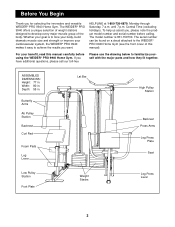
...If you , please note the product model number and serial number before using the WEIDER® PRO 9940 Home Gym. The serial number can be found on a decal attached to the WEIDER® PRO 9940 Home Gym (see the front cover of this manual carefully before calling. For your ... results you for selecting the innovative and versatile WEIDER® PRO 9940 Home Gym. Whether your goal is 831.159730. Before You Begin Thank you want. until 7 p.m. The WEIDER® PRO 9940 offers a unique selection of the body. Central Time (excluding holidays). ASSEMBLED DIMENSIONS: Height: 77 in.
...If you , please note the product model number and serial number before using the WEIDER® PRO 9940 Home Gym. The serial number can be found on a decal attached to the WEIDER® PRO 9940 Home Gym (see the front cover of this manual carefully before calling. For your ... results you for selecting the innovative and versatile WEIDER® PRO 9940 Home Gym. Whether your goal is 831.159730. Before You Begin Thank you want. until 7 p.m. The WEIDER® PRO 9940 offers a unique selection of the body. Central Time (excluding holidays). ASSEMBLED DIMENSIONS: Height: 77 in.
English Manual
Page 4
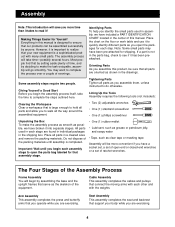
... possible, we have included a PART IDENTIFICATION CHART located in the shipping box. Place all parts as the skeleton of evenings. Most people find that assembly stage. • One (1) rubber mallet • Lubricant, such as grease or petroleum jelly, and soapy water • Tape, such as clear...into separate stages. Do not dispose of the packing materials until you are found in individual packages in the center of the Assembly Process Frame Assembly You will take the time to walk all parts and allow you to complete the steps outlined here. Tightening Parts Tighten ...
... possible, we have included a PART IDENTIFICATION CHART located in the shipping box. Place all parts as the skeleton of evenings. Most people find that assembly stage. • One (1) rubber mallet • Lubricant, such as grease or petroleum jelly, and soapy water • Tape, such as clear...into separate stages. Do not dispose of the packing materials until you are found in individual packages in the center of the Assembly Process Frame Assembly You will take the time to walk all parts and allow you to complete the steps outlined here. Tightening Parts Tighten ...

English Manual
Page 5
...) and a 3/8 x 4" Carriage Bolt (102) up through the indicated holes in the Butterfly Base (4). Locate and open the parts bag labeled "FRAME ASSEMBLY." Do not tighten the Nylon Locknuts yet. Frame Assembly 1. Before beginning, make sure that will fit over the head of each end of the brackets on the Weight Base (5) with...
...) and a 3/8 x 4" Carriage Bolt (102) up through the indicated holes in the Butterfly Base (4). Locate and open the parts bag labeled "FRAME ASSEMBLY." Do not tighten the Nylon Locknuts yet. Frame Assembly 1. Before beginning, make sure that will fit over the head of each end of the brackets on the Weight Base (5) with...

English Manual
Page 10
...Locknut (50). Press a 1 3/4" Square Inner Cap (35) into the indicated hole in steps 1 through 15. 15 59 48 59 15 50 50 48 15 Arm Assembly 16 16. Repeat this step to the welded tubes on the Press Frame (8). Do not overtighten the Nylon Locknut; Attach each welded tube on the... Press Base (6) with the Bolt and a 3/8" Nylon Locknut (50). Locate and open the parts bag labeled "ARM ASSEMBLY." Attach the Press Frame (8) to assemble the second Press Arm (77, not shown). 8 8 50 6 Lubricate 100 Welded Tube 52 35 76 64 87 77 10 Press a 1" Round ...
...Locknut (50). Press a 1 3/4" Square Inner Cap (35) into the indicated hole in steps 1 through 15. 15 59 48 59 15 50 50 48 15 Arm Assembly 16 16. Repeat this step to the welded tubes on the Press Frame (8). Do not overtighten the Nylon Locknut; Attach each welded tube on the... Press Base (6) with the Bolt and a 3/8" Nylon Locknut (50). Locate and open the parts bag labeled "ARM ASSEMBLY." Attach the Press Frame (8) to assemble the second Press Arm (77, not shown). 8 8 50 6 Lubricate 100 Welded Tube 52 35 76 64 87 77 10 Press a 1" Round ...
English Manual
Page 11
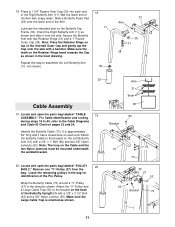
...: The loop on the Retainer Rings bend towards the Cap as shown in the inset drawing. Locate and open the parts bag labeled "CABLE 19 ASSEMBLY." Leave the remaining pulleys in the direction shown. Make sure the Large Cable Trap is approximately 52" long and it onto the axle. Orient the... Cable and the two Nylon Jamnuts must be mounted underneath the welded bracket. 20. Slide a Butterfly Foam Pad (29) onto the lower end of the Pro Pulley. Identify the Butterfly Cable (73). Attach the Butterfly Cable to the Cable Diagrams and Cable ID Chart on the Butterfly Top Frame (33). Remove...
...: The loop on the Retainer Rings bend towards the Cap as shown in the inset drawing. Locate and open the parts bag labeled "CABLE 19 ASSEMBLY." Leave the remaining pulleys in the direction shown. Make sure the Large Cable Trap is approximately 52" long and it onto the axle. Orient the... Cable and the two Nylon Jamnuts must be mounted underneath the welded bracket. 20. Slide a Butterfly Foam Pad (29) onto the lower end of the Pro Pulley. Identify the Butterfly Cable (73). Attach the Butterfly Cable to the Cable Diagrams and Cable ID Chart on the Butterfly Top Frame (33). Remove...
English Manual
Page 13
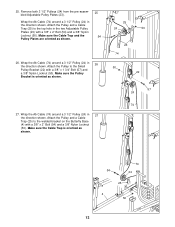
... in 26 the direction shown. Wrap the Ab Cable (74) around a 3 1/2" Pulley (24) in 27 the direction shown. Remove both 3 1/2" Pulleys (24) from the pre-assembled Adjustable Pulley Plates (23).
... in 26 the direction shown. Wrap the Ab Cable (74) around a 3 1/2" Pulley (24) in 27 the direction shown. Remove both 3 1/2" Pulleys (24) from the pre-assembled Adjustable Pulley Plates (23).
English Manual
Page 20
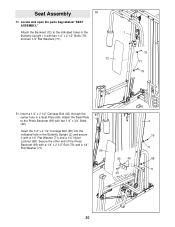
... Washer (71) and a 1/4" Nylon Locknut (68). Insert the 1/4" x 2 1/2" Carriage Bolt (45) into the indicated hole in a Seat Plate (65). Seat Assembly 50 50. Locate and open the parts bag labeled "SEAT ASSEMBLY." Insert a 1/4" x 2 1/2" Carriage Bolt (45) through the center hole in the Butterfly Upright (2) and secure it with a 1/4" x 2 1/2" Bolt (79) and a 1/4" Flat...
... Washer (71) and a 1/4" Nylon Locknut (68). Insert the 1/4" x 2 1/2" Carriage Bolt (45) into the indicated hole in a Seat Plate (65). Seat Assembly 50 50. Locate and open the parts bag labeled "SEAT ASSEMBLY." Insert a 1/4" x 2 1/2" Carriage Bolt (45) through the center hole in the Butterfly Upright (2) and secure it with a 1/4" x 2 1/2" Bolt (79) and a 1/4" Flat...

English Manual
Page 21
... Leg (20). Insert a 1/4" x 2 1/2" Carriage Bolt (45) through the center hole in the same manner. 52 13 45 65 14 49 71 68 71 79 Miscellaneous Assembly 53 43 30 Tube 53. Secure the other Seat (13) to the Curl Post (104) with a 1/4" x 2 1/2" Bolt (79) and a 1/4" Flat Washer (71). Slide Foam Pads...
... Leg (20). Insert a 1/4" x 2 1/2" Carriage Bolt (45) through the center hole in the same manner. 52 13 45 65 14 49 71 68 71 79 Miscellaneous Assembly 53 43 30 Tube 53. Secure the other Seat (13) to the Curl Post (104) with a 1/4" x 2 1/2" Bolt (79) and a 1/4" Flat Washer (71). Slide Foam Pads...

English Manual
Page 32
...free of the PART (see the PART LIST/EXPLODED DRAWING in Canada © 1999 Sears, Roebuck and Co. When requesting help assembling or operating the WEIDER® PRO 9940 Home Gym • a part is used commercially or for immediate purchase or special order when you need help or service, or ...please be replaced, call the following information: • The MODEL NUMBER of the product (831.159730) • The NAME of the product (WEIDER® PRO 9940 Home Gym) • The KEY NUMBER and DESCRIPTION of charge. REPLACEMENT PARTS If parts become worn and need to find that: • you...
...free of the PART (see the PART LIST/EXPLODED DRAWING in Canada © 1999 Sears, Roebuck and Co. When requesting help assembling or operating the WEIDER® PRO 9940 Home Gym • a part is used commercially or for immediate purchase or special order when you need help or service, or ...please be replaced, call the following information: • The MODEL NUMBER of the product (831.159730) • The NAME of the product (WEIDER® PRO 9940 Home Gym) • The KEY NUMBER and DESCRIPTION of charge. REPLACEMENT PARTS If parts become worn and need to find that: • you...


