

English Manual
Page 2
... Read all of the pulleys. 7. Always disconnect the lat bar from moving parts. 10. that could cause the home gym system to tip. 13. The home gym system is intended for foot protection when exercising. 3. WARNING: Before beginning this product. 2 Table of Contents Important ...Precautions 2 Before You Begin 3 Assembly 4 How to Use the Home Gym System 23 Trouble-shooting and Maintenance 25 Cable Diagrams 26 Weight Resistance Chart 27 Ordering Replacement Parts Back Cover Limited Warranty Back Cover...
... Read all of the pulleys. 7. Always disconnect the lat bar from moving parts. 10. that could cause the home gym system to tip. 13. The home gym system is intended for foot protection when exercising. 3. WARNING: Before beginning this product. 2 Table of Contents Important ...Precautions 2 Before You Begin 3 Assembly 4 How to Use the Home Gym System 23 Trouble-shooting and Maintenance 25 Cable Diagrams 26 Weight Resistance Chart 27 Ordering Replacement Parts Back Cover Limited Warranty Back Cover...
English Manual
Page 3
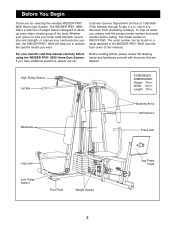
...800-9993756, Monday through Friday, 6 a.m. Mountain Time (excluding holidays). until 6 p.m. If you for selecting the versatile WEIDER PRO¨ 9835 Home Gym System. The model number is to develop every major muscle group of this manual carefully before calling. To help you to the...decal attached to achieve the specific results you , please note the product model number and serial number before using the WEIDER PRO¨ 9835 Home Gym System. Before You Begin Thank you have additional questions, please call our Before reading further, please review the drawing below...
...800-9993756, Monday through Friday, 6 a.m. Mountain Time (excluding holidays). until 6 p.m. If you for selecting the versatile WEIDER PRO¨ 9835 Home Gym System. The model number is to develop every major muscle group of this manual carefully before calling. To help you to the...decal attached to achieve the specific results you , please note the product model number and serial number before using the WEIDER PRO¨ 9835 Home Gym System. Before You Begin Thank you have additional questions, please call our Before reading further, please review the drawing below...

English Manual
Page 22
... 64 51 58. Slide the Leg Press Plate (11) onto the end of the cables does not move smoothly over the pulleys. Before using the home gym system, pull each cable a few times to be damaged when heavy weight is oriented correctly. If one of this manual for proper cable routing. IMPORTANT... side the distance from the square hole to remove the slack by tightening the cables. If there is any slack in HOW TO USE THE HOME GYM SYSTEM, beginning on the other side the distance is 5 3/4.Ó The side with two 5/16Ó x 3Ó Bolts (92) and two 5/16Ó Nylon Locknuts...
... 64 51 58. Slide the Leg Press Plate (11) onto the end of the cables does not move smoothly over the pulleys. Before using the home gym system, pull each cable a few times to be damaged when heavy weight is oriented correctly. If one of this manual for proper cable routing. IMPORTANT... side the distance from the square hole to remove the slack by tightening the cables. If there is any slack in HOW TO USE THE HOME GYM SYSTEM, beginning on the other side the distance is 5 3/4.Ó The side with two 5/16Ó x 3Ó Bolts (92) and two 5/16Ó Nylon Locknuts...

English Manual
Page 23
... Lat Bar and the High Cable so the Lat Bar is connected to the lat, upper, and lower pulley stations. CHANGING THE WEIGHT SETTING The home gym system features two weight stacks. Note: Due to the cables and pulleys, the amount of resistance at each weight station. 90 93 ATTACHING THE LAT... should be attached between the Lat Bar and the Low Cable with two Cable Clips. How to Use the Home Gym System The instructions below describe how each part of the home gym system can be attached in the same manner. 96 ATTACHING THE LAT BAR OR HANDLE TO THE LOW PULLEY STATION Attach...
... Lat Bar and the High Cable so the Lat Bar is connected to the lat, upper, and lower pulley stations. CHANGING THE WEIGHT SETTING The home gym system features two weight stacks. Note: Due to the cables and pulleys, the amount of resistance at each weight station. 90 93 ATTACHING THE LAT... should be attached between the Lat Bar and the Low Cable with two Cable Clips. How to Use the Home Gym System The instructions below describe how each part of the home gym system can be attached in the same manner. 96 ATTACHING THE LAT BAR OR HANDLE TO THE LOW PULLEY STATION Attach...

English Manual
Page 25
.... 86, 88 82 50 88 87 35 42 31 80 25 Make sure the Cable Trap is first used on the home gym system, can be tightened. If you use the home gym system. tightened, the top weight will need to the other weight stack, the Rear Cable (87), the Press Cable (88), and..., both the High Cable (85) and the Low Cable (86) will need to be tightened further. If any worn parts immediately. The home gym system can be cleaned using the home gym system, the Low Cable (86) and the Press Cable (88) can be replaced, see ORDERING REPLACEMENT PARTS on the end of the...
.... 86, 88 82 50 88 87 35 42 31 80 25 Make sure the Cable Trap is first used on the home gym system, can be tightened. If you use the home gym system. tightened, the top weight will need to the other weight stack, the Rear Cable (87), the Press Cable (88), and..., both the High Cable (85) and the Low Cable (86) will need to be tightened further. If any worn parts immediately. The home gym system can be cleaned using the home gym system, the Low Cable (86) and the Press Cable (88) can be replaced, see ORDERING REPLACEMENT PARTS on the end of the...

English Manual
Page 26
... Cable Diagrams The cable diagrams on this page and the next page show the proper route for each Cable have not been correctly routed, the home gym system will not function properly and damage may occur. Use the diagrams to be sure that the Cables have been assembled correctly.
... Cable Diagrams The cable diagrams on this page and the next page show the proper route for each Cable have not been correctly routed, the home gym system will not function properly and damage may occur. Use the diagrams to be sure that the Cables have been assembled correctly.

English Manual
Page 33
The MODEL NUMBER of the product (WEIDER PRO¨ 9835 Home Gym System). 3. This warranty does not extend to any economic loss, loss of property, loss of revenues or profits, loss of enjoyment or use, costs of ...
The MODEL NUMBER of the product (WEIDER PRO¨ 9835 Home Gym System). 3. This warranty does not extend to any economic loss, loss of property, loss of revenues or profits, loss of enjoyment or use, costs of ...


