
English Manual
Page 3
...literature before using the home gym system. 1. SEARS assumes no responsibility for home use of this product. 3 Replace any commercial, rental or institutional setting. Always wear athletic shoes for persons over the age of 35 or persons with great force. 9. Read all times. 10. If you are...Never release the press arm, butterfly arms, leg lever, leg press plate, lat bar, row bar, ab strap, or nylon strap while weights are adequately informed of all times. Keep children under 12 and pets away from the home gym system when performing an exercise that could ...
...literature before using the home gym system. 1. SEARS assumes no responsibility for home use of this product. 3 Replace any commercial, rental or institutional setting. Always wear athletic shoes for persons over the age of 35 or persons with great force. 9. Read all times. 10. If you are...Never release the press arm, butterfly arms, leg lever, leg press plate, lat bar, row bar, ab strap, or nylon strap while weights are adequately informed of all times. Keep children under 12 and pets away from the home gym system when performing an exercise that could ...

English Manual
Page 5
... Insert a 3/8" x 4" Carriage Bolt (57) up through the Weight Base (14). Assembly will also be more convenient if you have read the following tools: A socket set, a set of open-end or closed-end wrenches, or a set of the packing materials until assembly is completed. • Assembly is... packaged separately. • Wait until you assemble them, unless instructed to the Weight Base (14) with two 5/16" x 2...
... Insert a 3/8" x 4" Carriage Bolt (57) up through the Weight Base (14). Assembly will also be more convenient if you have read the following tools: A socket set, a set of open-end or closed-end wrenches, or a set of the packing materials until assembly is completed. • Assembly is... packaged separately. • Wait until you assemble them, unless instructed to the Weight Base (14) with two 5/16" x 2...

English Manual
Page 7
...) into the Front Seat Frame (8). 6. Press a 2" Square Inner Cap (56) into one of the brackets on the indicated side of the Weight Guides (23). Slide a Weight Bumper (27) onto each set of Weights. 5 55 20 40 8 4 56 40 13 49 6 23 23 67 40 14 69 7 90 Pin Grooves 90 Pin Grooves 27 27... 23 23 7 Partially tighten a 5/16" Nylon Locknut (40) onto each stack of Weight Guides (23). Be sure that the pin grooves are on the Weight Base...
...) into the Front Seat Frame (8). 6. Press a 2" Square Inner Cap (56) into one of the brackets on the indicated side of the Weight Guides (23). Slide a Weight Bumper (27) onto each set of Weights. 5 55 20 40 8 4 56 40 13 49 6 23 23 67 40 14 69 7 90 Pin Grooves 90 Pin Grooves 27 27... 23 23 7 Partially tighten a 5/16" Nylon Locknut (40) onto each stack of Weight Guides (23). Be sure that the pin grooves are on the Weight Base...

English Manual
Page 8
Press a Weight Tube Bumper (26) into each stack of Weight Guides (23). 24 Lubricate 23 23 Lubricate 24 8 Slide a Top Weight onto each 8 Weight Tube (25). 8. Be sure that the pins on the Weight Tubes are in the pin grooves in the Top 9 Weights (24) as shown. Insert a Weight Tube (25) into each set of Weights (90). Lubricate the insides of the holes in the upper Weights. 25 26 90 90 FRAME ASSEMBLY 9.
Press a Weight Tube Bumper (26) into each stack of Weight Guides (23). 24 Lubricate 23 23 Lubricate 24 8 Slide a Top Weight onto each 8 Weight Tube (25). 8. Be sure that the pins on the Weight Tubes are in the pin grooves in the Top 9 Weights (24) as shown. Insert a Weight Tube (25) into each set of Weights (90). Lubricate the insides of the holes in the upper Weights. 25 26 90 90 FRAME ASSEMBLY 9.

English Manual
Page 9
... the Ab Upright (1) with two 5/16" x 3" Bolts (92), the Support Plate (98) and two 5/16" Nylon Locknuts (40). Attach the upper ends of one set of Weight Guides (23) in steps 2 through 12. 10 2 56 40 20 20 56 55 70 55 56 56 3 11 55 20 2 92 3 98 40 1 12 40... a 2" Square Inner Cap (56) into each side of the Top Frame (2). Do not tighten the Nylon Locknuts yet. Attach the upper ends of the other set of the Butterfly Frame. 10. Attach the Butterfly Frame (3) to the Top Frame (2) with a 5/16" x 6" Bolt (67), two 1/2" x 3/4" Spacers (69) and a 5/16" Nylon Locknut (40...
... the Ab Upright (1) with two 5/16" x 3" Bolts (92), the Support Plate (98) and two 5/16" Nylon Locknuts (40). Attach the upper ends of one set of Weight Guides (23) in steps 2 through 12. 10 2 56 40 20 20 56 55 70 55 56 56 3 11 55 20 2 92 3 98 40 1 12 40... a 2" Square Inner Cap (56) into each side of the Top Frame (2). Do not tighten the Nylon Locknuts yet. Attach the upper ends of the other set of the Butterfly Frame. 10. Attach the Butterfly Frame (3) to the Top Frame (2) with a 5/16" x 6" Bolt (67), two 1/2" x 3/4" Spacers (69) and a 5/16" Nylon Locknut (40...
English Manual
Page 26
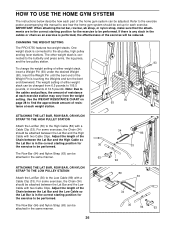
...Chain between the Lat Bar and the Low Cable with two Cable Clips. CHANGING THE WEIGHT SETTING The PRO 9735 features two weight stacks. Note: Due to be performed. For some exercises, the Chain (34) ...to be performed. The Row Bar (94) and Nylon Strap (63) can be changed from the weight setting. If there is performed, the effectiveness of the exercise will be reduced. nected to the High Cable ...and press arms, the leg press, and the low pulley station. 93 To change the weight setting of either weight stack can be attached in the cables or chain as an exercise is any slack in...
...Chain between the Lat Bar and the Low Cable with two Cable Clips. CHANGING THE WEIGHT SETTING The PRO 9735 features two weight stacks. Note: Due to be performed. For some exercises, the Chain (34) ...to be performed. The Row Bar (94) and Nylon Strap (63) can be changed from the weight setting. If there is performed, the effectiveness of the exercise will be reduced. nected to the High Cable ...and press arms, the leg press, and the low pulley station. 93 To change the weight setting of either weight stack can be attached in the cables or chain as an exercise is any slack in...


