
English Manual
Page 2
... arm. 11.:Always be surethat your body weight is especially important for foot protection. Use the home gym system only on a foot plate when performing an• exercise that does not use of this manual. away.f.rorn the: home,•.•g•.:y:...r.ri:•.sy•s•••t•e• •-r•h a•...
... arm. 11.:Always be surethat your body weight is especially important for foot protection. Use the home gym system only on a foot plate when performing an• exercise that does not use of this manual. away.f.rorn the: home,•.•g•.:y:...r.ri:•.sy•s•••t•e• •-r•h a•...
English Manual
Page 3
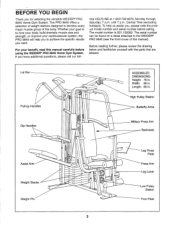
...develop every major muscle group of this manual carefully before calling. High Pulley Station Butterfly Arms Military Press Arm Backrests Leg Press Plate Press Arm Leg Lever Low Pulley Station Foot Plate 3 The model number is to the WEIDER® PRO 9645 (see the front cover of the ...at 1-800-736-6879, Monday through Saturday, 7 a.m. If you , please note the product model number and serial number before using the WEIDER® PRO 9645 Home Gym System. BEFORE YOU BEGIN Thank you want. Whether your goal is 831.159380. The serial number can be found on a decal attached ...
...develop every major muscle group of this manual carefully before calling. High Pulley Station Butterfly Arms Military Press Arm Backrests Leg Press Plate Press Arm Leg Lever Low Pulley Station Foot Plate 3 The model number is to the WEIDER® PRO 9645 (see the front cover of the ...at 1-800-736-6879, Monday through Saturday, 7 a.m. If you , please note the product model number and serial number before using the WEIDER® PRO 9645 Home Gym System. BEFORE YOU BEGIN Thank you want. Whether your goal is 831.159380. The serial number can be found on a decal attached ...
English Manual
Page 21
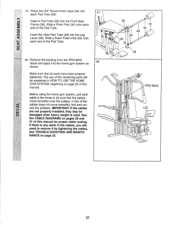
.... Press two 3/4" Round Inner Caps (34) into each cable a few times to the home gym system as 48 shown. Slide a Foam Foam Pad (30) onto each end of the Pad Tube. 48. 47. Remove the backing from the PRO 9645 decal and apply it by tightening the cables. Slide a Foam Pad (30) onto each... the other Pad Tube (28) into the Front Seat 2 Frame (36). See the CABLE DIAGRAMS on page 25. 0 36 30 34 28 34 0 30 0 29 0 PRO 9645 lR ci) ----- 00 21 If one of this manual. Make sure that the cables move smoothly, find and correct the problem.
.... Press two 3/4" Round Inner Caps (34) into each cable a few times to the home gym system as 48 shown. Slide a Foam Foam Pad (30) onto each end of the Pad Tube. 48. 47. Remove the backing from the PRO 9645 decal and apply it by tightening the cables. Slide a Foam Pad (30) onto each... the other Pad Tube (28) into the Front Seat 2 Frame (36). See the CABLE DIAGRAMS on page 25. 0 36 30 34 28 34 0 30 0 29 0 PRO 9645 lR ci) ----- 00 21 If one of this manual. Make sure that the cables move smoothly, find and correct the problem.
English Manual
Page 22
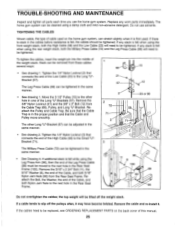
... of the exercise will be performed. Refer to the exercise poster accompanying this manual to see how the home gym system should be set up for the exercise to be reduced. CHANGING THE WEIGHT SETTING The PRO 9645 features two weight stacks. The weight setting of either weight stack, insert a... Weight Pin (26) under the desired Weight (25). Note: Due to the cables and pulleys, the amount of resistance at each exercise. tance at each part of the home gym system can be...
... of the exercise will be performed. Refer to the exercise poster accompanying this manual to see how the home gym system should be set up for the exercise to be reduced. CHANGING THE WEIGHT SETTING The PRO 9645 features two weight stacks. The weight setting of either weight stack, insert a... Weight Pin (26) under the desired Weight (25). Note: Due to the cables and pulleys, the amount of resistance at each exercise. tance at each part of the home gym system can be...
English Manual
Page 25
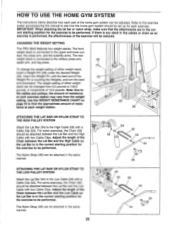
...93) from the Rear Seat Frame. TIGHTENING THE CABLES Woven cable, the type of this manual. 25 Move the 3 1/2" Pulley (15) to the other Long "U"-Bracket (57) can be replaced, see ORDERING REPLACEMENT PARTS on the home gym system, can be moved to the Long "U"Bracket (57). Be sure that the Cable ...) to the next hole in the Rear Seat Frame. 0 96 11 8 100 99 O 93 93 Do not overtighten the cables; Do not use the home gym system. Tighten the 1/4" Nylon Locknut (2) that the Cable and Pulley move smoothly. To tighten the cables, insert the weight pin into the middle of the...
...93) from the Rear Seat Frame. TIGHTENING THE CABLES Woven cable, the type of this manual. 25 Move the 3 1/2" Pulley (15) to the other Long "U"-Bracket (57) can be replaced, see ORDERING REPLACEMENT PARTS on the home gym system, can be moved to the Long "U"Bracket (57). Be sure that the Cable ...) to the next hole in the Rear Seat Frame. 0 96 11 8 100 99 O 93 93 Do not overtighten the cables; Do not use the home gym system. Tighten the 1/4" Nylon Locknut (2) that the Cable and Pulley move smoothly. To tighten the cables, insert the weight pin into the middle of the...
English Manual
Page 28
... by telephone, call the following information: • The MODEL NUMBER of the product (831.159380). • The NAME of the product (WEIDER® PRO 9645 Home Gym System). • The PART NUMBER of the PART (see the PART LIST and the EXPLODED DRAWING at the left. To request service or ... 90 DAY WARRANTY For 90 days from state to the frame. See the front cover of this manual). • The DESCRIPTION of charge. When requesting help assembling or operating the WEIDER® PRO 9645 • a part is used commercially orfor rental purposes. If you may also have other rights ...
... by telephone, call the following information: • The MODEL NUMBER of the product (831.159380). • The NAME of the product (WEIDER® PRO 9645 Home Gym System). • The PART NUMBER of the PART (see the PART LIST and the EXPLODED DRAWING at the left. To request service or ... 90 DAY WARRANTY For 90 days from state to the frame. See the front cover of this manual). • The DESCRIPTION of charge. When requesting help assembling or operating the WEIDER® PRO 9645 • a part is used commercially orfor rental purposes. If you may also have other rights ...


