
English Manual
Page 2
TABLE OF CONTENTS WARNING DECAL PLACEMENT 2 IMPORTANT PRECAUTIONS 3 BEFORE YOU BEGIN 4 PART IDENTIFICATION CHART 5 ASSEMBLY 7 ADJUSTMENT 34 WEIGHT RESISTANCE CHART 37 CABLE DIAGRAM 38 MAINTENANCE 39 EXERCISE GUIDELINES 40 PART LIST 43 EXPLODED DRAWING 45 ORDERING REPLACEMENT PARTS Back Cover 90-DAY FULL WARRANTY Back ...
TABLE OF CONTENTS WARNING DECAL PLACEMENT 2 IMPORTANT PRECAUTIONS 3 BEFORE YOU BEGIN 4 PART IDENTIFICATION CHART 5 ASSEMBLY 7 ADJUSTMENT 34 WEIGHT RESISTANCE CHART 37 CABLE DIAGRAM 38 MAINTENANCE 39 EXERCISE GUIDELINES 40 PART LIST 43 EXPLODED DRAWING 45 ORDERING REPLACEMENT PARTS Back Cover 90-DAY FULL WARRANTY Back ...
English Manual
Page 34
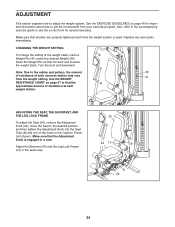
...adjust the weight system. CHANGING THE WEIGHT SETTING To change the setting of resistance at each weight station. Turn the bent end downward. Replace any worn parts immediately. Use the WEIGHT 41 RESISTANCE CHART on page 40 for important information about how to see the correct form ...for several exercises. See the EXERCISE GUIDELINES on page 37 to the cables and pulleys, the amount 30 of resistance at each exercise station may vary from...
...adjust the weight system. CHANGING THE WEIGHT SETTING To change the setting of resistance at each weight station. Turn the bent end downward. Replace any worn parts immediately. Use the WEIGHT 41 RESISTANCE CHART on page 40 for important information about how to see the correct form ...for several exercises. See the EXERCISE GUIDELINES on page 37 to the cables and pulleys, the amount 30 of resistance at each exercise station may vary from...
English Manual
Page 35
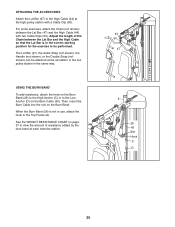
... starting position for the exercise to be attached at the ab station or the low pulley station in the same way. Adjust the length of resistance added by the burn band at each exercise station. 44 50 47 6 26 45 Slot Hook C D 35 When the Burn Band (26) is in use... 37 to view the amount of the Chain between the Lat Bar (47) and the High Cable (44) with a Cable Clip (50). See the WEIGHT RESISTANCE CHART on the Burn Cable (45). Then, insert the Burn Cable into the slot on the Burn Band. The Lat Bar (47), the Ankle Strap (not...
... starting position for the exercise to be attached at the ab station or the low pulley station in the same way. Adjust the length of resistance added by the burn band at each exercise station. 44 50 47 6 26 45 Slot Hook C D 35 When the Burn Band (26) is in use... 37 to view the amount of the Chain between the Lat Bar (47) and the High Cable (44) with a Cable Clip (50). See the WEIGHT RESISTANCE CHART on the Burn Cable (45). Then, insert the Burn Cable into the slot on the Burn Band. The Lat Bar (47), the Ankle Strap (not...
English Manual
Page 37
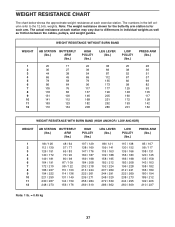
... 67 82 98 125 148 160 172 193 201 PRESS ARM (lbs.) 26 36 51 57 69 82 93 105 117 128 142 162 WEIGHT RESISTANCE WITH BURN BAND (HIGH ANCHOR / LOW ANCHOR) WEIGHT 1 2 3 4 5 6 7 8 9 10 11 12 AB STATION BUTTERFLY (lbs.) ARM (lbs.) 98 / 126 112 / 139 126 / 151 ... each exercise station. The numbers in individual weights as well as friction between the cables, pulleys, and weight guides. The actual resistance at each arm. WEIGHT RESISTANCE CHART The chart below shows the approximate weight resistance at each station may vary due to differences in the left column refer to the 12.5-lb.
... 67 82 98 125 148 160 172 193 201 PRESS ARM (lbs.) 26 36 51 57 69 82 93 105 117 128 142 162 WEIGHT RESISTANCE WITH BURN BAND (HIGH ANCHOR / LOW ANCHOR) WEIGHT 1 2 3 4 5 6 7 8 9 10 11 12 AB STATION BUTTERFLY (lbs.) ARM (lbs.) 98 / 126 112 / 139 126 / 151 ... each exercise station. The numbers in individual weights as well as friction between the cables, pulleys, and weight guides. The actual resistance at each arm. WEIGHT RESISTANCE CHART The chart below shows the approximate weight resistance at each station may vary due to differences in the left column refer to the 12.5-lb.


