

Canadian English Manual
Page 12
...78). Remove the preattached 3 1/2" Pulleys (78) from the top of Weights (44). Insert a Weight Pin (50) into the Weight Tube. Wrap the Swivel High Cable (74) over a 4 1/2" 21 Pulley (119). Lift the Weight Tube (43) and the Top Weight (45) 22 closest to the Swivel Upright (5). 19 5...which is 115 3/8" 23 long and has an eyelet on the Top Frame (6) with a 3/8" x 2" Bolt (100) and a 3/8" Nylon Locknut (87). Route the Swivel High Cable (74) through the Swivel Upright (5) and over a 4 1/2" Pulley (119). Tighten a 1/2" Nut (118) halfway onto the end of the indicat- Then,...
...78). Remove the preattached 3 1/2" Pulleys (78) from the top of Weights (44). Insert a Weight Pin (50) into the Weight Tube. Wrap the Swivel High Cable (74) over a 4 1/2" 21 Pulley (119). Lift the Weight Tube (43) and the Top Weight (45) 22 closest to the Swivel Upright (5). 19 5...which is 115 3/8" 23 long and has an eyelet on the Top Frame (6) with a 3/8" x 2" Bolt (100) and a 3/8" Nylon Locknut (87). Route the Swivel High Cable (74) through the Swivel Upright (5) and over a 4 1/2" Pulley (119). Tighten a 1/2" Nut (118) halfway onto the end of the indicat- Then,...

Canadian English Manual
Page 13
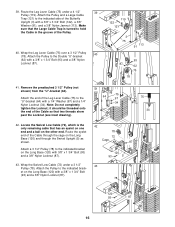
... Locate the Lat Cable (88), which is 89 1/4" long and has a ball on one end and an eyelet on the Swivel Upright (5) with a 3/8" x 2 3/4" Bolt (101), two 3/8" Washers (91), two 1/2" Spacers (89), and a 3/8" Nylon Locknut (87). 28 78 87 91 89 7 88 89 91 101 13 Route the eyelet end ...of the Butterfly Top Frame with a 3/8" x 2" Bolt (100) and a 3/8" Nylon Locknut (87). Make sure the Cable Trap is turned to the 5 bracket on the other. Remove the preattached 3 1/2" Pulleys (78) from ...
... Locate the Lat Cable (88), which is 89 1/4" long and has a ball on one end and an eyelet on the Swivel Upright (5) with a 3/8" x 2 3/4" Bolt (101), two 3/8" Washers (91), two 1/2" Spacers (89), and a 3/8" Nylon Locknut (87). 28 78 87 91 89 7 88 89 91 101 13 Route the eyelet end ...of the Butterfly Top Frame with a 3/8" x 2" Bolt (100) and a 3/8" Nylon Locknut (87). Make sure the Cable Trap is turned to the 5 bracket on the other. Remove the preattached 3 1/2" Pulleys (78) from ...

Canadian English Manual
Page 15
... the groove of the Cable through the Seat Upright (9) and attach it to the Double "U"-bracket (62) with a 3/8" x 2 3/4" Bolt (101), two 3/8" Washers (91), two 1/2" Spacers (89), and a 3/8" Nylon Locknut (87), as shown. 37 86 10 103 38 91 89 87 75 9 78 75 91 101 89 15 Route the eyelet end of...
... the groove of the Cable through the Seat Upright (9) and attach it to the Double "U"-bracket (62) with a 3/8" x 2 3/4" Bolt (101), two 3/8" Washers (91), two 1/2" Spacers (89), and a 3/8" Nylon Locknut (87), as shown. 37 86 10 103 38 91 89 87 75 9 78 75 91 101 89 15 Route the eyelet end of...
Canadian English Manual
Page 16
... (78) to the Double "U"-bracket (62) with a 3/8" x 3 3/4" Bolt (122), a 3/8" Washer (91), and a 3/8" Nylon Jamnut (113). Route the eyelet end of the Cable so that has an eyelet on one end and a ball on the Long Base (120) and through the cage on the other end... (93) and a 3/8" Nylon Locknut (87). 43. it should be threaded onto the end of the Cable through the Swivel Upright (5) as shown. Route the Leg Lever Cable (75) under a 3 1/2" Pulley (78). Attach the Pulley and a Large Cable Trap (121) to the indicated bracket on the Long Base (120) with a 3/8" x 1 3/4" Bolt...
... (78) to the Double "U"-bracket (62) with a 3/8" x 3 3/4" Bolt (122), a 3/8" Washer (91), and a 3/8" Nylon Jamnut (113). Route the eyelet end of the Cable so that has an eyelet on one end and a ball on the Long Base (120) and through the cage on the other end... (93) and a 3/8" Nylon Locknut (87). 43. it should be threaded onto the end of the Cable through the Swivel Upright (5) as shown. Route the Leg Lever Cable (75) under a 3 1/2" Pulley (78). Attach the Pulley and a Large Cable Trap (121) to the indicated bracket on the Long Base (120) with a 3/8" x 1 3/4" Bolt...

Canadian English Manual
Page 17
...Attach the Pulley to the indicated brack- Route the Swivel Low Cable (72) under a 3 1/2" 48 Pulley (78). Attach the Pulley to the indicated bracket on the Long Base (120) with a 3/8" x 1 3/4" Bolt (93) and a 3/8" Nylon Locknut (87). 46. Attach the Pulley and a Cable Trap (68) between the indicated holes...Plates (63) with a 3/8" x 1 3/4" Bolt (93) and a 3/8" Nylon Locknut (87). 47. 44. Wrap the Swivel Low Cable (72) over a 3 1/2" Pulley 44 (78). Make sure that the Cable Trap is turned to the indicated bracket on the Long Base (120) with a 3/8" x 2" Bolt (100) and a 3/8" Nylon ...
...Attach the Pulley to the indicated brack- Route the Swivel Low Cable (72) under a 3 1/2" 48 Pulley (78). Attach the Pulley to the indicated bracket on the Long Base (120) with a 3/8" x 1 3/4" Bolt (93) and a 3/8" Nylon Locknut (87). 46. Attach the Pulley and a Cable Trap (68) between the indicated holes...Plates (63) with a 3/8" x 1 3/4" Bolt (93) and a 3/8" Nylon Locknut (87). 47. 44. Wrap the Swivel Low Cable (72) over a 3 1/2" Pulley 44 (78). Make sure that the Cable Trap is turned to the indicated bracket on the Long Base (120) with a 3/8" x 2" Bolt (100) and a 3/8" Nylon ...

Canadian English Manual
Page 21
... are not properly installed, they may be explained in ADJUSTMENTS, beginning on page 22 of this manual for proper cable routing. IMPORTANT: If the cables are closer to remove the slack by tightening the cables. 61. See TROUBLESHOOTING on page 26 and 27 of the Squat Backrest than the top. The use of the... remaining parts will need to the bottom of this manual. If one of the cables does not move smoothly over the pulleys. Next, pull the Knob and 35 slide the Squat Bracket (37) down onto the Squat Slider (38). ...
... are not properly installed, they may be explained in ADJUSTMENTS, beginning on page 22 of this manual for proper cable routing. IMPORTANT: If the cables are closer to remove the slack by tightening the cables. 61. See TROUBLESHOOTING on page 26 and 27 of the Squat Backrest than the top. The use of the... remaining parts will need to the bottom of this manual. If one of the cables does not move smoothly over the pulleys. Next, pull the Knob and 35 slide the Squat Bracket (37) down onto the Squat Slider (38). ...

Canadian English Manual
Page 26
... correctly routed, the weight system will not function properly and damage may occur. Cable Identification Chart Butterfly Cable (69)-52" Swivel Low Cable (72)-205" Squat Cable (73)-174" Swivel High Cable (74)-124 1/2" Leg Lever Cable (75)-98 1/2" Lat Cable (88)-89 1/4" Swivel Cable (17)-115 3/8" Lat Cable (88) 4 2 1 5 4 Butterfly Cable (69) 2 3 1 3 Swivel High Cable (74) 4 2 1 3 Squat Cable (73) 4 5 5 2 3 1 26 CABLE DIAGRAMS The cable...
... correctly routed, the weight system will not function properly and damage may occur. Cable Identification Chart Butterfly Cable (69)-52" Swivel Low Cable (72)-205" Squat Cable (73)-174" Swivel High Cable (74)-124 1/2" Leg Lever Cable (75)-98 1/2" Lat Cable (88)-89 1/4" Swivel Cable (17)-115 3/8" Lat Cable (88) 4 2 1 5 4 Butterfly Cable (69) 2 3 1 3 Swivel High Cable (74) 4 2 1 3 Squat Cable (73) 4 5 5 2 3 1 26 CABLE DIAGRAMS The cable...


