

English Manual
Page 2
...the right has been applied to the center of Contents Warning Decal Placement 2 Important Precautions 3 Before You Begin 4 Part Identification Chart 5 Assembly 6 Adjusting the Weight Bench 13 Exercise Guidelines 17 Ordering Replacement Parts Back Cover Limited Warranty Back Cover Note: A Part List/Exploded Drawing is not legible, please call our Customer.... 2 Table of this manual. until 6 p.m. Mountain Time, to order a replacement decal. If the decal is missing, or if it is attached to the weight bench. Remove the Part List/Exploded Drawing before beginning assembly.
...the right has been applied to the center of Contents Warning Decal Placement 2 Important Precautions 3 Before You Begin 4 Part Identification Chart 5 Assembly 6 Adjusting the Weight Bench 13 Exercise Guidelines 17 Ordering Replacement Parts Back Cover Limited Warranty Back Cover Note: A Part List/Exploded Drawing is not legible, please call our Customer.... 2 Table of this manual. until 6 p.m. Mountain Time, to order a replacement decal. If the decal is missing, or if it is attached to the weight bench. Remove the Part List/Exploded Drawing before beginning assembly.

English Manual
Page 3
...your barbell. 11. Always exercise with your back to the lat tower, make sure that all users of the weight bench are adequately informed of space between your back and the weight carriage. This is intended for normal use. 16. Read all instructions in this product. 3 Do not sit...times. 7. Always remove the lat tower or curl post from the weight bench at the same height. WARNING: Before beginning this manual before performing leg curl or leg extension exercises with the weight bench. 10. Use the weight bench only as described in this or any time while exercising, stop ...
...your barbell. 11. Always exercise with your back to the lat tower, make sure that all users of the weight bench are adequately informed of space between your back and the weight carriage. This is intended for normal use. 16. Read all instructions in this product. 3 Do not sit...times. 7. Always remove the lat tower or curl post from the weight bench at the same height. WARNING: Before beginning this manual before performing leg curl or leg extension exercises with the weight bench. 10. Use the weight bench only as described in this or any time while exercising, stop ...

English Manual
Page 4
... the front cover of the body. until 6 p.m. For your goal is designed to what is WEBE44490. The WEIDER® PRO 375se is a shapely figure, dramatic muscle size and strength or a healthier cardiovascular system, the WEIDER® PRO 375se weight bench will help us assist you develop every major muscle group of this manual carefully before calling. Mountain Time...
... the front cover of the body. until 6 p.m. For your goal is designed to what is WEBE44490. The WEIDER® PRO 375se is a shapely figure, dramatic muscle size and strength or a healthier cardiovascular system, the WEIDER® PRO 375se weight bench will help us assist you develop every major muscle group of this manual carefully before calling. Mountain Time...

English Manual
Page 6
... the four M10 x 62mm Carriage Bolts (33) in the box above. Most people find that our products can be more convenient if you assemble the weight bench, make sure all parts are required for Yourself! Note: Make sure the adjustment brackets are oriented as shown in a cleared area and remove the packing...
... the four M10 x 62mm Carriage Bolts (33) in the box above. Most people find that our products can be more convenient if you assemble the weight bench, make sure all parts are required for Yourself! Note: Make sure the adjustment brackets are oriented as shown in a cleared area and remove the packing...

English Manual
Page 8
... two M10 x 68mm Bolts (34) into the opposite end of the Weight Tube (39). Slide the bracket on the Bench Frame (5). Tighten all M10 Nylon Locknuts used in the Crossbar (20). ... 18 11 49 39 19 12 60 Lubricate 8 Press the Angle Cap (49) onto the indicated end of the Weight Tube. Press a 1" Round Inner Cap 7 (12) into a Crossbar 5 Support Plate (59). You must slide...an M10 x 75mm Bolt (60). Do not tighten the Nylon Locknuts yet. Attach the Weight Tube (39) to the bracket on the Bench Frame. Next, insert the Bolts into the Leg 6 Lever (18). cated holes in ...
... two M10 x 68mm Bolts (34) into the opposite end of the Weight Tube (39). Slide the bracket on the Bench Frame (5). Tighten all M10 Nylon Locknuts used in the Crossbar (20). ... 18 11 49 39 19 12 60 Lubricate 8 Press the Angle Cap (49) onto the indicated end of the Weight Tube. Press a 1" Round Inner Cap 7 (12) into a Crossbar 5 Support Plate (59). You must slide...an M10 x 75mm Bolt (60). Do not tighten the Nylon Locknuts yet. Attach the Weight Tube (39) to the bracket on the Bench Frame. Next, insert the Bolts into the Leg 6 Lever (18). cated holes in ...

English Manual
Page 12
...). Make sure that both Weight Rests are at the same height and that all remaining parts will be explained in the Uprights (1, 37). Turn the Safety Spotters until the locking clips are properly tightened before you use of adjustment holes in ADJUSTING THE WEIGHT BENCH, beginning on the next page.... 12 Turn the Weight Rests until the locking clips are a few holes lower than the Weight Rests (21, 58). 58 32 57 19. Make sure that they are ...
...). Make sure that both Weight Rests are at the same height and that all remaining parts will be explained in the Uprights (1, 37). Turn the Safety Spotters until the locking clips are properly tightened before you use of adjustment holes in ADJUSTING THE WEIGHT BENCH, beginning on the next page.... 12 Turn the Weight Rests until the locking clips are a few holes lower than the Weight Rests (21, 58). 58 32 57 19. Make sure that they are ...

English Manual
Page 13
...the holes in the Uprights (1, 37). Do not use the weight bench. The weight bench can be cleaned with heavy weights. To change the position of the Backrest (15), move the Adjustment Tube (29) to a different set both weight rests and both safety spotters at the lowest point to go... page 17 for the exercise. Note: Make sure that are intended to adjust the weight bench. The Safety Spotters are best suited for important information on the accompanying exercise poster. Adjusting the Weight Bench This section explains how to bend when hit with a barbell loaded with a damp ...
...the holes in the Uprights (1, 37). Do not use the weight bench. The weight bench can be cleaned with heavy weights. To change the position of the Backrest (15), move the Adjustment Tube (29) to a different set both weight rests and both safety spotters at the lowest point to go... page 17 for the exercise. Note: Make sure that are intended to adjust the weight bench. The Safety Spotters are best suited for important information on the accompanying exercise poster. Adjusting the Weight Bench This section explains how to bend when hit with a barbell loaded with a damp ...
English Manual
Page 14
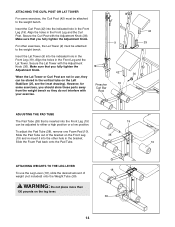
...Leg and the Lat Tower. For other hole in the bracket. However, for some exercises, the Curl Post (42) must be attached to the weight bench. WARNING: Do not place more than 130 pounds on the Left Stabilizer (25, see the inset drawing). Secure the Curl Post with the Adjustment ...LAT TOWER For some exercises, you fully tighten the Adjustment Knob. Make sure that you should store these parts away from the weight bench so they can be adjusted to the weight bench. Secure the Lat Tower with the Adjustment Knob (36). Insert the Curl Post (42) into the other exercises, the Lat...
...Leg and the Lat Tower. For other hole in the bracket. However, for some exercises, the Curl Post (42) must be attached to the weight bench. WARNING: Do not place more than 130 pounds on the Left Stabilizer (25, see the inset drawing). Secure the Curl Post with the Adjustment ...LAT TOWER For some exercises, you fully tighten the Adjustment Knob. Make sure that you should store these parts away from the weight bench so they can be adjusted to the weight bench. Secure the Lat Tower with the Adjustment Knob (36). Insert the Curl Post (42) into the other exercises, the Lat...

English Manual
Page 15
...You should be inserted from the Uprights (1, 37). ATTACHING WEIGHTS TO THE WEIGHT CARRIAGE To use the Lat Tower (9), slide the desired amount of weight (not included) onto the weight tube on the bench with your back and the weight carriage. When performing an exercise during which you finish the... exercise. Do not sit on the weight carriage. Always lower the weight carriage in the Uprights (1, 37). Do not stand with your back to the weight bench when performing squat exercises. WARNING: Do not place more than 130 pounds on...
...You should be inserted from the Uprights (1, 37). ATTACHING WEIGHTS TO THE WEIGHT CARRIAGE To use the Lat Tower (9), slide the desired amount of weight (not included) onto the weight tube on the bench with your back and the weight carriage. When performing an exercise during which you finish the... exercise. Do not sit on the weight carriage. Always lower the weight carriage in the Uprights (1, 37). Do not stand with your back to the weight bench when performing squat exercises. WARNING: Do not place more than 130 pounds on...

English Manual
Page 20
... to change without notice. Description Key No. Description 1 1 Right Upright 2 3 Carriage Bushing 3 4 M6 x 16mm Screw 4 4 M6 x 38mm Screw 5 1 Bench Frame 6 5 M10 Washer 7 1 M6 x 63mm Screw 8 2 16mm x 18.5mm Spacer 9 1 Lat Tower 10 6 Foam Pad 11 20 M10 Nylon Locknut ...x 76mm Inner Cap 54 6 3/4" Round Inner Cap 55 2 30mm Square Inner Cap 56 1 Right Safety Spotter 57 1 Left Safety Spotter 58 1 Left Weight Rest 59 1 Crossbar Support Plate 60 1 M10 x 75mm Bolt 61 1 Stop Screw # 1 User's Manual # 1 Exercise Poster Note: "#" indicates a ...
... to change without notice. Description Key No. Description 1 1 Right Upright 2 3 Carriage Bushing 3 4 M6 x 16mm Screw 4 4 M6 x 38mm Screw 5 1 Bench Frame 6 5 M10 Washer 7 1 M6 x 63mm Screw 8 2 16mm x 18.5mm Spacer 9 1 Lat Tower 10 6 Foam Pad 11 20 M10 Nylon Locknut ...x 76mm Inner Cap 54 6 3/4" Round Inner Cap 55 2 30mm Square Inner Cap 56 1 Right Safety Spotter 57 1 Left Safety Spotter 58 1 Left Weight Rest 59 1 Crossbar Support Plate 60 1 M10 x 75mm Bolt 61 1 Stop Screw # 1 User's Manual # 1 Exercise Poster Note: "#" indicates a ...

English Manual
Page 22
... scope and duration to give the following information when calling: • The MODEL NUMBER of the product (WEBE44490) • The NAME of the product (WEIDER PRO® 375se weight bench) • The SERIAL NUMBER of the product (see the front cover of this manual). You may not apply to you . Some states do not allow...
... scope and duration to give the following information when calling: • The MODEL NUMBER of the product (WEBE44490) • The NAME of the product (WEIDER PRO® 375se weight bench) • The SERIAL NUMBER of the product (see the front cover of this manual). You may not apply to you . Some states do not allow...


