

English Manual
Page 2
...Time, to the center of Contents Warning Decal Placement 2 Important Precautions 3 Before You Begin 4 Part Identification Chart 5 Assembly 6 Adjusting the Weight Bench 13 Exercise Guidelines 17 Ordering Replacement Parts Back Cover Limited Warranty Back Cover Note: A Part List/Exploded Drawing is not legible, please call our ...Customer Service Department toll-free at the right has been applied to the weight bench. Apply the replacement decal in the location shown. 2 If the decal is missing, or if it is attached to order a ...
...Time, to the center of Contents Warning Decal Placement 2 Important Precautions 3 Before You Begin 4 Part Identification Chart 5 Assembly 6 Adjusting the Weight Bench 13 Exercise Guidelines 17 Ordering Replacement Parts Back Cover Limited Warranty Back Cover Note: A Part List/Exploded Drawing is not legible, please call our ...Customer Service Department toll-free at the right has been applied to the weight bench. Apply the replacement decal in the location shown. 2 If the decal is missing, or if it is attached to order a ...

English Manual
Page 3
.... 4. When you feel pain or dizziness at all precautions. 3. If you are sitting on the weight carriage. tions before using the weight bench. You should stand behind you to catch the barbell if you use a barbell (not included) longer than 130 pounds on the leg lever ... for foot protection while exercising. 9. Replace any commercial, rental or institutional setting. 14. Do not place more than 130 pounds on the bench with your partner should be able to support a maximum of serious injury, read the following important precau- Always remove the lat tower or ...
.... 4. When you feel pain or dizziness at all precautions. 3. If you are sitting on the weight carriage. tions before using the weight bench. You should stand behind you to catch the barbell if you use a barbell (not included) longer than 130 pounds on the leg lever ... for foot protection while exercising. 9. Replace any commercial, rental or institutional setting. 14. Do not place more than 130 pounds on the bench with your partner should be able to support a maximum of serious injury, read the following important precau- Always remove the lat tower or ...

English Manual
Page 4
...is WEBE44490. they do not correspond to help you achieve the specific results you for selecting the versatile WEIDER® PRO 375se weight bench. The WEIDER® PRO 375se is designed to what is right and left side" are have additional questions, please call our Customer ...excluding holidays). The model number is a shapely figure, dramatic muscle size and strength or a healthier cardiovascular system, the WEIDER® PRO 375se weight bench will help you , please note the product model number and serial number before Before reading further, please review the drawing using ...
...is WEBE44490. they do not correspond to help you achieve the specific results you for selecting the versatile WEIDER® PRO 375se weight bench. The WEIDER® PRO 375se is designed to what is right and left side" are have additional questions, please call our Customer ...excluding holidays). The model number is a shapely figure, dramatic muscle size and strength or a healthier cardiovascular system, the WEIDER® PRO 375se weight bench will help you , please note the product model number and serial number before Before reading further, please review the drawing using ...

English Manual
Page 6
... area and remove the packing materials. Most people find that this side.) Place the right Stabilizer flat on page 5. • As you assemble the weight bench, make the task enjoyable, assembly will take time. Assembly Before beginning assembly, carefully read the following tools: A socket set, a set of open-end or closed...
... area and remove the packing materials. Most people find that this side.) Place the right Stabilizer flat on page 5. • As you assemble the weight bench, make the task enjoyable, assembly will take time. Assembly Before beginning assembly, carefully read the following tools: A socket set, a set of open-end or closed...

English Manual
Page 8
... upper 4 hole in the Crossbar (20). Do not tighten the Nylon Locknuts yet. cated holes in the Front Leg (19) and the bracket on the Bench Frame (5). Press a 1" Round Inner Cap 7 (12) into the indi- Lubricate an M10 x 75mm Bolt (60). Secure the M10 x 68mm Bolts (34) with two M10 ... 17 17 23 43 7. Tighten all M10 Nylon Locknuts used in steps 1 through an M10 Washer (6), the lower hole in the Crossbar (20). Attach the Bench Frame with two M10 Nylon Locknuts (11). Insert the Curl Post (42) into a Crossbar 5 Support Plate (59). Insert two M10 x 68mm Bolts (34) into ...
... upper 4 hole in the Crossbar (20). Do not tighten the Nylon Locknuts yet. cated holes in the Front Leg (19) and the bracket on the Bench Frame (5). Press a 1" Round Inner Cap 7 (12) into the indi- Lubricate an M10 x 75mm Bolt (60). Secure the M10 x 68mm Bolts (34) with two M10 ... 17 17 23 43 7. Tighten all M10 Nylon Locknuts used in steps 1 through an M10 Washer (6), the lower hole in the Crossbar (20). Attach the Bench Frame with two M10 Nylon Locknuts (11). Insert the Curl Post (42) into a Crossbar 5 Support Plate (59). Insert two M10 x 68mm Bolts (34) into ...

English Manual
Page 9
... x 38mm Screws (4) and four M6 28 Washers (30). Do not tighten the Screw yet. Attach the other side. Make sure 1 that the pins on the Bench Frame (5) with an M6 x 63mm Screw (7) and an M6 Washer (30). Lubricate the Bolt. 27 4 4 Rest the Backrest (15) on the 6 other end... tighten the Nylon Locknut. Insert the M10 x 155mm Bolt (22) through the Spacer and the 5 Backrest Tube. Hold a 16mm x 18.5mm Spacer (8) between the Bench Frame and the left Backrest Tube 29 (27) and insert the Bolt through the right Backrest Tube (27) and then slide a 16mm x 18.5mm 10...
... x 38mm Screws (4) and four M6 28 Washers (30). Do not tighten the Screw yet. Attach the other side. Make sure 1 that the pins on the Bench Frame (5) with an M6 x 63mm Screw (7) and an M6 Washer (30). Lubricate the Bolt. 27 4 4 Rest the Backrest (15) on the 6 other end... tighten the Nylon Locknut. Insert the M10 x 155mm Bolt (22) through the Spacer and the 5 Backrest Tube. Hold a 16mm x 18.5mm Spacer (8) between the Bench Frame and the left Backrest Tube 29 (27) and insert the Bolt through the right Backrest Tube (27) and then slide a 16mm x 18.5mm 10...

English Manual
Page 12
... the Weight Rests until the locking clips are properly tightened before you use of holes in ADJUSTING THE WEIGHT BENCH, beginning on the next page. 12 Make sure that both Safety Spotters are at the same height. 32 21 32 56 1 37 32 Insert the ...
... the Weight Rests until the locking clips are properly tightened before you use of holes in ADJUSTING THE WEIGHT BENCH, beginning on the next page. 12 Make sure that both Safety Spotters are at the same height. 32 21 32 56 1 37 32 Insert the ...

English Manual
Page 13
... a different set to reduce the risk of adjustment brackets in the Uprights (1, 37) that the locking clips are intended to adjust the weight bench. Important: The Safety Spotters (56, 57) are best suited for the exercise. See the EXERCISE GUIDELINES on the accompanying exercise poster. Note:...see the correct form for important information on how to get the most benefit from your barbell to which you use solvents. The weight bench can be cleaned with heavy weights. Replace any worn parts immediately. WARNING: Always set the Backrest (15) to the lowest decline ...
... a different set to reduce the risk of adjustment brackets in the Uprights (1, 37) that the locking clips are intended to adjust the weight bench. Important: The Safety Spotters (56, 57) are best suited for the exercise. See the EXERCISE GUIDELINES on the accompanying exercise poster. Note:...see the correct form for important information on how to get the most benefit from your barbell to which you use solvents. The weight bench can be cleaned with heavy weights. Replace any worn parts immediately. WARNING: Always set the Backrest (15) to the lowest decline ...
English Manual
Page 14
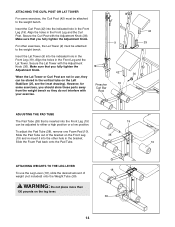
Make sure that you should store these parts away from the weight bench so they can be attached to the weight bench. WARNING: Do not place more than 130 pounds on the Front Leg 38 (19) and re-insert it into the indicated hole in the bracket. ... use , they do not interfere with your exercise. Insert the Curl Post (42) into the Front Leg (19) 19 can be attached to the weight bench. ATTACHING THE CURL POST OR LAT TOWER For some exercises, you fully tighten the Adjustment Knob.
Make sure that you should store these parts away from the weight bench so they can be attached to the weight bench. WARNING: Do not place more than 130 pounds on the Front Leg 38 (19) and re-insert it into the indicated hole in the bracket. ... use , they do not interfere with your exercise. Insert the Curl Post (42) into the Front Leg (19) 19 can be attached to the weight bench. ATTACHING THE CURL POST OR LAT TOWER For some exercises, you fully tighten the Adjustment Knob.

English Manual
Page 15
... back to the lat tower, make sure there is folded. Important: For 15 squat exercises, the Weights Rests must be able to balance the bench when performing squat exercises. WARNING: Do not place more than 130 pounds on the seat when the backrest is plenty of the way when performing...the Adjustment Tube (29) from the back, as it will go. WARNING: Always fold the backrest out of space between your back to the weight bench when performing squat exercises. Always lower the weight carriage in the Uprights (1, 37). Do not sit on the weight carriage. Do not stand with ...
... back to the lat tower, make sure there is folded. Important: For 15 squat exercises, the Weights Rests must be able to balance the bench when performing squat exercises. WARNING: Do not place more than 130 pounds on the seat when the backrest is plenty of the way when performing...the Adjustment Tube (29) from the back, as it will go. WARNING: Always fold the backrest out of space between your back to the weight bench when performing squat exercises. Always lower the weight carriage in the Uprights (1, 37). Do not sit on the weight carriage. Do not stand with ...

English Manual
Page 20
... the back cover of the user's manual for information about ordering replacement parts. Qty. Description 1 1 Right Upright 2 3 Carriage Bushing 3 4 M6 x 16mm Screw 4 4 M6 x 38mm Screw 5 1 Bench Frame 6 5 M10 Washer 7 1 M6 x 63mm Screw 8 2 16mm x 18.5mm Spacer 9 1 Lat Tower 10 6 Foam Pad 11 20 M10 Nylon Locknut 12 2 1" Round Inner Cap 13...
... the back cover of the user's manual for information about ordering replacement parts. Qty. Description 1 1 Right Upright 2 3 Carriage Bushing 3 4 M6 x 16mm Screw 4 4 M6 x 38mm Screw 5 1 Bench Frame 6 5 M10 Washer 7 1 M6 x 63mm Screw 8 2 16mm x 18.5mm Spacer 9 1 Lat Tower 10 6 Foam Pad 11 20 M10 Nylon Locknut 12 2 1" Round Inner Cap 13...

English Manual
Page 22
...to give the following information when calling: • The MODEL NUMBER of the product (WEBE44490) • The NAME of the product (WEIDER PRO® 375se weight bench) • The SERIAL NUMBER of the product (see the front cover of this manual) • The KEY NUMBER and DESCRIPTION of ...any and all freight and other consequential damages of whatsoever nature. ICON HEALTH & FITNESS, INC., 1500 S. 1000 W., LOGAN, UT 84321-9813 WEIDER® is authorized by ICON. Mountain Time (excluding holidays). The warranty extended hereunder is made must be received by ICON at 1-800-999-3756...
...to give the following information when calling: • The MODEL NUMBER of the product (WEBE44490) • The NAME of the product (WEIDER PRO® 375se weight bench) • The SERIAL NUMBER of the product (see the front cover of this manual) • The KEY NUMBER and DESCRIPTION of ...any and all freight and other consequential damages of whatsoever nature. ICON HEALTH & FITNESS, INC., 1500 S. 1000 W., LOGAN, UT 84321-9813 WEIDER® is authorized by ICON. Mountain Time (excluding holidays). The warranty extended hereunder is made must be received by ICON at 1-800-999-3756...


