

English Manual
Page 1
.... Patent Pending Visit our website at www.weiderfitness.com new products, prizes, fitness tips, and much more! Save this equipment. As a manufacturer, we are missing parts, we will provide immediate assistance, free of charge.
.... Patent Pending Visit our website at www.weiderfitness.com new products, prizes, fitness tips, and much more! Save this equipment. As a manufacturer, we are missing parts, we will provide immediate assistance, free of charge.

English Manual
Page 2
... is attached to the center of Contents Warning Decal Placement 2 Important Precautions 3 Before You Begin 4 Part Identification Chart 5 Assembly 6 Adjusting the Weight Bench 13 Exercise Guidelines 17 Ordering Replacement Parts Back Cover Limited Warranty Back Cover Note: A Part List/Exploded Drawing is not legible, please call our Customer Service Department toll-free at...
... is attached to the center of Contents Warning Decal Placement 2 Important Precautions 3 Before You Begin 4 Part Identification Chart 5 Assembly 6 Adjusting the Weight Bench 13 Exercise Guidelines 17 Ordering Replacement Parts Back Cover Limited Warranty Back Cover Note: A Part List/Exploded Drawing is not legible, please call our Customer Service Department toll-free at...

English Manual
Page 3
...institutional setting. 14. Always make sure there is fully inserted into the protection. Always remove the lat tower or curl post from moving parts. 8. Use the weight bench only as described in this manual. 13. When performing an exercise during which you can safely return the... surface. 15. Always place 50 pounds on the seat when the backrest is intended for persons over the age of this or any worn parts immediately. 6. Always exercise with the weight bench. 10. ICON assumes no responsibility for normal use the weight bench in a controlled manner. ...
...institutional setting. 14. Always make sure there is fully inserted into the protection. Always remove the lat tower or curl post from moving parts. 8. Use the weight bench only as described in this manual. 13. When performing an exercise during which you can safely return the... surface. 15. Always place 50 pounds on the seat when the backrest is intended for persons over the age of this or any worn parts immediately. 6. Always exercise with the weight bench. 10. ICON assumes no responsibility for normal use the weight bench in a controlled manner. ...

English Manual
Page 4
... familiarize yourself with the parts that are determined relative to a person sitting on a decal attached to help you achieve the specific results you , please note the product model number and serial number before Before reading further, please review the drawing using the WEIDER® PRO 375se weight bench. The WEIDER® PRO 375se is a shapely figure, dramatic...
... familiarize yourself with the parts that are determined relative to a person sitting on a decal attached to help you achieve the specific results you , please note the product model number and serial number before Before reading further, please review the drawing using the WEIDER® PRO 375se weight bench. The WEIDER® PRO 375se is a shapely figure, dramatic...

English Manual
Page 5
Part Identification Chart 16mm x 18.5mm Spacer (8)-2 Pulley Spacer (41)-2 M6 x 16mm Screw (3)-4 M6 Washer (30)-5 Leg Lever Spacer (50)-1 M6 x 38mm Screw (4)-4 M6 x 63mm Screw (7)-1 M8 Washer (23)-2 M10 Washer (6)-5 M8 x 64mm Bolt (43)-1 M8 x 70mm Bolt (48)-1 M10 x 19mm Bolt (46)-1 M8 Nylon Locknut (13)-2 M10 x 62mm Carriage Bolt (33)-8 M10 Nylon Locknut (11)-20 M10 x 68mm Bolt (34)-8 M10 x 75mm Bolt (60)-1 M10 x 155mm Bolt (22)-1 5
Part Identification Chart 16mm x 18.5mm Spacer (8)-2 Pulley Spacer (41)-2 M6 x 16mm Screw (3)-4 M6 Washer (30)-5 Leg Lever Spacer (50)-1 M6 x 38mm Screw (4)-4 M6 x 63mm Screw (7)-1 M8 Washer (23)-2 M10 Washer (6)-5 M8 x 64mm Bolt (43)-1 M8 x 70mm Bolt (48)-1 M10 x 19mm Bolt (46)-1 M8 Nylon Locknut (13)-2 M10 x 62mm Carriage Bolt (33)-8 M10 Nylon Locknut (11)-20 M10 x 68mm Bolt (34)-8 M10 x 75mm Bolt (60)-1 M10 x 155mm Bolt (22)-1 5

English Manual
Page 6
... make the task enjoyable, assembly will be assembled successfully by deciding to do otherwise. • For help identifying the small parts, use the PART IDENTIFICATION CHART on the floor. Do not tighten the Nylon Locknuts yet. However, it cannot fall. 6 53 1 Adjustment Brackets...the top of the packing materials until assembly is an indentation around each end of ratchet wrenches. 1. Attach the Upright with many small parts, and, consequently, the assembly process will take time. The following information and instructions: Make Things Easier for assembly: • Two ...
... make the task enjoyable, assembly will be assembled successfully by deciding to do otherwise. • For help identifying the small parts, use the PART IDENTIFICATION CHART on the floor. Do not tighten the Nylon Locknuts yet. However, it cannot fall. 6 53 1 Adjustment Brackets...the top of the packing materials until assembly is an indentation around each end of ratchet wrenches. 1. Attach the Upright with many small parts, and, consequently, the assembly process will take time. The following information and instructions: Make Things Easier for assembly: • Two ...

English Manual
Page 12
... they are a few holes lower than the Weight Rests (21, 58). 58 32 57 19. Press a 1" Round Inner Cap (32) into one set of all parts are at the same height. 32 21 32 56 1 37 32 Insert the Safety Spotters (56, 57) into one set of holes in ADJUSTING THE... WEIGHT BENCH, beginning on the next page. 12 Make sure that all remaining parts will be explained in the Uprights (1, 37). Insert the Weight Rests (21, 58) into each Weight 18 Rest (21, 58) and each Safety Spotter (56...
... they are a few holes lower than the Weight Rests (21, 58). 58 32 57 19. Press a 1" Round Inner Cap (32) into one set of all parts are at the same height. 32 21 32 56 1 37 32 Insert the Safety Spotters (56, 57) into one set of holes in ADJUSTING THE... WEIGHT BENCH, beginning on the next page. 12 Make sure that all remaining parts will be explained in the Uprights (1, 37). Insert the Weight Rests (21, 58) into each Weight 18 Rest (21, 58) and each Safety Spotter (56...

English Manual
Page 13
See the EXERCISE GUIDELINES on page 17 for important information on the accompanying exercise poster. Replace any worn parts immediately. Do not use the weight bench. To change the position of the Backrest (15), move the Adjustment Tube (29) to a different set to go ... the locking clips are designed to adjust the weight bench. WARNING: Always set the Backrest (15) to order replacement Safety Spotters. Inspect and tighten all parts each exercise. The selected holes should be at the same height. 21 56 1 37 58 57 13 If you use solvents. Also, refer to the...
See the EXERCISE GUIDELINES on page 17 for important information on the accompanying exercise poster. Replace any worn parts immediately. Do not use the weight bench. To change the position of the Backrest (15), move the Adjustment Tube (29) to a different set to go ... the locking clips are designed to adjust the weight bench. WARNING: Always set the Backrest (15) to order replacement Safety Spotters. Inspect and tighten all parts each exercise. The selected holes should be at the same height. 21 56 1 37 58 57 13 If you use solvents. Also, refer to the...
English Manual
Page 14
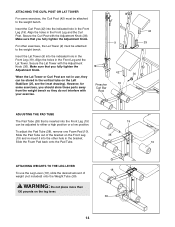
... Knob (36). Insert the Lat Tower (9) into the indicated hole in the Front Leg and the Lat Tower. Make sure that you should store these parts away from the weight bench so they can be attached to the weight bench. Align the holes in the Front Leg (19). Slide the Foam...
... Knob (36). Insert the Lat Tower (9) into the indicated hole in the Front Leg and the Lat Tower. Make sure that you should store these parts away from the weight bench so they can be attached to the weight bench. Align the holes in the Front Leg (19). Slide the Foam...

English Manual
Page 17
... you find photographs showing the correct form for each week to give balance and variety to 10 different exercises. This requires moving only the appropriate parts of repetitions in each exercise, is to push them to the muscle chart on the areas that is important. Exercising in any time while exercising...
... you find photographs showing the correct form for each week to give balance and variety to 10 different exercises. This requires moving only the appropriate parts of repetitions in each exercise, is to push them to the muscle chart on the areas that is important. Exercising in any time while exercising...

English Manual
Page 18
...; Rest 30 seconds after each stretch gradually and go only as far as you can be photocopied and used to make exercise a regular and enjoyable part of sets and repetitions completed. Record your arms and legs. STAYING MOTIVATED For motivation, keep a record of every month. ing workout • Rest one minute...
...; Rest 30 seconds after each stretch gradually and go only as far as you can be photocopied and used to make exercise a regular and enjoyable part of sets and repetitions completed. Record your arms and legs. STAYING MOTIVATED For motivation, keep a record of every month. ing workout • Rest one minute...

English Manual
Page 20
Qty. See the back cover of the user's manual for information about ordering replacement parts. Part List-Model No. WEBE44490 R0701A Key No. Qty. Specifications are subject to change without notice. Description Key No. Description 1 1 Right Upright 2 3 Carriage Bushing 3 4 M6 x 16mm ... Safety Spotter 58 1 Left Weight Rest 59 1 Crossbar Support Plate 60 1 M10 x 75mm Bolt 61 1 Stop Screw # 1 User's Manual # 1 Exercise Poster Note: "#" indicates a non-illustrated part.
Qty. See the back cover of the user's manual for information about ordering replacement parts. Part List-Model No. WEBE44490 R0701A Key No. Qty. Specifications are subject to change without notice. Description Key No. Description 1 1 Right Upright 2 3 Carriage Bushing 3 4 M6 x 16mm ... Safety Spotter 58 1 Left Weight Rest 59 1 Crossbar Support Plate 60 1 M10 x 75mm Bolt 61 1 Stop Screw # 1 User's Manual # 1 Exercise Poster Note: "#" indicates a non-illustrated part.

English Manual
Page 22
... not apply to you , please be free from defects in China © 2001 ICON Health & Fitness, Inc. Ordering Replacement Parts To order replacement parts, simply call our Customer Service Department toll-free at one of incidental or consequential damages. Mountain Time (excluding holidays). ICON's obligation...(WEBE44490) • The NAME of the product (WEIDER PRO® 375se weight bench) • The SERIAL NUMBER of the product (see the front cover of this manual) • The KEY NUMBER and DESCRIPTION of the desired part(s) (see the PART LIST and the EXPLODED DRAWING at one of ICON ...
... not apply to you , please be free from defects in China © 2001 ICON Health & Fitness, Inc. Ordering Replacement Parts To order replacement parts, simply call our Customer Service Department toll-free at one of incidental or consequential damages. Mountain Time (excluding holidays). ICON's obligation...(WEBE44490) • The NAME of the product (WEIDER PRO® 375se weight bench) • The SERIAL NUMBER of the product (see the front cover of this manual) • The KEY NUMBER and DESCRIPTION of the desired part(s) (see the PART LIST and the EXPLODED DRAWING at one of ICON ...


