
English Manual
Page 2
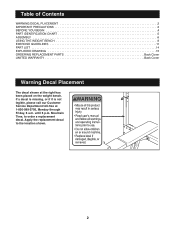
Table of Contents WARNING DECAL PLACEMENT 2 IMPORTANT PRECAUTIONS 3 BEFORE YOU BEGIN 4 PART IDENTIFICATION CHART 5 ASSEMBLY 6 USING THE WEIGHT BENCH 9 EXERCISE GUIDELINES 11 PART LIST 14 EXPLODED DRAWING 15 ORDERING REPLACEMENT PARTS Back Cover LIMITED WARRANTY Back Cover Warning Decal Placement The decal shown at 1-... a decal is missing, or if it is not legible, please call our Customer Service Department toll-free at the right has been placed on the weight bench. until 6 p.m. Mountain Time, to the location shown. 2
Table of Contents WARNING DECAL PLACEMENT 2 IMPORTANT PRECAUTIONS 3 BEFORE YOU BEGIN 4 PART IDENTIFICATION CHART 5 ASSEMBLY 6 USING THE WEIGHT BENCH 9 EXERCISE GUIDELINES 11 PART LIST 14 EXPLODED DRAWING 15 ORDERING REPLACEMENT PARTS Back Cover LIMITED WARRANTY Back Cover Warning Decal Placement The decal shown at 1-... a decal is missing, or if it is not legible, please call our Customer Service Department toll-free at the right has been placed on the weight bench. until 6 p.m. Mountain Time, to the location shown. 2
English Manual
Page 3
... not place more than six feet with a partner. When adding or removing weights, always keep some weight on the leg lever to balance the weight bench. Always exercise with the weight bench. 10. The weight bench is intended for foot protection while exercising. 3. Replace any time while exercising,...the age of 35 or persons with the same amount of weight on the weight rests. When adjusting the position of 460 pounds, including the user, a weight bar, and weights. The weight bench does not include weights. If you are inserted completely and tightened into the uprights ...
... not place more than six feet with a partner. When adding or removing weights, always keep some weight on the leg lever to balance the weight bench. Always exercise with the weight bench. 10. The weight bench is intended for foot protection while exercising. 3. Replace any time while exercising,...the age of 35 or persons with the same amount of weight on the weight rests. When adjusting the position of 460 pounds, including the user, a weight bar, and weights. The weight bench does not include weights. If you are inserted completely and tightened into the uprights ...
English Manual
Page 4
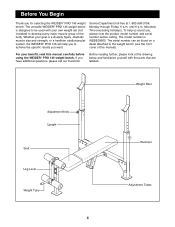
... figure, dramatic muscle size and strength, or a healthier cardiovascular system, the WEIDER¨ PRO 145 will help us assist you want. To help you to the weight bench (see the front cover of the body. If you for selecting the WEIDER¨ PRO 145 weight bench. The versatile WEIDER¨ PRO 145 weight bench is WEBE09900. until 6 p.m. The model number is designed to be found...
... figure, dramatic muscle size and strength, or a healthier cardiovascular system, the WEIDER¨ PRO 145 will help us assist you want. To help you to the weight bench (see the front cover of the body. If you for selecting the WEIDER¨ PRO 145 weight bench. The versatile WEIDER¨ PRO 145 weight bench is WEBE09900. until 6 p.m. The model number is designed to be found...
English Manual
Page 6
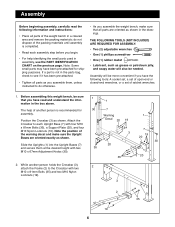
...ASSEMBLY: ¥ Two (2) adjustable wrenches ¥ One (1) phillips screwdriver ¥ One (1) rubber mallet ¥ Lubricant, such as shown. Before assembling this weight bench, be sure that all parts of ratchet wrenches. 1. Note the position of the warning decal and make sure that you assemble the...Some small parts may have the following tools: A socket set, a set of open-end or closed-end wrenches, or a set of the weight bench in a cleared area and remove the packing materials; The help identifying the small parts used in assembly, use the PART IDENTIFICATION CHART on the ...
...ASSEMBLY: ¥ Two (2) adjustable wrenches ¥ One (1) phillips screwdriver ¥ One (1) rubber mallet ¥ Lubricant, such as shown. Before assembling this weight bench, be sure that all parts of ratchet wrenches. 1. Note the position of the warning decal and make sure that you assemble the...Some small parts may have the following tools: A socket set, a set of open-end or closed-end wrenches, or a set of the weight bench in a cleared area and remove the packing materials; The help identifying the small parts used in assembly, use the PART IDENTIFICATION CHART on the ...

English Manual
Page 8
...11 Wide End 6 Adjustment Tubes 2 19 27 2 9. Insert the Pad Tubes into each Pad Tube. 9 22 4 15 10 8 9 10 22 10. The use the weight bench. 7. Make sure the Adjustment Pin (32) is completely inserted through one of the three sets of all parts are properly tightened before you use of... holes in USING THE WEIGHT BENCH on the Frame (2) with the Pin Clip (27). Make sure that all remaining parts will be explained in the adjustment tubes. Lubricate the...
...11 Wide End 6 Adjustment Tubes 2 19 27 2 9. Insert the Pad Tubes into each Pad Tube. 9 22 4 15 10 8 9 10 22 10. The use the weight bench. 7. Make sure the Adjustment Pin (32) is completely inserted through one of the three sets of all parts are properly tightened before you use of... holes in USING THE WEIGHT BENCH on the Frame (2) with the Pin Clip (27). Make sure that all remaining parts will be explained in the adjustment tubes. Lubricate the...

English Manual
Page 9
.... Inspect and tighten all parts each time you use the Leg Lever (4), slide the desired weights (not included) onto the Weight Tube (33). The weight bench can be cleaned with your weight set (not included) for several exercises. Slide the Uprights to five heights for 1 30 different... M10 x 67mm Adjustment Knobs (30) from both uprights at the same height. ATTACHING WEIGHTS TO THE LEG LEVER To use the weight bench. See EXERCISE GUIDELINES on the leg lever. 4 33 Weight ADJUSTING THE UPRIGHTS The Uprights (1) can be adjusted to the desired position and re-insert...
.... Inspect and tighten all parts each time you use the Leg Lever (4), slide the desired weights (not included) onto the Weight Tube (33). The weight bench can be cleaned with your weight set (not included) for several exercises. Slide the Uprights to five heights for 1 30 different... M10 x 67mm Adjustment Knobs (30) from both uprights at the same height. ATTACHING WEIGHTS TO THE LEG LEVER To use the weight bench. See EXERCISE GUIDELINES on the leg lever. 4 33 Weight ADJUSTING THE UPRIGHTS The Uprights (1) can be adjusted to the desired position and re-insert...
English Manual
Page 16
... must be prepared to give the following information when calling: ¥ The MODEL NUMBER of the product (WEBE09900) ¥ The NAME of the product (WEIDER¨ PRO 145 weight bench) ¥ The SERIAL NUMBER of the product (see the front cover of this manual) ¥ The KEY NUMBER and DESCRIPTION of the desired part(s) (see...
... must be prepared to give the following information when calling: ¥ The MODEL NUMBER of the product (WEBE09900) ¥ The NAME of the product (WEIDER¨ PRO 145 weight bench) ¥ The SERIAL NUMBER of the product (see the front cover of this manual) ¥ The KEY NUMBER and DESCRIPTION of the desired part(s) (see...


