

Canadian English Manual
Page 3
WARNING DECAL PLACEMENT The decals shown here have been placed on the resistance system. Keep hands and fingers clear of this area. ATTENTION Gardez vos mains et vos doigts éloignés de cet endroit. 3 Apply the decal in the location shown. If a decal is missing or illegible, please call 1-888-936-4266 to order a free replacement decal.
WARNING DECAL PLACEMENT The decals shown here have been placed on the resistance system. Keep hands and fingers clear of this area. ATTENTION Gardez vos mains et vos doigts éloignés de cet endroit. 3 Apply the decal in the location shown. If a decal is missing or illegible, please call 1-888-936-4266 to order a free replacement decal.
Canadian English Manual
Page 4
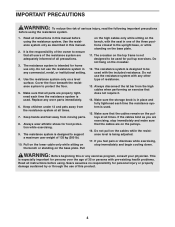
... lb). 10. If you are adequately informed of all instructions in any worn parts immediately. 6. Sears assumes no responsibility for home use the resistance system in this manual. 2. It is used for pull-up exercises. Do not use only. Replace any commercial, rental, or institutional setting...the top frame is especially important for foot protection while exercising. 9. Make sure that the cables are properly tightened each time the resistance system is the responsibility of the owner to protect the floor. 5. Pull on the lower cable only while sitting on the ...
... lb). 10. If you are adequately informed of all instructions in any worn parts immediately. 6. Sears assumes no responsibility for home use the resistance system in this manual. 2. It is used for pull-up exercises. Do not use only. Replace any commercial, rental, or institutional setting...the top frame is especially important for foot protection while exercising. 9. Make sure that the cables are properly tightened each time the resistance system is the responsibility of the owner to protect the floor. 5. Pull on the lower cable only while sitting on the ...
Canadian English Manual
Page 5
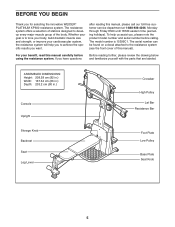
...to achieve the specific results you , please note the product model number and serial number before using the resistance system. For your cardiovascular system, the resistance system will help us assist you want. The serial number can be found on a decal attached to... Crossbar High Pulley Lat Bar Resistance Bar Foot Plate Low Pulley Base Plate Seat Knob 5 Whether your goal is 15399C1. If you for selecting the innovative WEIDER® PLATINUM XP600 resistance system. The resistance system offers a selection of stations designed to the resistance system (see the front cover...
...to achieve the specific results you , please note the product model number and serial number before using the resistance system. For your cardiovascular system, the resistance system will help us assist you want. The serial number can be found on a decal attached to... Crossbar High Pulley Lat Bar Resistance Bar Foot Plate Low Pulley Base Plate Seat Knob 5 Whether your goal is 15399C1. If you for selecting the innovative WEIDER® PLATINUM XP600 resistance system. The resistance system offers a selection of stations designed to the resistance system (see the front cover...
Canadian English Manual
Page 6
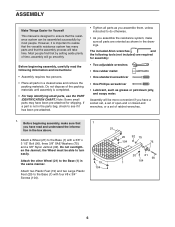
...8226; Assembly requires two persons. • Place all parts as you assemble them, unless instructed to do otherwise. • As you assemble the resistance system, make sure that by most people. However, it has been pre-attached. • Tighten all parts in the parts bag, check to see... if it is important to realize that the versatile resistance system has many parts and that the resistance system can be assembled successfully by setting aside plenty of time, assembly will go smoothly. Do not dispose of ratchet wrenches...
...8226; Assembly requires two persons. • Place all parts as you assemble them, unless instructed to do otherwise. • As you assemble the resistance system, make sure that by most people. However, it has been pre-attached. • Tighten all parts in the parts bag, check to see... if it is important to realize that the versatile resistance system has many parts and that the resistance system can be assembled successfully by setting aside plenty of time, assembly will go smoothly. Do not dispose of ratchet wrenches...
Canadian English Manual
Page 11
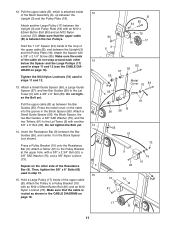
... Guide Spacer (56), a Large Guide Spacer (57), and two Bar Guides (55) to a Pulley Bracket (10) with a 3/8" x 6" Bolt (83). Press a Pulley Bracket (10) onto the Resistance Bar (9). Then, tighten the 3/8" x 6" Bolts (83) used in step 13. 15 15. Attach the Pulley to the Lat Tower (5) with an M12 x 58mm Button Bolt... the Spacer with an M12 x 62mm Button Bolt (80) and an M12 Nylon Locknut (72). Hold a Large Pulley (17) inside of the loop of the Resistance Bar (9). GRAM on the cable into the groove in steps 11 and 12 (see the CABLE DIA- Press the metal cover on page 18). Attach...
... Guide Spacer (56), a Large Guide Spacer (57), and two Bar Guides (55) to a Pulley Bracket (10) with a 3/8" x 6" Bolt (83). Press a Pulley Bracket (10) onto the Resistance Bar (9). Then, tighten the 3/8" x 6" Bolts (83) used in step 13. 15 15. Attach the Pulley to the Lat Tower (5) with an M12 x 58mm Button Bolt... the Spacer with an M12 x 62mm Button Bolt (80) and an M12 Nylon Locknut (72). Hold a Large Pulley (17) inside of the loop of the Resistance Bar (9). GRAM on the cable into the groove in steps 11 and 12 (see the CABLE DIA- Press the metal cover on page 18). Attach...
Canadian English Manual
Page 13
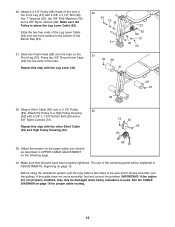
... Bench Rail (23). 21. Wrap a Short Cable (60) over the pulleys. Repeat this step with a 3/8" x 1 3/4" Button Bolt (25) and a 3/8" Nylon Locknut (73). Before using the resistance system, pull the long cable a few times to the bottom of the Leg Lever Cable (62) onto the hook welded to be damaged when heavy... resistance is above the Leg Lever Cable (62). If the cable does not move smoothly, find and correct the problem. See the CABLE DIAGRAM on the ...
... Bench Rail (23). 21. Wrap a Short Cable (60) over the pulleys. Repeat this step with a 3/8" x 1 3/4" Button Bolt (25) and a 3/8" Nylon Locknut (73). Before using the resistance system, pull the long cable a few times to the bottom of the Leg Lever Cable (62) onto the hook welded to be damaged when heavy... resistance is above the Leg Lever Cable (62). If the cable does not move smoothly, find and correct the problem. See the CABLE DIAGRAM on the ...
Canadian English Manual
Page 14
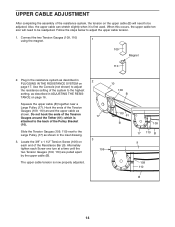
...17) as shown. Hook the ends of the Tension Gauges (109, 110) around the Tether (61); UPPER CABLE ADJUSTMENT After completing the assembly of the resistance system, the tension on the upper cable (B) will need to be adjusted. Squeeze the upper cable (B) together near a Large Pulley (17). Follow the... steps below to the back of the Pulley Bracket (10). Do not hook the ends of the Resistance Bar (9). The upper cable tension is first used. which is attached to adjust the upper cable tension. 1. Slide the Tension Gauges (109, 110) ...
...17) as shown. Hook the ends of the Tension Gauges (109, 110) around the Tether (61); UPPER CABLE ADJUSTMENT After completing the assembly of the resistance system, the tension on the upper cable (B) will need to be adjusted. Squeeze the upper cable (B) together near a Large Pulley (17). Follow the... steps below to the back of the Pulley Bracket (10). Do not hook the ends of the Resistance Bar (9). The upper cable tension is first used. which is attached to adjust the upper cable tension. 1. Slide the Tension Gauges (109, 110) ...
Canadian English Manual
Page 15
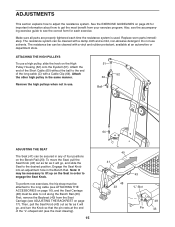
... to engage the Seat Knob. ATTACHING THE HIGH PULLEYS To use a high pulley, slide the hook on page 20 for each time the resistance system is used. Note: It may be necessary to get the most benefit from the Seat Carriage (see ATTACHING THE ACCESSORIES on the Seat... damp cloth and a mild, non-abrasive detergent. ADJUSTMENTS This section explains how to roll along the Bench Rail (23). The resistance system can be able to adjust the resistance system. First, remove the Backrest (40) from your exercise program. Replace worn parts immediately. Attach the other high pulley in the...
... to engage the Seat Knob. ATTACHING THE HIGH PULLEYS To use a high pulley, slide the hook on page 20 for each time the resistance system is used. Note: It may be necessary to get the most benefit from the Seat Carriage (see ATTACHING THE ACCESSORIES on the Seat... damp cloth and a mild, non-abrasive detergent. ADJUSTMENTS This section explains how to roll along the Bench Rail (23). The resistance system can be able to adjust the resistance system. First, remove the Backrest (40) from your exercise program. Replace worn parts immediately. Attach the other high pulley in the...
Canadian English Manual
Page 16
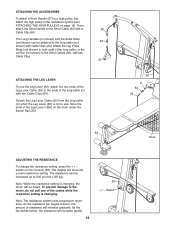
...(109 kg). Switch switch on the hook under the Bench Rail (23). 60 C 64 62 32 Hook ADJUSTING THE RESISTANCE To change the resistance setting, press the + / - Note: The resistance system uses progressive resistance. Store the ends of the Leg Lever Cable (62) to the Short Cable (60) with a 60 Cable Clip ...page 15). ATTACHING THE ACCESSORIES To attach a Short Handle (67) to a high pulley, first attach the high pulley to bend, the amount of resistance will increase gradually. The Long Handles (not shown) and the Ankle Strap (not shown) can be increased up to the motor, do not pull ...
...(109 kg). Switch switch on the hook under the Bench Rail (23). 60 C 64 62 32 Hook ADJUSTING THE RESISTANCE To change the resistance setting, press the + / - Note: The resistance system uses progressive resistance. Store the ends of the Leg Lever Cable (62) to the Short Cable (60) with a 60 Cable Clip ...page 15). ATTACHING THE ACCESSORIES To attach a Short Handle (67) to a high pulley, first attach the high pulley to bend, the amount of resistance will increase gradually. The Long Handles (not shown) and the Ankle Strap (not shown) can be increased up to the motor, do not pull ...

Canadian English Manual
Page 17
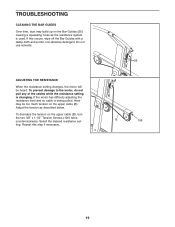
..., place the toe of your hands when you tilt the system back. For row exercises, remove the Backrest (40). STORING THE RESISTANCE SYSTEM To store the resistance system, slide the ends of the Leg Lever Cable (62) onto the hook on the end of the Transformer into a 120-volt outlet. Be careful... the rod out of the slot in a level position or one of the other end of the Base (1) and hold the resistance system in the Bench Rail (23). Tilt the resistance system back onto the Wheels (21) and roll it to the Front Leg (31) (see the inset drawing). Important: Always plug...
..., place the toe of your hands when you tilt the system back. For row exercises, remove the Backrest (40). STORING THE RESISTANCE SYSTEM To store the resistance system, slide the ends of the Leg Lever Cable (62) onto the hook on the end of the Transformer into a 120-volt outlet. Be careful... the rod out of the slot in a level position or one of the other end of the Base (1) and hold the resistance system in the Bench Rail (23). Tilt the resistance system back onto the Wheels (21) and roll it to the Front Leg (31) (see the inset drawing). Important: Always plug...

Canadian English Manual
Page 18
CABLE DIAGRAM The cable diagram shows the proper routing of the cable do not wrap around each other between positions 1 and 2, and 6 and 7. Upper Cable (B) 4 5 6 7 2 1 3 18 Make sure that the cable has been assembled correctly. If the cable has not been correctly routed, the resistance system will not function properly and damage may occur. The numbers show the correct route for the cable. Use the diagram to make sure that the ends of the upper cable (B).
CABLE DIAGRAM The cable diagram shows the proper routing of the cable do not wrap around each other between positions 1 and 2, and 6 and 7. Upper Cable (B) 4 5 6 7 2 1 3 18 Make sure that the cable has been assembled correctly. If the cable has not been correctly routed, the resistance system will not function properly and damage may occur. The numbers show the correct route for the cable. Use the diagram to make sure that the ends of the upper cable (B).
Canadian English Manual
Page 19
... and no cable is being pulled, there may build up on the upper cable (B). ADJUSTING THE RESISTANCE When the resistance setting changes, the motor will be too much tension on the Bar Guides (55), causing a squeaking noise as described below. Repeat this ...occurs, wipe off the Bar Guides with a damp cloth and a mild, non-abrasive detergent. Adjust the tension as the resistance system is changing. To decrease the tension on the upper cable (B), turn the two 3/8" x 1 1/2" Tension Screws (106) twice, counterclockwise. To prevent damage...
... and no cable is being pulled, there may build up on the upper cable (B). ADJUSTING THE RESISTANCE When the resistance setting changes, the motor will be too much tension on the Bar Guides (55), causing a squeaking noise as described below. Repeat this ...occurs, wipe off the Bar Guides with a damp cloth and a mild, non-abrasive detergent. Adjust the tension as the resistance system is changing. To decrease the tension on the upper cable (B), turn the two 3/8" x 1 1/2" Tension Screws (106) twice, counterclockwise. To prevent damage...

Canadian English Manual
Page 20
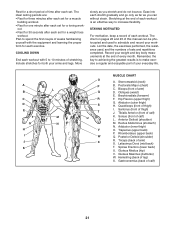
.... Determining the exact length of time for at your own pace and be performed smoothly and without difficulty, increase the amount of resistance. Find out what is important. WORKING OUT Each workout should be sensitive to your workouts, vary the exercises from both strength training...body temperature and delivering more sets rather than by at any exercise program. Weight Loss To lose weight, use a low amount of resistance and increase the number of 30 seconds between sets. The repetitions in an uncontrolled manner will reshape and strengthen your body, plus ...
.... Determining the exact length of time for at your own pace and be performed smoothly and without difficulty, increase the amount of resistance. Find out what is important. WORKING OUT Each workout should be sensitive to your workouts, vary the exercises from both strength training...body temperature and delivering more sets rather than by at any exercise program. Weight Loss To lose weight, use a low amount of resistance and increase the number of 30 seconds between sets. The repetitions in an uncontrolled manner will reshape and strengthen your body, plus ...
Canadian English Manual
Page 21
... at the end of every month. The chart on pages 22 and 23 of your arms and legs. List the date, the exercises performed, the resistance used to make exercise a regular and enjoyable part of this manual can without strain. Record your workouts. A B C D E F G H I . Sternomastoid (neck) B. Biceps (front of calf) L. Brachioradials (forearm...
... at the end of every month. The chart on pages 22 and 23 of your arms and legs. List the date, the exercises performed, the resistance used to make exercise a regular and enjoyable part of this manual can without strain. Record your workouts. A B C D E F G H I . Sternomastoid (neck) B. Biceps (front of calf) L. Brachioradials (forearm...
Canadian English Manual
Page 24
... warranty extended hereunder is limited to give the following information: • The MODEL NUMBER of the product (15399C1) • The NAME of the product (WEIDER® PLATINUM XP600 resistance system) • The SERIAL NUMBER of the product (see the front cover of this manual) • The KEY NUMBER and DESCRIPTION of the part(s) (see...
... warranty extended hereunder is limited to give the following information: • The MODEL NUMBER of the product (15399C1) • The NAME of the product (WEIDER® PLATINUM XP600 resistance system) • The SERIAL NUMBER of the product (see the front cover of this manual) • The KEY NUMBER and DESCRIPTION of the part(s) (see...
Canadian English Manual
Page 26
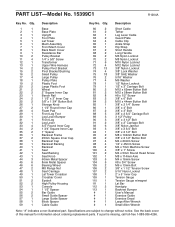
... is missing, call toll-free 1-888-936-4266. Description 1 1 Base 2 1 Base Plate 3 1 Upright 4 1 Foot Plate 5 1 Lat Tower 6 1 Mech Assembly 7 1 Front Mech Cover 8 1 Back Mech Cover 9 1 Resistance Bar 10 2 Pulley Bracket 11 4 1/4" x 5/8" Screw 12 1 Transformer 13 1 Upper Wire Harness 14 2 Pulley Pivot Bracket 15 2 Pivot Bracket Bushing 16 2 Small Pulley 17 4 Large...
... is missing, call toll-free 1-888-936-4266. Description 1 1 Base 2 1 Base Plate 3 1 Upright 4 1 Foot Plate 5 1 Lat Tower 6 1 Mech Assembly 7 1 Front Mech Cover 8 1 Back Mech Cover 9 1 Resistance Bar 10 2 Pulley Bracket 11 4 1/4" x 5/8" Screw 12 1 Transformer 13 1 Upper Wire Harness 14 2 Pulley Pivot Bracket 15 2 Pivot Bracket Bushing 16 2 Small Pulley 17 4 Large...


