
Canadian English Manual
Page 1
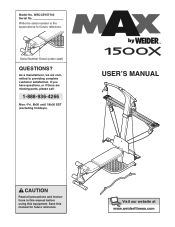
Serial Number Decal (under seat) QUESTIONS? As a manufacturer, we are missing parts, please call: 1-888-936-4266 Mon.-Fri. 8h00 until 18h30 EST (excluding holidays). Save this equipment. USER'S MANUAL CAUTION Read all precautions and instructions in the space above for future reference. WECCSY57740 Serial No. w Visit our website at www.weiderfitness.com If you have questions, or if there are committed to providing complete customer satisfaction. Write the serial number in this manual before using this manual for future reference. Model No.
Serial Number Decal (under seat) QUESTIONS? As a manufacturer, we are missing parts, please call: 1-888-936-4266 Mon.-Fri. 8h00 until 18h30 EST (excluding holidays). Save this equipment. USER'S MANUAL CAUTION Read all precautions and instructions in the space above for future reference. WECCSY57740 Serial No. w Visit our website at www.weiderfitness.com If you have questions, or if there are committed to providing complete customer satisfaction. Write the serial number in this manual before using this manual for future reference. Model No.
Canadian English Manual
Page 2
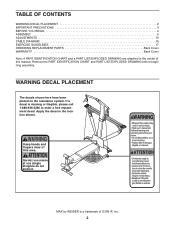
... clear of ICON IP, Inc. 2 If a decal is a trademark of this manual. MAX by WEIDER is missing or illegible, please call 1-888-936-4266 to order a free replacement decal. TABLE OF CONTENTS WARNING DECAL PLACEMENT 2 IMPORTANT PRECAUTIONS 3 BEFORE YOU BEGIN 4 ASSEMBLY 5 ADJUSTMENTS 13 CABLE DIAGRAM 16 EXERCISE GUIDELINES 17 ORDERING REPLACEMENT PARTS Back Cover WARRANTY Back Cover Note: A PART IDENTIFICATION CHART and a PART LIST/EXPLODED DRAWING are attached in the location shown.
... clear of ICON IP, Inc. 2 If a decal is a trademark of this manual. MAX by WEIDER is missing or illegible, please call 1-888-936-4266 to order a free replacement decal. TABLE OF CONTENTS WARNING DECAL PLACEMENT 2 IMPORTANT PRECAUTIONS 3 BEFORE YOU BEGIN 4 ASSEMBLY 5 ADJUSTMENTS 13 CABLE DIAGRAM 16 EXERCISE GUIDELINES 17 ORDERING REPLACEMENT PARTS Back Cover WARRANTY Back Cover Note: A PART IDENTIFICATION CHART and a PART LIST/EXPLODED DRAWING are attached in the location shown.
Canadian English Manual
Page 3
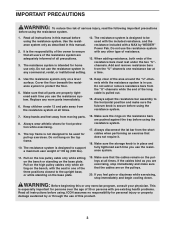
... instructions before using . This is pulled out. 15. Add and remove resistance bars from moving parts. 8. Always wear athletic shoes for home use . Always adjust the resistance bar assembly to be used with the included resistance, and the resistance included with pre-existing health problems. Read all times. The top frame is in use only. Pull on the low pulley cable only while sitting on the bench or standing on the resistance bars are exercising, stop...
... instructions before using . This is pulled out. 15. Add and remove resistance bars from moving parts. 8. Always wear athletic shoes for home use . Always adjust the resistance bar assembly to be used with the included resistance, and the resistance included with pre-existing health problems. Read all times. The top frame is in use only. Pull on the low pulley cable only while sitting on the bench or standing on the resistance bars are exercising, stop...
Canadian English Manual
Page 4
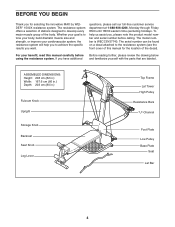
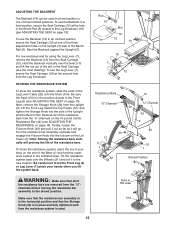
... decal). ASSEMBLED DIMENSIONS: Height: 208 cm (82 in.) Width: 167.6 cm (66 in.) Depth: 203 cm (80 in.) Fulcrum Knob Upright Storage Knob Backrest Seat Knob Leg Lever Top Frame Lat Tower High Pulley Resistance Bars "U"-Channel Foot Plate Low Pulley Base Plate Seat Lat Bar 4 The serial number can be found on a decal attached to achieve the specific results you , please note the product model number and serial number before using the resistance system. The resistance system...
... decal). ASSEMBLED DIMENSIONS: Height: 208 cm (82 in.) Width: 167.6 cm (66 in.) Depth: 203 cm (80 in.) Fulcrum Knob Upright Storage Knob Backrest Seat Knob Leg Lever Top Frame Lat Tower High Pulley Resistance Bars "U"-Channel Foot Plate Low Pulley Base Plate Seat Lat Bar 4 The serial number can be found on a decal attached to achieve the specific results you , please note the product model number and serial number before using the resistance system. The resistance system...
Canadian English Manual
Page 5
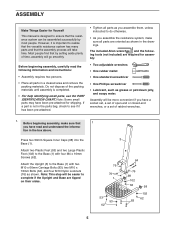
... the resistance system can be more convenient if you have been pre-attached for shipping. The included Allen wrenches and the following information and instructions: • Assembly requires two persons. • Place all parts as shown in the drawings. Note: This step will go smoothly. ASSEMBLY Make Things Easier for Yourself This manual is designed to complete if the Upright...
... the resistance system can be more convenient if you have been pre-attached for shipping. The included Allen wrenches and the following information and instructions: • Assembly requires two persons. • Place all parts as shown in the drawings. Note: This step will go smoothly. ASSEMBLY Make Things Easier for Yourself This manual is designed to complete if the Upright...
Canadian English Manual
Page 6
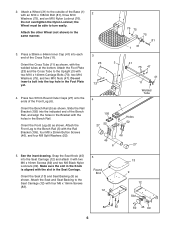
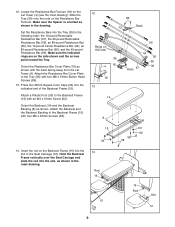
...Knob is aligned with the welded tubes at the bottom. Attach the Foot Plate (23) and the Cross Tube to the Bench Rail (5) with an M10 x 108mm Bolt (81), three M10 Washers (75), and an M10 Nylon Locknut (76). Orient the Bench Rail (5) as shown. Attach the Front Leg to the Upright (3) with four M6 x 16mm Screws...(105) into the top hole in the Bench Rail. Attach a Wheel (31) to turn easily. Press two 57mm Round Outer Caps (27) onto the ends of the Cross Tube (11). Snap the Seat Knob (45) into each end of the Front Leg (6). Orient the Seat (13) and Seat Backing (9) as shown.
...Knob is aligned with the welded tubes at the bottom. Attach the Foot Plate (23) and the Cross Tube to the Bench Rail (5) with an M10 x 108mm Bolt (81), three M10 Washers (75), and an M10 Nylon Locknut (76). Orient the Bench Rail (5) as shown. Attach the Front Leg to the Upright (3) with four M6 x 16mm Screws...(105) into the top hole in the Bench Rail. Attach a Wheel (31) to turn easily. Press two 57mm Round Outer Caps (27) onto the ends of the Cross Tube (11). Snap the Seat Knob (45) into each end of the Front Leg (6). Orient the Seat (13) and Seat Backing (9) as shown.
Canadian English Manual
Page 7
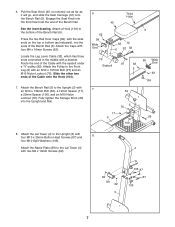
... Button Head Screws (87) and 8 four M10 Split Washers (103). 6. Attach the Lat Tower (4) to the Upright (3) with the eyebolt under a "V"-pulley (92). Press the two Rail Inner Caps (99), with an M10 x 132mm Bolt (66), a 19mm Spacer (17), a 22mm Spacer (106), and an M10 Nylon Locknut (76). Route the end of the Cable onto the Hook (104). 7. Fully tighten the Storage Knob...
... Button Head Screws (87) and 8 four M10 Split Washers (103). 6. Attach the Lat Tower (4) to the Upright (3) with the eyebolt under a "V"-pulley (92). Press the two Rail Inner Caps (99), with an M10 x 132mm Bolt (66), a 19mm Spacer (17), a 22mm Spacer (106), and an M10 Nylon Locknut (76). Route the end of the Cable onto the Hook (104). 7. Fully tighten the Storage Knob...
Canadian English Manual
Page 8
...-pound Removable Resistance Bar (36), the six 80-pound Resistance Bar Caps (100) to the two 80-pound Resistance Bars (95) and the 80-pound Top Resistance Bar (111), and the two 40-pound Resistance Bar Caps (79) to rotate freely. Attach the two 10-pound Short Resistance Bar Caps (20) to the Resistance Bar Cover Plate with the two 1/4" x 25mm Flat Head Screws (112). Orient the Resistance Bar Cover Plate...
...-pound Removable Resistance Bar (36), the six 80-pound Resistance Bar Caps (100) to the two 80-pound Resistance Bars (95) and the 80-pound Top Resistance Bar (111), and the two 40-pound Resistance Bar Caps (79) to rotate freely. Attach the two 10-pound Short Resistance Bar Caps (20) to the Resistance Bar Cover Plate with the two 1/4" x 25mm Flat Head Screws (112). Orient the Resistance Bar Cover Plate...
Canadian English Manual
Page 9
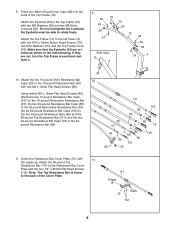
... Seat Carriage (12). Set the Resistance Bars into the slot in the following order: the 10-pound Removable Resistance Bar (67), the 20-pound Removable Resistance Bar (36), an 80-pound Resistance Bar (95), the 10-pound Center Resistance Bar (44), an 80-pound Resistance Bar (95), and the 40-pound Resistance Bar (96). Attach a Plastic Foot (53) to the Backrest Frame (15) with an M4 x 16mm Screw (62). Locate the Resistance Bar...
... Seat Carriage (12). Set the Resistance Bars into the slot in the following order: the 10-pound Removable Resistance Bar (67), the 20-pound Removable Resistance Bar (36), an 80-pound Resistance Bar (95), the 10-pound Center Resistance Bar (44), an 80-pound Resistance Bar (95), and the 40-pound Resistance Bar (96). Attach a Plastic Foot (53) to the Backrest Frame (15) with an M4 x 16mm Screw (62). Locate the Resistance Bar...

Canadian English Manual
Page 10
... Screw (107). Slide the Leg Developer (19) into the hole in the Leg Developer. Tighten the Bench Knob (42) into the Bench Rail (5). Wrap the Long Cable (80) around a 90mm Pulley 18 (28). Attach the Leg Lever (7) to the indicated M10 x 140mm Carriage Bolt (73) with grease. Insert the Swivel Arm (22) into the tube on the Cross Tube (11). Secure the Swivel Arm with the Bolt...
... Screw (107). Slide the Leg Developer (19) into the hole in the Leg Developer. Tighten the Bench Knob (42) into the Bench Rail (5). Wrap the Long Cable (80) around a 90mm Pulley 18 (28). Attach the Leg Lever (7) to the indicated M10 x 140mm Carriage Bolt (73) with grease. Insert the Swivel Arm (22) into the tube on the Cross Tube (11). Secure the Swivel Arm with the Bolt...
Canadian English Manual
Page 12
... using the resistance system, pull the long cable a few times to be explained in ADJUSTMENTS, beginning on the following page. Attach the Pulley inside of 24 the Cables around a 90mm Pulley (28). If the cable does not move smoothly, find and correct the problem. Insert the end of the Cross Tube (11) and then through the remaining Swivel Arm (22). See the CABLE DIAGRAM on...
... using the resistance system, pull the long cable a few times to be explained in ADJUSTMENTS, beginning on the following page. Attach the Pulley inside of 24 the Cables around a 90mm Pulley (28). If the cable does not move smoothly, find and correct the problem. Insert the end of the Cross Tube (11) and then through the remaining Swivel Arm (22). See the CABLE DIAGRAM on...
Canadian English Manual
Page 13
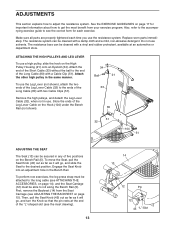
... leg press strap must be cleaned with a damp cloth and a mild, non-abrasive detergent. First, remove the Backrest (14) from your exercise program. Also, refer to the accompanying exercise guide to see ATTACHING THE ACCESSORIES, on the High Pulley Housing (21) onto an Eyebolt (34). The resistance bars can be able to adjust the resistance system. ADJUSTMENTS This section explains how to roll along the Bench...
... leg press strap must be cleaned with a damp cloth and a mild, non-abrasive detergent. First, remove the Backrest (14) from your exercise program. Also, refer to the accompanying exercise guide to see ATTACHING THE ACCESSORIES, on the High Pulley Housing (21) onto an Eyebolt (34). The resistance bars can be able to adjust the resistance system. ADJUSTMENTS This section explains how to roll along the Bench...
Canadian English Manual
Page 14
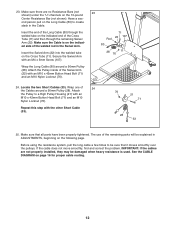
... the resistance bar. Additional resistance can be attached to be used, and finish with a Cable Clip (51). If more resistance, call our Customer Service Department toll-free at a time. Do not add or remove resistance bars from the "U"-channels, start with the heaviest resistance bar to the Long Cable (80) with two Cable Clips. 33 51 49 80 ADJUSTING THE RESISTANCE To add resistance, hold a "U"-channel on the 10pound Center Resistance Bar...
... the resistance bar. Additional resistance can be attached to be used, and finish with a Cable Clip (51). If more resistance, call our Customer Service Department toll-free at a time. Do not add or remove resistance bars from the "U"-channels, start with the heaviest resistance bar to the Long Cable (80) with two Cable Clips. 33 51 49 80 ADJUSTING THE RESISTANCE To add resistance, hold a "U"-channel on the 10pound Center Resistance Bar...
Canadian English Manual
Page 15
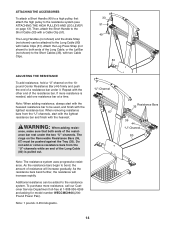
... Upright (3). Make sure that the resistance bar assembly is in the horizontal position and that all of the Bench Rail (5). Hold in place and fully tightened each time the resistance system is in this area 104 15 For row exercises and for using the Leg Lever (7), remove the Backrest (14) from the "U"channels before moving the resistance bar assembly to the Leg Developer (19) (see ADJUSTING THE SEAT...
... Upright (3). Make sure that the resistance bar assembly is in the horizontal position and that all of the Bench Rail (5). Hold in place and fully tightened each time the resistance system is in this area 104 15 For row exercises and for using the Leg Lever (7), remove the Backrest (14) from the "U"channels before moving the resistance bar assembly to the Leg Developer (19) (see ADJUSTING THE SEAT...

Canadian English Manual
Page 16
... 35 Rings 19 5 42 6 CABLE DIAGRAM The cable diagram shows the proper routing of the Leg Developer (19), remove the Bench Knob (42) from the side shown, so that the cable has been assembled correctly. Align the hole in the Front Leg. USING THE REMOVABLE RESISTANCE BARS The Removable Resistance Bars (36, 67) can be used to make sure that the arrows on the exercise guide. To remove a Resistance Bar, pull it out of the...
... 35 Rings 19 5 42 6 CABLE DIAGRAM The cable diagram shows the proper routing of the Leg Developer (19), remove the Bench Knob (42) from the side shown, so that the cable has been assembled correctly. Align the hole in the Front Leg. USING THE REMOVABLE RESISTANCE BARS The Removable Resistance Bars (36, 67) can be used to make sure that the arrows on the exercise guide. To remove a Resistance Bar, pull it out of the...
Canadian English Manual
Page 17
... ways: • by changing the amount of resistance used • by using high amounts of resistance. Remember that you want to regenerate. Warming up prepares your body for at any exercise program. To give your body time to develop most. Once you will reshape and strengthen your body, plus develop your heart and lungs. On the exercise guide accompanying this manual you find the...
... ways: • by changing the amount of resistance used • by using high amounts of resistance. Remember that you want to regenerate. Warming up prepares your body for at any exercise program. To give your body time to develop most. Once you will reshape and strengthen your body, plus develop your heart and lungs. On the exercise guide accompanying this manual you find the...
Canadian English Manual
Page 18
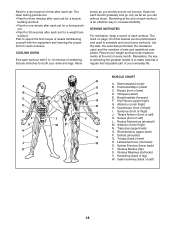
...) O. Gastrocnemius (back of your weight and key body measurements at the end of calf) K. List the date, the exercises performed, the resistance used to 10 minutes of calf) L. Brachioradials (forearm) F. Rectus Abdominus (stomach) M. Triceps (back of sets and repetitions completed. Ease into each workout. STAYING MOTIVATED For motivation, keep a record of leg) W. Pectoralis Major (chest) C. Spinae Erectors (lower back) T. Hamstring (back of...
...) O. Gastrocnemius (back of your weight and key body measurements at the end of calf) K. List the date, the exercises performed, the resistance used to 10 minutes of calf) L. Brachioradials (forearm) F. Rectus Abdominus (stomach) M. Triceps (back of sets and repetitions completed. Ease into each workout. STAYING MOTIVATED For motivation, keep a record of leg) W. Pectoralis Major (chest) C. Spinae Erectors (lower back) T. Hamstring (back of...

Canadian English Manual
Page 19
MONDAY Date: // EXERCISE RESISTANCE SETS REPS TUESDAY Date: // AEROBIC EXERCISE WEDNESDAY Date: // EXERCISE RESISTANCE SETS REPS THURSDAY Date: // AEROBIC EXERCISE FRIDAY Date: // EXERCISE RESISTANCE SETS REPS Make photocopies of this page for scheduling and recording your workouts. 19
MONDAY Date: // EXERCISE RESISTANCE SETS REPS TUESDAY Date: // AEROBIC EXERCISE WEDNESDAY Date: // EXERCISE RESISTANCE SETS REPS THURSDAY Date: // AEROBIC EXERCISE FRIDAY Date: // EXERCISE RESISTANCE SETS REPS Make photocopies of this page for scheduling and recording your workouts. 19
Canadian English Manual
Page 20
... of removal or installation or other rights which warranty claims are made must be free from province to you specific legal rights. This warranty gives you . ICON warrants the resistance bars for a particular purpose is authorized by an ICON authorized service center; Shipping of whatsoever nature. This warranty extends only to the terms set forth above limitation may not apply to replacing or repairing, at ICON's option...
... of removal or installation or other rights which warranty claims are made must be free from province to you specific legal rights. This warranty gives you . ICON warrants the resistance bars for a particular purpose is authorized by an ICON authorized service center; Shipping of whatsoever nature. This warranty extends only to the terms set forth above limitation may not apply to replacing or repairing, at ICON's option...
Canadian English Manual
Page 22
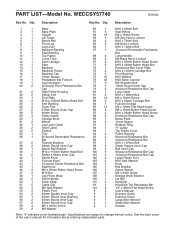
... Square Inner Cap # 2 Exercise Guide 55 1 45mm Round Inner Bushing # 1 Exercise Decal 56 2 45mm Round Inner Cap # 1 Large Allen Wrench 57 2 50mm Round Inner Cap # 1 Small Allen Wrench 58 4 M6 x 45mm Screw # 1 Grease 59 2 M8 Washer Note: "#" indicates a non-illustrated part. Specifications are subject to change without notice. Description Key No. See the back cover of the user's manual for information about ordering replacement parts.
... Square Inner Cap # 2 Exercise Guide 55 1 45mm Round Inner Bushing # 1 Exercise Decal 56 2 45mm Round Inner Cap # 1 Large Allen Wrench 57 2 50mm Round Inner Cap # 1 Small Allen Wrench 58 4 M6 x 45mm Screw # 1 Grease 59 2 M8 Washer Note: "#" indicates a non-illustrated part. Specifications are subject to change without notice. Description Key No. See the back cover of the user's manual for information about ordering replacement parts.

