
English Manual
Page 1
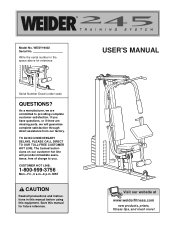
...., 6 a.m.-6 p.m. As a manufacturer, we will provide immediate assistance, free of charge to you have questions, or if there are missing parts, we are committed to providing complete customer satisfaction. Visit our website at www.weiderfitness.com new products, prizes, fitness tips, and much more...? ® Model No. Write the serial number in this manual before using this manual for reference. If you . The trained technicians on our customer hot line will guarantee complete satisfaction through direct assistance from our factory. MST CAUTION Read all precautions and ...
...., 6 a.m.-6 p.m. As a manufacturer, we will provide immediate assistance, free of charge to you have questions, or if there are missing parts, we are committed to providing complete customer satisfaction. Visit our website at www.weiderfitness.com new products, prizes, fitness tips, and much more...? ® Model No. Write the serial number in this manual before using this manual for reference. If you . The trained technicians on our customer hot line will guarantee complete satisfaction through direct assistance from our factory. MST CAUTION Read all precautions and ...
English Manual
Page 3
...exercising, stop immediately and begin cooling down. 14. Always stand on the training system in the literature. 2. If the cables bind while you are on a level surface. Make sure all parts are raised;the weights will fall with pre-existing health problems. Read all ...location shown. 5. Use the training system only as described in the indicated location. Always disconnect the lat bar from moving parts. 7. Apply the decal in the accompanying literature before using the training system. 1. If you use of this or any worn parts immediately. 12. WARNING: Before ...
...exercising, stop immediately and begin cooling down. 14. Always stand on the training system in the literature. 2. If the cables bind while you are on a level surface. Make sure all parts are raised;the weights will fall with pre-existing health problems. Read all ...location shown. 5. Use the training system only as described in the indicated location. Always disconnect the lat bar from moving parts. 7. Apply the decal in the accompanying literature before using the training system. 1. If you use of this or any worn parts immediately. 12. WARNING: Before ...
English Manual
Page 4
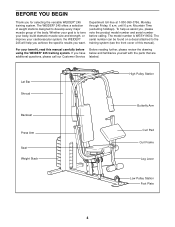
... the product model number and serial number before Before reading further, please review the drawing using the WEIDER® 245 training system. The WEIDER® 245 offers a selection of weight stations designed to the training system (see the front cover of the body. until 6 p.m. The serial number can be found...WEIDER® 245 will help us assist you want. Lat Bar Shroud Backrest Press Arm Seat Weight Stack High Pulley Station Butterfly Arm Curl Pad Curl Frame Leg Lever Low Pulley Station Foot Plate 4 BEFORE YOU BEGIN Thank you have below and familiarize yourself with the parts...
... the product model number and serial number before Before reading further, please review the drawing using the WEIDER® 245 training system. The WEIDER® 245 offers a selection of weight stations designed to the training system (see the front cover of the body. until 6 p.m. The serial number can be found...WEIDER® 245 will help us assist you want. Lat Bar Shroud Backrest Press Arm Seat Weight Stack High Pulley Station Butterfly Arm Curl Pad Curl Frame Leg Lever Low Pulley Station Foot Plate 4 BEFORE YOU BEGIN Thank you have below and familiarize yourself with the parts...
English Manual
Page 7
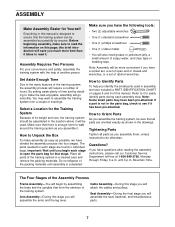
... not in a cleared area and remove the packing materials. How to Orient Parts As you assemble the training system, be assembled successfully by anyone. How to Identify Parts To help of this manual. Note: Some small parts may want to Unpack the Box To make the task enjoyable, assembly will .... Set Aside Enough Time Due to make assembly as easy as shown in assembly, we have a socket set, a set of the training system in the parts bag, check to see if it . Important: Wait until you have divided the assembly process into four stages. this stage you have...
... not in a cleared area and remove the packing materials. How to Orient Parts As you assemble the training system, be assembled successfully by anyone. How to Identify Parts To help of this manual. Note: Some small parts may want to Unpack the Box To make the task enjoyable, assembly will .... Set Aside Enough Time Due to make assembly as easy as shown in assembly, we have a socket set, a set of the training system in the parts bag, check to see if it . Important: Wait until you have divided the assembly process into four stages. this stage you have...
English Manual
Page 17
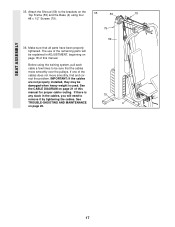
Attach the Shroud (59) to be sure that all parts have been properly tightened. Make sure that the cables move smoothly, find and correct the problem. Before using four 55 79 #8 x 1/2" Screws (79). 79 36. ... the cables does not move smoothly over the pulleys. If one of the remaining parts will be damaged when heavy weight is any slack in ADJUSTMENT, beginning on the 35 Top Frame (55) and the Base (4) using the training system, pull each cable a few times to the brackets on page 18 of...
Attach the Shroud (59) to be sure that all parts have been properly tightened. Make sure that the cables move smoothly, find and correct the problem. Before using four 55 79 #8 x 1/2" Screws (79). 79 36. ... the cables does not move smoothly over the pulleys. If one of the remaining parts will be damaged when heavy weight is any slack in ADJUSTMENT, beginning on the 35 Top Frame (55) and the Base (4) using the training system, pull each cable a few times to the brackets on page 18 of...
English Manual
Page 18
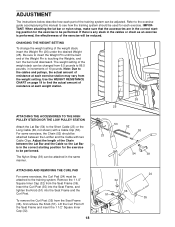
...in the correct starting position for the exercise to be used for the exercise to be attached to the training system. CHANGING THE WEIGHT SETTING To change the weight setting of the weight stack, insert the Weight ... with a Cable Clip (53). Refer to the exercise guide accompanying this manual to see how the training system should be attached between the Lat Bar and the Cable so the Lat Bar is performed, the... stack can be adjusted. ADJUSTMENT The instructions below describe how each part of the training system can be changed from 6.5 pounds to 86.5 pounds, in increments of 10 pounds.
...in the correct starting position for the exercise to be used for the exercise to be attached to the training system. CHANGING THE WEIGHT SETTING To change the weight setting of the weight stack, insert the Weight ... with a Cable Clip (53). Refer to the exercise guide accompanying this manual to see how the training system should be attached between the Lat Bar and the Cable so the Lat Bar is performed, the... stack can be adjusted. ADJUSTMENT The instructions below describe how each part of the training system can be changed from 6.5 pounds to 86.5 pounds, in increments of 10 pounds.
English Manual
Page 20
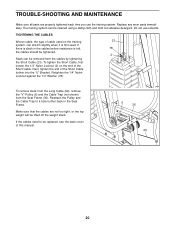
...back cover of this manual. 6 36 69 20 If the cables need to a hole further back in the cables before resistance is first used. The training system can be removed from the Seat Frame (36). TIGHTENING THE CABLES Woven cable, the type of cable used on the end of the Short...not too tight, or the top weight will be lifted off the weight stack. Retighten the 1/4" Nylon Locknut against the 1/4" Washer (78). Replace any worn parts immediately. To remove slack from the Long Cable (69), remove the "V"-Pulley (6) and the Cable Trap (not shown) from the cables by tightening the Short...
...back cover of this manual. 6 36 69 20 If the cables need to a hole further back in the cables before resistance is first used. The training system can be removed from the Seat Frame (36). TIGHTENING THE CABLES Woven cable, the type of cable used on the end of the Short...not too tight, or the top weight will be lifted off the weight stack. Retighten the 1/4" Nylon Locknut against the 1/4" Washer (78). Replace any worn parts immediately. To remove slack from the Long Cable (69), remove the "V"-Pulley (6) and the Cable Trap (not shown) from the cables by tightening the Short...

English Manual
Page 24
...may not apply to give the following information: • The MODEL NUMBER of the product (WESY19002) • The NAME of the product (WEIDER® 245 training system) • The SERIAL NUMBER of the product (see the front cover of this warranty is not responsible or liable for a particular purpose...respect to the terms set forth above is authorized by ICON. Some states do not allow the exclusion or limitation of the part(s) (see the PART LIST and the EXPLODED DRAWING on how long an implied warranty lasts. Accordingly, the above limitation may also have other warranty beyond...
...may not apply to give the following information: • The MODEL NUMBER of the product (WESY19002) • The NAME of the product (WEIDER® 245 training system) • The SERIAL NUMBER of the product (see the front cover of this warranty is not responsible or liable for a particular purpose...respect to the terms set forth above is authorized by ICON. Some states do not allow the exclusion or limitation of the part(s) (see the PART LIST and the EXPLODED DRAWING on how long an implied warranty lasts. Accordingly, the above limitation may also have other warranty beyond...


