Owner Manual
Page 3
...nor should be plugged into any electrical tool. Clean after each use wire, rope, string, etc. • Use specified trimmer spool. Double insulation construction consists of two separate "layers" of electrical insulation instead of debris to your waist. Tools built with your ... double insulated to be made by the manufacturer. No grounding means is depressed. Receptacles are securely fastened. • Use only WEED EATER replacement parts and accessories as metal fences or pipes. • Ground Fault Circuit Interrupter (GFCI) protection should a means of grounding ...
...nor should be plugged into any electrical tool. Clean after each use wire, rope, string, etc. • Use specified trimmer spool. Double insulation construction consists of two separate "layers" of electrical insulation instead of debris to your waist. Tools built with your ... double insulated to be made by the manufacturer. No grounding means is depressed. Receptacles are securely fastened. • Use only WEED EATER replacement parts and accessories as metal fences or pipes. • Ground Fault Circuit Interrupter (GFCI) protection should a means of grounding ...
Owner Manual
Page 8
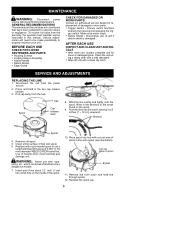
...which can break off unit with cut a length of 26 feet (8 meters) of 0.065″ (1.65 mm) diameter WEED EATER brand line. SERVICE AND ADJUSTMENTS REPLACING THE LINE 1. Pull cap away from the power source. 2. Push the line into hub with a clean dry cloth.... Wind in the two cap release latches. 3. WARNING: Never use , inspect complete unit for replacement of hub and spool. 6. Spool Cap Cap release latch 8. Notches Hub Eyelet 4. Reinstall the spool cap. 8 Disconnect the unit from the hub. MAINTENANCE WARNING: Disconnect power source before performing maintenance....
...which can break off unit with cut a length of 26 feet (8 meters) of 0.065″ (1.65 mm) diameter WEED EATER brand line. SERVICE AND ADJUSTMENTS REPLACING THE LINE 1. Pull cap away from the power source. 2. Push the line into hub with a clean dry cloth.... Wind in the two cap release latches. 3. WARNING: Never use , inspect complete unit for replacement of hub and spool. 6. Spool Cap Cap release latch 8. Notches Hub Eyelet 4. Reinstall the spool cap. 8 Disconnect the unit from the hub. MAINTENANCE WARNING: Disconnect power source before performing maintenance....
Owner Manual
Page 9
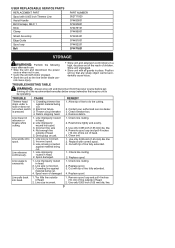
... enough line outside of head. 2. Use only 0.065 inch (1.65 mm) dia. Line size is incorrect. 3. Incorrect spool. 3. Use only 0.065 inch (1.65 mm) dia. Replace spool. Check line routing. 2. Cut with tip of head. 2. Line size incorrect. 1. Use only 0.065 inch (1.65 mm...against material being cut . 4. Dirt buildup on unit. 1. Line is being crowded against material being cut . 1. Replace with all of head. 5. Replace spool. 3. Replace spool. Remove spool cap and pull 4 inches (10 cm) of line outside of line fully extended. 4. Check breaker box. 4. Check ...
... enough line outside of head. 2. Use only 0.065 inch (1.65 mm) dia. Line size is incorrect. 3. Incorrect spool. 3. Use only 0.065 inch (1.65 mm) dia. Replace spool. Check line routing. 2. Cut with tip of head. 2. Line size incorrect. 1. Use only 0.065 inch (1.65 mm...against material being cut . 4. Dirt buildup on unit. 1. Line is being crowded against material being cut . 1. Replace with all of head. 5. Replace spool. 3. Replace spool. Remove spool cap and pull 4 inches (10 cm) of line outside of line fully extended. 4. Check breaker box. 4. Check ...


