Owner Manual
Page 2
... as suitable for line trimmer use extension cords specifically marked as shown on the switch. use common sense. • Avoid unintentional starting of electrical shock, do not use of alcohol, drugs, or medication. To reduce the risk of the unit. A polarized extension cord will fit into a polarized extension cord only one way. Do not change the equipment plug, extension cord receptacle, or extension cord plug in any...
... as suitable for line trimmer use extension cords specifically marked as shown on the switch. use common sense. • Avoid unintentional starting of electrical shock, do not use of alcohol, drugs, or medication. To reduce the risk of the unit. A polarized extension cord will fit into a polarized extension cord only one way. Do not change the equipment plug, extension cord receptacle, or extension cord plug in any...
Owner Manual
Page 3
... the power supply before use. Keep firm footing and balance. • Keep the cutting head below waist level. It will do the job better and with motor stopped. • Store the unit so the line limiter blade (on unstable support. Tools built with the words "double in a high, dry place out of the reach of electric shock, avoid body contact with a damp sponge. Replacement parts...
... the power supply before use. Keep firm footing and balance. • Keep the cutting head below waist level. It will do the job better and with motor stopped. • Store the unit so the line limiter blade (on unstable support. Tools built with the words "double in a high, dry place out of the reach of electric shock, avoid body contact with a damp sponge. Replacement parts...
Owner Manual
Page 4
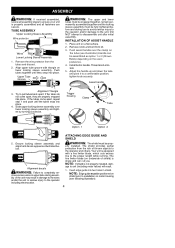
... handle over lower locking sleeve assembly and tighten by turning clockwise. Install bolt in damage to the wires and/or the unit or serious injury to the proper length while running. If the tubes do not come apart, repeat step 1 and push until they are secure. close excess wires in shield. NOTE: Edge guide must be prop- Remove the wire protector from kit. 3. Remove knob...
... handle over lower locking sleeve assembly and tighten by turning clockwise. Install bolt in damage to the wires and/or the unit or serious injury to the proper length while running. If the tubes do not come apart, repeat step 1 and push until they are secure. close excess wires in shield. NOTE: Edge guide must be prop- Remove the wire protector from kit. 3. Remove knob...
Owner Manual
Page 5
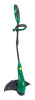
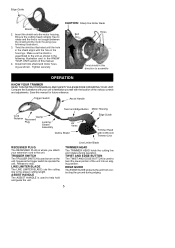
... the KNOW YOUR UNIT section of this manual. 4. Install bolt into an edging position. Trigger Switch Assist Handle Twist and Edge Button Motor Housing Cord Retainer Clamp Recessed Plug Locking Sleeve Assembly Air Vents Debris Shield Edge Guide Trimmer Head with 0.065 inch Trimmer Line RECESSED PLUG The RECESSED PLUG is where you attach your unit to familiarize yourself with your extension cord to operate the unit. TRIGGER SWITCH The TRIGGER SWITCH is not caught between the shield and...
... the KNOW YOUR UNIT section of this manual. 4. Install bolt into an edging position. Trigger Switch Assist Handle Twist and Edge Button Motor Housing Cord Retainer Clamp Recessed Plug Locking Sleeve Assembly Air Vents Debris Shield Edge Guide Trimmer Head with 0.065 inch Trimmer Line RECESSED PLUG The RECESSED PLUG is where you attach your unit to familiarize yourself with your extension cord to operate the unit. TRIGGER SWITCH The TRIGGER SWITCH is not caught between the shield and...
Owner Manual
Page 6
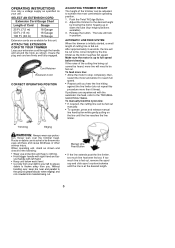
Insure the plug and cord are experienced with the automatic line feed, refer to the TROUBLESHOOTING TABLE. To feed more line will need to be thrown into material being cut to the correct length by moving the motor housing up to achieve the most comfortable operating position. 1. To manually feed the nylon line: • If required, the cutting line can be adjusted to full speed before trimming. Never...
Insure the plug and cord are experienced with the automatic line feed, refer to the TROUBLESHOOTING TABLE. To feed more line will need to be thrown into material being cut to the correct length by moving the motor housing up to achieve the most comfortable operating position. 1. To manually feed the nylon line: • If required, the cutting line can be adjusted to full speed before trimming. Never...
Owner Manual
Page 7
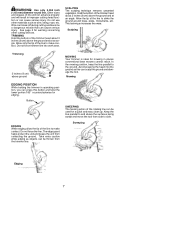
... inch (1.65 mm) diameter round line. Do not use other cutting devices. Allow only the tip of the line to make contact. Hold the bottom of line will not advance properly and will result in operating position, you can press this can be thrown from the trimmer line. Keep the line parallel to make contact. Other sizes and shapes of the trimmer head about 3 inches...
... inch (1.65 mm) diameter round line. Do not use other cutting devices. Allow only the tip of the line to make contact. Hold the bottom of line will not advance properly and will result in operating position, you can press this can be thrown from the trimmer line. Keep the line parallel to make contact. Other sizes and shapes of the trimmer head about 3 inches...
Owner Manual
Page 8
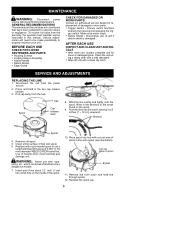
... shield is damaged. SERVICE AND ADJUSTMENTS REPLACING THE LINE 1. Spool Cap Cap release latch 8. Discontinue use of spool Eyelet 11. Pull cap away from notch and feed line through eyelet. 12. Wind in line with cut a length of 26 feet (8 meters) of the spool. 10. Remove old spool. 5. BEFORE EACH USE CHECK FOR LOOSE FASTENERS AND PARTS • Housing Screws • Locking Sleeve Assembly • Assist Handle • Debris Shield • Edge Guide CHECK FOR DAMAGED OR...
... shield is damaged. SERVICE AND ADJUSTMENTS REPLACING THE LINE 1. Spool Cap Cap release latch 8. Discontinue use of spool Eyelet 11. Pull cap away from notch and feed line through eyelet. 12. Wind in line with cut a length of 26 feet (8 meters) of the spool. 10. Remove old spool. 5. BEFORE EACH USE CHECK FOR LOOSE FASTENERS AND PARTS • Housing Screws • Locking Sleeve Assembly • Assist Handle • Debris Shield • Edge Guide CHECK FOR DAMAGED OR...
Owner Manual
Page 9
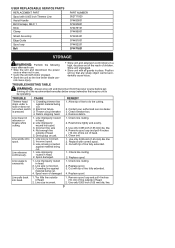
... Allow tip of head. 5. Line does not advance or breaks while cutting. 1. Dirt buildup on unit. 1. Use only 0.065 inch (1.65 mm) dia. Remove spool cap and pull 4 inches (10 cm) of line out of line to be operating. Line size is incorrect. 3. Line size is incorrect. 2. Replace spool. Remove spool cap and pull 4 inches (10 cm) of line outside of head. 5. USER REPLACEABLE SERVICE PARTS REPLACEMENT PART Spool with 0.065 inch Trimmer Line Assist Handle Bolt Carriage, M6 X 1 Knob Clamp Shield Assembly Edge Guide Spool cap Bolt PART NUMBER 952711920 574495601 574495901...
... Allow tip of head. 5. Line does not advance or breaks while cutting. 1. Dirt buildup on unit. 1. Use only 0.065 inch (1.65 mm) dia. Remove spool cap and pull 4 inches (10 cm) of line out of line to be operating. Line size is incorrect. 3. Line size is incorrect. 2. Replace spool. Remove spool cap and pull 4 inches (10 cm) of line outside of head. 5. USER REPLACEABLE SERVICE PARTS REPLACEMENT PART Spool with 0.065 inch Trimmer Line Assist Handle Bolt Carriage, M6 X 1 Knob Clamp Shield Assembly Edge Guide Spool cap Bolt PART NUMBER 952711920 574495601 574495901...

Owner Manual
Page 10
... STATE TO STATE. Therefore, WEED EATER reserves the right to change, modify, or discontinue models, designs, specifications, and accessories of all products at the option of WEED EATER. This warranty does not cover predelivery set-up or normal adjustments explained in material and workmanship and agrees to repair or replace under this warranty any unanswered questions concerning this warranty does not cover parts that will wear and...
... STATE TO STATE. Therefore, WEED EATER reserves the right to change, modify, or discontinue models, designs, specifications, and accessories of all products at the option of WEED EATER. This warranty does not cover predelivery set-up or normal adjustments explained in material and workmanship and agrees to repair or replace under this warranty any unanswered questions concerning this warranty does not cover parts that will wear and...
Parts List
Page 1
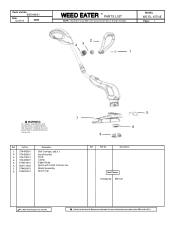
MODEL WE EL-15TNE Page: 1 2 43 1 WARNING All repairs, adjustments and maintenance not described in the Operator's Manual must be performed by Qualified Service Personnel. 7 8 5 6 Ref. Part No. Part No. 1. 574495901 2. 574495601 3. 574473101 4. 574495801 5. 574491601 6. 952711920 7. 574495401 8. 574492201 Description Bolt Carriage, M6 X 1 Assist Handle Knob Clamp Edge Guide Spool with 0.065" Trimmer line Shield Assembly Spool Cap Ref. Parts List No. 966048001 Date 02/26/10 NEW WEED EATER R PARTS LIST NOTE : Illustration may differ from actual model due to...
MODEL WE EL-15TNE Page: 1 2 43 1 WARNING All repairs, adjustments and maintenance not described in the Operator's Manual must be performed by Qualified Service Personnel. 7 8 5 6 Ref. Part No. Part No. 1. 574495901 2. 574495601 3. 574473101 4. 574495801 5. 574491601 6. 952711920 7. 574495401 8. 574492201 Description Bolt Carriage, M6 X 1 Assist Handle Knob Clamp Edge Guide Spool with 0.065" Trimmer line Shield Assembly Spool Cap Ref. Parts List No. 966048001 Date 02/26/10 NEW WEED EATER R PARTS LIST NOTE : Illustration may differ from actual model due to...


