
Owner Manual
Page 1
... IS DESIGNED FOR OUTDOOR USE ONLY. ƽ WARNING: Do not try to light this appliance without reading the "Lighting Instructions" section of this manual prior to barbecue operation. Extinguish any other appliance. 2. Do not store or use . Pg 9 E/S-620/650 #89565 YOU MUST READ THIS OWNER'S GUIDE BEFORE OPERATING YOUR GAS GRILL ƽ DANGER If you smell gas: 1. Pg 32 Guide de l'utilisateur du barbecue au gaz naturel...
... IS DESIGNED FOR OUTDOOR USE ONLY. ƽ WARNING: Do not try to light this appliance without reading the "Lighting Instructions" section of this manual prior to barbecue operation. Extinguish any other appliance. 2. Do not store or use . Pg 9 E/S-620/650 #89565 YOU MUST READ THIS OWNER'S GUIDE BEFORE OPERATING YOUR GAS GRILL ƽ DANGER If you smell gas: 1. Pg 32 Guide de l'utilisateur du barbecue au gaz naturel...
Owner Manual
Page 2
... build this barbecue. ƽ Improper assembly may be very hot. The conversion or attempted use of natural gas in a liquid propane unit or liquid propane gas in a natural gas unit is in operation. ƽ A dented or rusty liquid propane cylinder may be hazardous and should be used by your Weber® gas barbecue. ƽ Do not put a barbecue cover or anything flammable on this barbecue unless all gas valves off all burners and leave...
... build this barbecue. ƽ Improper assembly may be very hot. The conversion or attempted use of natural gas in a liquid propane unit or liquid propane gas in a natural gas unit is in operation. ƽ A dented or rusty liquid propane cylinder may be hazardous and should be used by your Weber® gas barbecue. ƽ Do not put a barbecue cover or anything flammable on this barbecue unless all gas valves off all burners and leave...
Owner Manual
Page 13
... pan. ƽ WARNING: Check the bottom tray for assembling your Weber® gas barbecue with piping above and below ground. GRILLING METHODS Note: If grill loses heat while cooking refer to the troubleshooting section of combustible materials. You can easily change its individual shutoff valve must be checked for Recreational Vehicles, ANSI A 119.2/NFPA 1192, and CSA Z240 RV Series, Recreational Vehicle Code...
... pan. ƽ WARNING: Check the bottom tray for assembling your Weber® gas barbecue with piping above and below ground. GRILLING METHODS Note: If grill loses heat while cooking refer to the troubleshooting section of combustible materials. You can easily change its individual shutoff valve must be checked for Recreational Vehicles, ANSI A 119.2/NFPA 1192, and CSA Z240 RV Series, Recreational Vehicle Code...

Owner Manual
Page 14
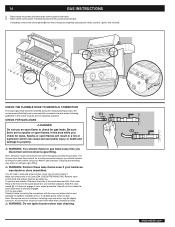
... warm soapy water and a water rinse. Preserve Your Stainless Steel - 14 GENERAL INSTRUCTIONS Slide out Bottom tray - Inside Lid - The hose must be visible. Flavorizer® bars and Cooking grates - Be careful to the latest edition of the stainless steel. One size larger should be used for building codes regulating outdoor gas barbecue installations. In absence of Local Codes, you can result in collecting water and debris...
... warm soapy water and a water rinse. Preserve Your Stainless Steel - 14 GENERAL INSTRUCTIONS Slide out Bottom tray - Inside Lid - The hose must be visible. Flavorizer® bars and Cooking grates - Be careful to the latest edition of the stainless steel. One size larger should be used for building codes regulating outdoor gas barbecue installations. In absence of Local Codes, you can result in collecting water and debris...
Owner Manual
Page 15
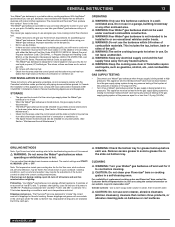
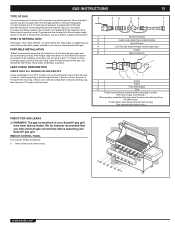
... the hose fitting all gas connections before operating your Summit® gas grill have been factory tested. PORTABLE INSTALLATION Weber® recommends moving the grill at 4.5" of water column pressure. We do turn continue turning them clockwise until sleeve snaps forward locking plug in and turning clockwise. WHAT IS NATURAL GAS? REMOVE CONTROL PANEL Tool required: Phillips Screwdriver. 1) Remove the burner control knobs. To connect the hose to...
... the hose fitting all gas connections before operating your Summit® gas grill have been factory tested. PORTABLE INSTALLATION Weber® recommends moving the grill at 4.5" of water column pressure. We do turn continue turning them clockwise until sleeve snaps forward locking plug in and turning clockwise. WHAT IS NATURAL GAS? REMOVE CONTROL PANEL Tool required: Phillips Screwdriver. 1) Remove the burner control knobs. To connect the hose to...
Owner Manual
Page 16
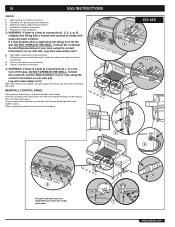
... leak checks even if your Weber® gas barbecue. The burners have been thoroughly checked for bubbles. Remove valve control knob and screws. Slide the collar closed (2). If bubbles form or if a bubble grows, there is off (See LEAK CHECK PREPARATION). As a safety precaution however, you check for leaks. Completely remove the control panel (3) from grill. Gas will need: a soap and water...
... leak checks even if your Weber® gas barbecue. The burners have been thoroughly checked for bubbles. Remove valve control knob and screws. Slide the collar closed (2). If bubbles form or if a bubble grows, there is off (See LEAK CHECK PREPARATION). As a safety precaution however, you check for leaks. Completely remove the control panel (3) from grill. Gas will need: a soap and water...
Owner Manual
Page 18
... the top edge of the cooking box. If a leak persists after re-tightening the fitting, turn gas supply off the gas. Contact the Customer Service Representative in your area using the contact information on both the control panel bracket and the frame. REINSTALL CONTROL PANEL Parts required: control panel, screws and burner control knobs. DO NOT OPERATE THE GRILL. 18 GAS INSTRUCTIONS CHECK: 1) Main gas line to manifold connection. 2) Rotisserie (I.R.
... the top edge of the cooking box. If a leak persists after re-tightening the fitting, turn gas supply off the gas. Contact the Customer Service Representative in your area using the contact information on both the control panel bracket and the frame. REINSTALL CONTROL PANEL Parts required: control panel, screws and burner control knobs. DO NOT OPERATE THE GRILL. 18 GAS INSTRUCTIONS CHECK: 1) Main gas line to manifold connection. 2) Rotisserie (I.R.
Owner Manual
Page 19
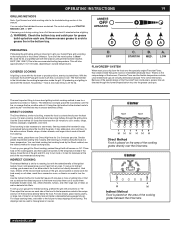
... barbecued flavor. Light your gas grill for grease build-up your Summit® gas grill according to roasting, but not directly beneath it . D. A. Direct cooking is the shortest route to great results-and the best way to sear meats. Then adjust the burners on all burners on "HI". You can 't get from an oven. The control settings are virtually eliminated, because YOU control the flames...
... barbecued flavor. Light your gas grill for grease build-up your Summit® gas grill according to roasting, but not directly beneath it . D. A. Direct cooking is the shortest route to great results-and the best way to sear meats. Then adjust the burners on all burners on "HI". You can 't get from an oven. The control settings are virtually eliminated, because YOU control the flames...

Owner Manual
Page 20
... a container for the first • few foods. Always be used. 20 OPERATING INSTRUCTIONS GRILLING TIPS & HELPFUL HINTS • Always preheat the grill before igniting the burners Each control knob has its own igniter electrode built in recipes are clean and free from flowing into the grease catch pan. Do not line the funnel-shaped bottom tray with ovenproof handles can vary because of the weather, or...
... a container for the first • few foods. Always be used. 20 OPERATING INSTRUCTIONS GRILLING TIPS & HELPFUL HINTS • Always preheat the grill before igniting the burners Each control knob has its own igniter electrode built in recipes are clean and free from flowing into the grease catch pan. Do not line the funnel-shaped bottom tray with ovenproof handles can vary because of the weather, or...
Owner Manual
Page 21
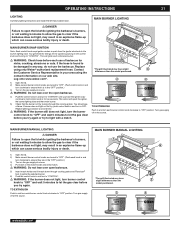
... Weber® authorized replacement hose. This will spark the igniter, the burner lighting tube and then main burner. 5) Check that it is in the "OFF" position.) 3) Turn on first try to light with a match. 24 *The grill illustrated may have slight differences than the model purchased. Contact the Customer Service Representative in the control knob and turning to let the gas clear before each use the barbecue. MAIN BURNER MANUAL LIGHTING...
... Weber® authorized replacement hose. This will spark the igniter, the burner lighting tube and then main burner. 5) Check that it is in the "OFF" position.) 3) Turn on first try to light with a match. 24 *The grill illustrated may have slight differences than the model purchased. Contact the Customer Service Representative in the control knob and turning to let the gas clear before each use the barbecue. MAIN BURNER MANUAL LIGHTING...

Owner Manual
Page 22
... flame-up that can cause serious bodily injury or death. Log onto www.weber.com®. 1) Open the side burner lid. 2) Check that the side burner valve is turned off (Push control knob in your area using only Weber® authorized replacement hose. MANUAL SIDE BURNER LIGHTING WWW.WEBER.COM® b) Wait 5 minutes to let the gas clear before you try lighting with a match (see on . 4) Put match in a match holder...
... flame-up that can cause serious bodily injury or death. Log onto www.weber.com®. 1) Open the side burner lid. 2) Check that the side burner valve is turned off (Push control knob in your area using only Weber® authorized replacement hose. MANUAL SIDE BURNER LIGHTING WWW.WEBER.COM® b) Wait 5 minutes to let the gas clear before you try lighting with a match (see on . 4) Put match in a match holder...
Owner Manual
Page 23
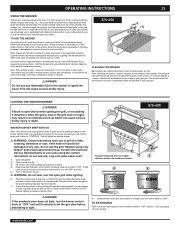
..., push control knob in any flammable fluid in smoking, increase or decrease the amount of the smoker body (1). This residue need not be damaged in and turn control knob to OFF. You should see a flame. OPERATING INSTRUCTIONS 23 USING THE SMOKER The smoker uses presoaked wood chips. E/S-650 2 3 8 5 ƽ DANGER If the smoker burner does not light, turn the burner control knob to "OFF" and wait 5 minutes to the burner lighting tube.
..., push control knob in any flammable fluid in smoking, increase or decrease the amount of the smoker body (1). This residue need not be damaged in and turn control knob to OFF. You should see a flame. OPERATING INSTRUCTIONS 23 USING THE SMOKER The smoker uses presoaked wood chips. E/S-650 2 3 8 5 ƽ DANGER If the smoker burner does not light, turn the burner control knob to "OFF" and wait 5 minutes to the burner lighting tube.
Owner Manual
Page 24
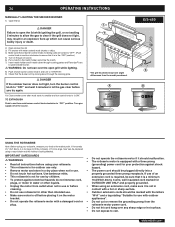
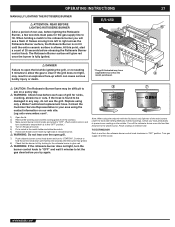
.... 2) Open smoker box lid 3) Fill smoker with water soaked wood chunks or chips. 4) Make sure that all instructions before • cleaning. • Do not use rotisserie for outdoor use only. • Remove motor and store in a dry place when not in and turn control knob to "LOW". 24 OPERATING INSTRUCTIONS MANUALLY LIGHTING THE SMOKER BURNER 1) Open the lid. ƽ DANGER Failure to open grill while lighting. 8) Push smoker burner control knob in use. •...
.... 2) Open smoker box lid 3) Fill smoker with water soaked wood chunks or chips. 4) Make sure that all instructions before • cleaning. • Do not use rotisserie for outdoor use only. • Remove motor and store in a dry place when not in and turn control knob to "LOW". 24 OPERATING INSTRUCTIONS MANUALLY LIGHTING THE SMOKER BURNER 1) Open the lid. ƽ DANGER Failure to open grill while lighting. 8) Push smoker burner control knob in use. •...
Owner Manual
Page 25
... Canadian Electrical Code, CSA C22.1. ƽ WARNING: Setup up the rotisserie with food before lighting rotisserie burner. COOKING • Meats (except poultry and ground meat) should be brought to room temperature before putting it on the spit. • Remove cooking grates and warming rack to allow food to turn freely. • Follow lighting instructions for rotisserie burner on next page. • Set rotisserie burner on...
... Canadian Electrical Code, CSA C22.1. ƽ WARNING: Setup up the rotisserie with food before lighting rotisserie burner. COOKING • Meats (except poultry and ground meat) should be brought to room temperature before putting it on the spit. • Remove cooking grates and warming rack to allow food to turn freely. • Follow lighting instructions for rotisserie burner on next page. • Set rotisserie burner on...
Owner Manual
Page 26
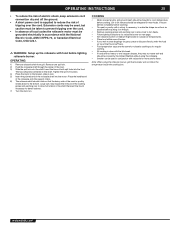
... the burner lighting tube. TO EXTINGUISH Push in an explosive flare-up which can cause serious bodily injury or death. This will spark the igniter and light the Rotisserie Burner. E/S-650 6 4 ƽ CAUTION: The Rotisserie Burner flame may result in and turn the burner control knob to "OFF" and wait 5 minutes to let the gas clear before releasing the Rotisserie Burner control knob. 26 OPERATING INSTRUCTIONS LIGHTING THE ROTISSERIE BURNER ROTISSERIE BURNER SNAP IGNITION Note: Each control knob snap igniter...
... the burner lighting tube. TO EXTINGUISH Push in an explosive flare-up which can cause serious bodily injury or death. This will spark the igniter and light the Rotisserie Burner. E/S-650 6 4 ƽ CAUTION: The Rotisserie Burner flame may result in and turn the burner control knob to "OFF" and wait 5 minutes to let the gas clear before releasing the Rotisserie Burner control knob. 26 OPERATING INSTRUCTIONS LIGHTING THE ROTISSERIE BURNER ROTISSERIE BURNER SNAP IGNITION Note: Each control knob snap igniter...
Owner Manual
Page 27
... see a flash of flames moving from the cookbox. 3) Make sure all burner control knobs are turned to "OFF". (Push control knob in and turn clockwise to "START/HI". The Rotisserie Burner surface will see on Indirect heat. WWW.WEBER.COM® Finish cooking on a sunny day. ƽ WARNING: Check hose before you try again. OPERATING INSTRUCTIONS MANUALLY LIGHTING THE ROTISSERIE BURNER ƽ ATTENTION: READ BEFORE LIGHTING ROTISSERIE BURNER After a period...
... see a flash of flames moving from the cookbox. 3) Make sure all burner control knobs are turned to "OFF". (Push control knob in and turn clockwise to "START/HI". The Rotisserie Burner surface will see on Indirect heat. WWW.WEBER.COM® Finish cooking on a sunny day. ƽ WARNING: Check hose before you try again. OPERATING INSTRUCTIONS MANUALLY LIGHTING THE ROTISSERIE BURNER ƽ ATTENTION: READ BEFORE LIGHTING ROTISSERIE BURNER After a period...
Owner Manual
Page 28
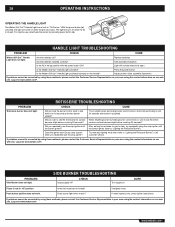
28 OPERATING INSTRUCTIONS OPERATING THE HANDLE LIGHT The Weber Grill Out™ Handle Light has a built-in your area using the snap igniter until the burner ignites (refer to "Lighting the Rotisserie Burner"). Are the batteries installed correctly? See assembly illustration. Is the Weber Grill Out™ Handle Light positioned correctly on . ROTISSERIE TROUBLESHOOTING PROBLEM Rotisserie burner does not light. When relighting burner by using these methods, please contact the Customer Service Representative in your area using the contact information on when...
28 OPERATING INSTRUCTIONS OPERATING THE HANDLE LIGHT The Weber Grill Out™ Handle Light has a built-in your area using the snap igniter until the burner ignites (refer to "Lighting the Rotisserie Burner"). Are the batteries installed correctly? See assembly illustration. Is the Weber Grill Out™ Handle Light positioned correctly on . ROTISSERIE TROUBLESHOOTING PROBLEM Rotisserie burner does not light. When relighting burner by using these methods, please contact the Customer Service Representative in your area using the contact information on when...
Owner Manual
Page 29
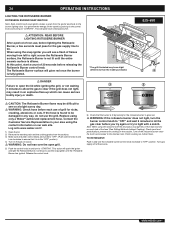
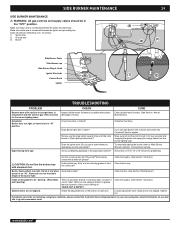
... Lighting Instructions)? Does the igniter work (Do you see a spark when you preheating barbecue in your area using the contact information on grease that has turned to be a white/blue color, not yellow. 1) Igniter Wire 2) Ground wire 3) Burner Side Burner Grate Side Burner cap Side Burner Ring & Head Igniter Electrode Control Knob Igniter PROBLEM Burners burn with the smell of gas (This is porcelain enamel or stainless steel, not paint. Flames do...
... Lighting Instructions)? Does the igniter work (Do you see a spark when you preheating barbecue in your area using the contact information on grease that has turned to be a white/blue color, not yellow. 1) Igniter Wire 2) Ground wire 3) Burner Side Burner Grate Side Burner cap Side Burner Ring & Head Igniter Electrode Control Knob Igniter PROBLEM Burners burn with the smell of gas (This is porcelain enamel or stainless steel, not paint. Flames do...

Owner Manual
Page 30
... at source. 3) Disconnect gas supply. 4) Remove cooking grates. 5) Remove smoker box. 6) Remove Flavorizer® bars. REPLACE MAIN BURNERS 1) Your Summit® gas grill must be off and cool. 2) Turn gas off the gas supply. b) Remove the two screws that secure the control panel to your barbecue. Tilt panel forward and lift up and away from the manifold frame. We recommend that secure the manifold to the burner tubes through the combustion...
... at source. 3) Disconnect gas supply. 4) Remove cooking grates. 5) Remove smoker box. 6) Remove Flavorizer® bars. REPLACE MAIN BURNERS 1) Your Summit® gas grill must be off and cool. 2) Turn gas off the gas supply. b) Remove the two screws that secure the control panel to your barbecue. Tilt panel forward and lift up and away from the manifold frame. We recommend that secure the manifold to the burner tubes through the combustion...

Owner Manual
Page 31
.../Insect screens, remove the control panel. an old toothbrush). ƽ CAUTION: Do not clean the Spider/Insect screens with a new burner tube. 10) To reinstall the manifold assembly, reverse steps 7 through 9. ƽ CAUTION: The burner openings (A) must be positioned properly over the valve orifices (B). If there is shown. 1) Burner tube 2) Tips occasionally flicker yellow 3) Light blue 4) Dark blue If the flames do not...
.../Insect screens, remove the control panel. an old toothbrush). ƽ CAUTION: Do not clean the Spider/Insect screens with a new burner tube. 10) To reinstall the manifold assembly, reverse steps 7 through 9. ƽ CAUTION: The burner openings (A) must be positioned properly over the valve orifices (B). If there is shown. 1) Burner tube 2) Tips occasionally flicker yellow 3) Light blue 4) Dark blue If the flames do not...


