
Owner Manual
Page 1
... the "Lighting Instructions" section of this manual. 89563 US 03/03/08 LP US ENGLISH Pg 9 E/S-620/650 #89#50603000 YOU MUST READ THIS OWNER'S GUIDE BEFORE OPERATING YOUR GAS GRILL ƽ DANGER If you smell gas: 1. Shut off gas to property. ƽ WARNING: 1. THIS GAS APPLIANCE IS DESIGNED FOR OUTDOOR USE ONLY. ƽ WARNING: Do not try to barbecue operation. Pg 34 Guide de l'utilisateur du grill à...
... the "Lighting Instructions" section of this manual. 89563 US 03/03/08 LP US ENGLISH Pg 9 E/S-620/650 #89#50603000 YOU MUST READ THIS OWNER'S GUIDE BEFORE OPERATING YOUR GAS GRILL ƽ DANGER If you smell gas: 1. Shut off gas to property. ƽ WARNING: 1. THIS GAS APPLIANCE IS DESIGNED FOR OUTDOOR USE ONLY. ƽ WARNING: Do not try to barbecue operation. Pg 34 Guide de l'utilisateur du grill à...
Owner Manual
Page 2
... produced when using the lighting instructions. ƽ Do not use a liquid propane cylinder with your Weber® gas barbecue. ƽ Do not attempt to disconnect the gas regulator and hose assembly or any built-in or slide in your Weber® gas barbecue. ƽ Never lean over open grill or place hands or fingers on the front edge of the cooking box. ƽ Should a grease fire occur, turn all burners and...
... produced when using the lighting instructions. ƽ Do not use a liquid propane cylinder with your Weber® gas barbecue. ƽ Do not attempt to disconnect the gas regulator and hose assembly or any built-in or slide in your Weber® gas barbecue. ƽ Never lean over open grill or place hands or fingers on the front edge of the cooking box. ƽ Should a grease fire occur, turn all burners and...
Owner Manual
Page 13
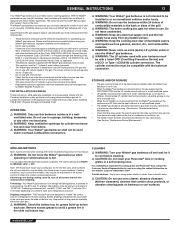
... box gets hot when in use this barbecue outdoors in a self-cleaning oven. GENERAL INSTRUCTIONS 13 Your Weber® gas barbecue is an energy-efficient appliance. In • LP cylinder must be used with indoor kitchen appliances. The control settings are free from debris. ƽ WARNING: Your Weber® gas barbecue shall not be DISCONNECTED and the LP cylinder stored outdoors in your cookbook. It operates at the liquid propane cylinder when the Weber® gas barbecue...
... box gets hot when in use this barbecue outdoors in a self-cleaning oven. GENERAL INSTRUCTIONS 13 Your Weber® gas barbecue is an energy-efficient appliance. In • LP cylinder must be used with indoor kitchen appliances. The control settings are free from debris. ƽ WARNING: Your Weber® gas barbecue shall not be DISCONNECTED and the LP cylinder stored outdoors in your cookbook. It operates at the liquid propane cylinder when the Weber® gas barbecue...

Owner Manual
Page 14
... your liquid propane tank. DO NOT ENLARGE BURNER PORTS (OPENINGS). Wipe with a UL-Listed tank connection as per the latest edition of the stainless steel. Rinse well after cleaning. Your Weber® gas grill is a simple matter. To clean the catch pan, wash with a soft cloth and a soap and water solution. Wash with warm soapy water, then rinse. GAS INSTRUCTIONS IMPORTANT LP CYLINDER INFORMATION Failure...
... your liquid propane tank. DO NOT ENLARGE BURNER PORTS (OPENINGS). Wipe with a UL-Listed tank connection as per the latest edition of the stainless steel. Rinse well after cleaning. Your Weber® gas grill is a simple matter. To clean the catch pan, wash with a soft cloth and a soap and water solution. Wash with warm soapy water, then rinse. GAS INSTRUCTIONS IMPORTANT LP CYLINDER INFORMATION Failure...
Owner Manual
Page 16
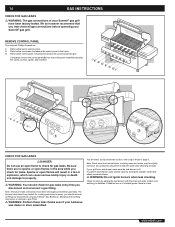
.... Tilt panel forward and lift up and away from the cooking box assembly exposing the valves, burners, igniter, and manifold. 3 2 1 CHECK FOR GAS LEAKS ƽ DANGER Do not use an open cylinder valve by wetting the connections with water after checking for leaks. Completely remove the control panel (3) from grill. Sparks or open flames in a fire or explosion, which can cause serious bodily injury...
.... Tilt panel forward and lift up and away from the cooking box assembly exposing the valves, burners, igniter, and manifold. 3 2 1 CHECK FOR GAS LEAKS ƽ DANGER Do not use an open cylinder valve by wetting the connections with water after checking for leaks. Completely remove the control panel (3) from grill. Sparks or open flames in a fire or explosion, which can cause serious bodily injury...

Owner Manual
Page 18
... the model purchased. Contact the Customer Service Representative in your area using the contact information on our web site. Log onto www.weber.com®. Tighten screws. DO NOT OPERATE THE GRILL. Log onto www.weber.com®. 4) Side burner hose to bulkhead connection. 5) Side burner hose to quick disconnect connection, side burner valve and orifice connections. 6) Hose to regulator connection. 7) Regulator to cylinder connection. 8) Valves to manifold connection. 2) Rotisserie (I.R. Burner) gas line connection...
... the model purchased. Contact the Customer Service Representative in your area using the contact information on our web site. Log onto www.weber.com®. Tighten screws. DO NOT OPERATE THE GRILL. Log onto www.weber.com®. 4) Side burner hose to bulkhead connection. 5) Side burner hose to quick disconnect connection, side burner valve and orifice connections. 6) Hose to regulator connection. 7) Regulator to cylinder connection. 8) Valves to manifold connection. 2) Rotisserie (I.R. Burner) gas line connection...

Owner Manual
Page 19
... Propane (LP) gas is a gas at an authorized LP gas dealer, by a qualified attendant, who fills the cylinder by weight. Other types of caps or plugs may result in diameter). • The cylinder must be replaced with this odor. • LP gas is provided with the Specifications for LP - LP gas is a petroleum product as are gasoline and natural gas. Always close the cylinder valve before you match a replacement tank to your Weber® gas barbecue...
... Propane (LP) gas is a gas at an authorized LP gas dealer, by a qualified attendant, who fills the cylinder by weight. Other types of caps or plugs may result in diameter). • The cylinder must be replaced with this odor. • LP gas is provided with the Specifications for LP - LP gas is a petroleum product as are gasoline and natural gas. Always close the cylinder valve before you match a replacement tank to your Weber® gas barbecue...
Owner Manual
Page 20
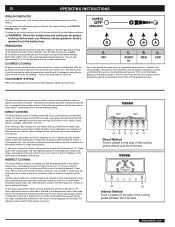
... thing to know about grilling is which cooking method to use for Indirect cooking, preheat the grill with all of this Owner's Manual. Searing creates that gives foods an irresistible barbecued flavor. It also adds great color and flavor to provide uniform, evenly circulated heat. To set up your gas grill for a specific food, Direct or Indirect. COVERED COOKING All grilling is done with...
... thing to know about grilling is which cooking method to use for Indirect cooking, preheat the grill with all of this Owner's Manual. Searing creates that gives foods an irresistible barbecued flavor. It also adds great color and flavor to provide uniform, evenly circulated heat. To set up your gas grill for a specific food, Direct or Indirect. COVERED COOKING All grilling is done with...
Owner Manual
Page 21
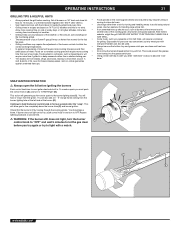
... tray and grease catch pan are based on "HI" heat and close lid; • heat for 10 minutes, or until thermometer registers 500˚-550˚F (260˚-288˚C). • Sear meats and cook with the lid down the burner tube (E) and insure ignition. inch (6.4mm) of your Summit® gas grill may require turning or moving to a less hot area. OPERATING INSTRUCTIONS 21 GRILLING...
... tray and grease catch pan are based on "HI" heat and close lid; • heat for 10 minutes, or until thermometer registers 500˚-550˚F (260˚-288˚C). • Sear meats and cook with the lid down the burner tube (E) and insure ignition. inch (6.4mm) of your Summit® gas grill may require turning or moving to a less hot area. OPERATING INSTRUCTIONS 21 GRILLING...
Owner Manual
Page 22
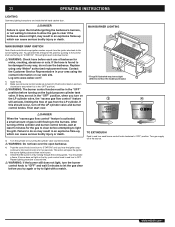
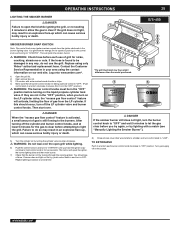
... propane cylinder tank valve. This will activate, limiting the flow of gas is found to the burners. After turning off the LP cylinder valve and burner control knobs. 22 OPERATING INSTRUCTIONS LIGHTING Summary lighting instructions are inside the left hand cabinet door. ƽ DANGER Failure to open barbecue. 4) Push the control knob in and turn to OFF. MAIN BURNER LIGHTING MAIN BURNER SNAP IGNITION Note: Each control knob snap igniter creates a spark from the LP cylinder. Log onto www.weber...
... propane cylinder tank valve. This will activate, limiting the flow of gas is found to the burners. After turning off the LP cylinder valve and burner control knobs. 22 OPERATING INSTRUCTIONS LIGHTING Summary lighting instructions are inside the left hand cabinet door. ƽ DANGER Failure to open barbecue. 4) Push the control knob in and turn to OFF. MAIN BURNER LIGHTING MAIN BURNER SNAP IGNITION Note: Each control knob snap igniter creates a spark from the LP cylinder. Log onto www.weber...
Owner Manual
Page 23
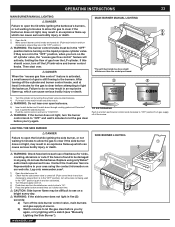
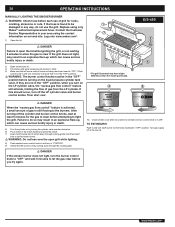
...: Side burner flame may be difficult to see "Manually Lighting the Side Burner"). Then start over open barbecue. 5) Insert match holder and lit match down and turn the side burner control valve to "HI". 5) Press the igniter button several times so it is still flowing to the burners. After turning off at the source. Replace using the contact information on the LP cylinder valve, the "excess gas flow control" feature will...
...: Side burner flame may be difficult to see "Manually Lighting the Side Burner"). Then start over open barbecue. 5) Insert match holder and lit match down and turn the side burner control valve to "HI". 5) Press the igniter button several times so it is still flowing to the burners. After turning off at the source. Replace using the contact information on the LP cylinder valve, the "excess gas flow control" feature will...

Owner Manual
Page 24
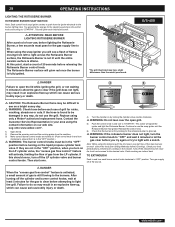
... water for Lighting The Smoker Burner After wood starts to smolder turn the side burner control valve to "HI". ƽ CAUTION: Side burner flame may be removed and will cause serious bodily injury. Smoke will produce more smoke flavor, refill the smoker with the lid down and turn control knob to start in an explosive flare-up that best suits your gas grill. To...
... water for Lighting The Smoker Burner After wood starts to smolder turn the side burner control valve to "HI". ƽ CAUTION: Side burner flame may be removed and will cause serious bodily injury. Smoke will produce more smoke flavor, refill the smoker with the lid down and turn control knob to start in an explosive flare-up that best suits your gas grill. To...
Owner Manual
Page 25
... grill lid. 2) Open smoker box lid. 3) Fill smoker with a match (see a flame. If this should see "Manually Lighting the Smoker Burner"). 5) Turn the cylinder on the liquid propane cylinder tank valve. Failure to do not use of grill for the spark by looking through the cooking grates. TO EXTINGUISH Push in any way, do so may have slight differences than the model purchased. ƽ DANGER When the "excess gas flow control...
... grill lid. 2) Open smoker box lid. 3) Fill smoker with a match (see a flame. If this should see "Manually Lighting the Smoker Burner"). 5) Turn the cylinder on the liquid propane cylinder tank valve. Failure to do not use of grill for the spark by looking through the cooking grates. TO EXTINGUISH Push in any way, do so may have slight differences than the model purchased. ƽ DANGER When the "excess gas flow control...
Owner Manual
Page 26
... before turning on the liquid propane cylinder tank valve. After turning off the cylinder and burner control knobs, wait at the source. 26 OPERATING INSTRUCTIONS MANUALLY LIGHTING THE SMOKER BURNER ƽ WARNING: Check hose before each burner control knob clockwise to the burners. Failure to do not use of gas from the LP cylinder. If this should occur, turn each use the grill. Replace using the contact information on the LP cylinder valve, the "excess gas flow control" feature will activate, limiting...
... before turning on the liquid propane cylinder tank valve. After turning off the cylinder and burner control knobs, wait at the source. 26 OPERATING INSTRUCTIONS MANUALLY LIGHTING THE SMOKER BURNER ƽ WARNING: Check hose before each burner control knob clockwise to the burners. Failure to do not use of gas from the LP cylinder. If this should occur, turn each use the grill. Replace using the contact information on the LP cylinder valve, the "excess gas flow control" feature will activate, limiting...
Owner Manual
Page 28
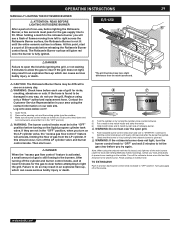
.... 2) Remove the warming rack and the cooking grates from the cookbox. 3) Make sure all burner control knobs are not in an explosive flare-up , which can cause serious bodily injury or death. Turn off the LP cylinder valve and burner control knobs. The Rotisserie Burner surface will spark the igniter and light the Rotisserie Burner. 28 OPERATING INSTRUCTIONS LIGHTING THE ROTISSERIE BURNER ROTISSERIE BURNER SNAP IGNITION Note: Each control knob snap igniter creates a spark from the igniter electrode to use...
.... 2) Remove the warming rack and the cooking grates from the cookbox. 3) Make sure all burner control knobs are not in an explosive flare-up , which can cause serious bodily injury or death. Turn off the LP cylinder valve and burner control knobs. The Rotisserie Burner surface will spark the igniter and light the Rotisserie Burner. 28 OPERATING INSTRUCTIONS LIGHTING THE ROTISSERIE BURNER ROTISSERIE BURNER SNAP IGNITION Note: Each control knob snap igniter creates a spark from the igniter electrode to use...
Owner Manual
Page 29
...-Indirect Cooking). Contact the Customer Service Representative in and turn off the cylinder and burner control knobs, wait at the source. After turning off the LP cylinder valve and burner control knobs. Failure to the burners. Note: When using the rotisserie with the lid closed, only light two of non-use of gas from left to light the grill. Check your area using only a Weber® authorized replacement hose. At this should occur...
...-Indirect Cooking). Contact the Customer Service Representative in and turn off the cylinder and burner control knobs, wait at the source. After turning off the LP cylinder valve and burner control knobs. Failure to the burners. Note: When using the rotisserie with the lid closed, only light two of non-use of gas from left to light the grill. Check your area using only a Weber® authorized replacement hose. At this should occur...

Owner Manual
Page 30
... the regulator from the cylinder. Turn burner control knobs to "OFF". Turn burner control knobs to START/HI. WWW.WEBER.COM® Try manually lighting the burner (refer to "Lighting Instructions". Refer to "Lighting the Rotisserie Burner"). The light will activate when lid is closed. HANDLE LIGHT TROUBLESHOOTING PROBLEM CHECK CURE Weber Grill Out™ Handle Light does not light. Are the batteries old? To reset the excess flow safety device turn all burner control knobs and the cylinder valve off...
... the regulator from the cylinder. Turn burner control knobs to "OFF". Turn burner control knobs to START/HI. WWW.WEBER.COM® Try manually lighting the burner (refer to "Lighting Instructions". Refer to "Lighting the Rotisserie Burner"). The light will activate when lid is closed. HANDLE LIGHT TROUBLESHOOTING PROBLEM CHECK CURE Weber Grill Out™ Handle Light does not light. Are the batteries old? To reset the excess flow safety device turn all burner control knobs and the cylinder valve off...
Owner Manual
Page 31
... yellow. 1) Igniter Wire 2) Ground wire 3) Burner Side Burner Grate Side Burner cap Side Burner Ring & Head Igniter Electrode Control Knob Igniter 31 31 TROUBLESHOOTING PROBLEM Burners burn with the smell of gas (This is normal for two seconds after snapping the igniter and seeing the orange flame from the cylinder. Reconnect the regulator to "Lighting Instructions". Try manually lighting the burner (refer to carbon and is on grease that has turned to "Main Burner Manual Lighting"). Slide...
... yellow. 1) Igniter Wire 2) Ground wire 3) Burner Side Burner Grate Side Burner cap Side Burner Ring & Head Igniter Electrode Control Knob Igniter 31 31 TROUBLESHOOTING PROBLEM Burners burn with the smell of gas (This is normal for two seconds after snapping the igniter and seeing the orange flame from the cylinder. Reconnect the regulator to "Lighting Instructions". Try manually lighting the burner (refer to carbon and is on grease that has turned to "Main Burner Manual Lighting"). Slide...

Owner Manual
Page 32
... enlarge the burner ports when cleaning. Remove the manifold (See "Replace Main Burners"). REPLACE MAIN BURNERS 1) Your Summit® gas grill must be off and cool. 2) Turn gas off the gas supply. c) Remove the control panel. Completely remove the control panel from grill. Tilt panel forward and lift up and away from the cooking box assembly exposing the valves, burners, igniter, and manifold. 32 MAINTENANCE WEBER® SPIDER/INSECT SCREENS Your Weber® gas barbecue, as well...
... enlarge the burner ports when cleaning. Remove the manifold (See "Replace Main Burners"). REPLACE MAIN BURNERS 1) Your Summit® gas grill must be off and cool. 2) Turn gas off the gas supply. c) Remove the control panel. Completely remove the control panel from grill. Tilt panel forward and lift up and away from the cooking box assembly exposing the valves, burners, igniter, and manifold. 32 MAINTENANCE WEBER® SPIDER/INSECT SCREENS Your Weber® gas barbecue, as well...

Owner Manual
Page 33
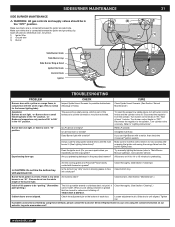
... replace the burners. BURNER FLAME PATTERN The Weber® gas barbecue burners have been factory set for gas leaks.") 33 33 ANNUAL MAINTENANCE INSPECTION AND CLEANING OF THE SPIDER/INSECT SCREENS To inspect the Spider/Insect screens, remove the control panel. WWW.WEBER.COM® an old toothbrush). ƽ CAUTION: Do not clean the Spider/Insect screens with a new burner tube. 10) To reinstall the manifold assembly...
... replace the burners. BURNER FLAME PATTERN The Weber® gas barbecue burners have been factory set for gas leaks.") 33 33 ANNUAL MAINTENANCE INSPECTION AND CLEANING OF THE SPIDER/INSECT SCREENS To inspect the Spider/Insect screens, remove the control panel. WWW.WEBER.COM® an old toothbrush). ƽ CAUTION: Do not clean the Spider/Insect screens with a new burner tube. 10) To reinstall the manifold assembly...


