Owner Manual
Page 1
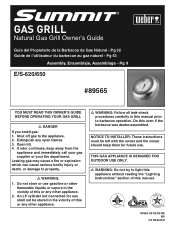
.... 2. Pg 32 Guide de l'utilisateur du barbecue au gaz naturel - Do not store or use . Pg 53 Assembly, Ensamblaje, Assemblage - THIS GAS APPLIANCE IS DESIGNED FOR OUTDOOR USE ONLY. ƽ WARNING: Do not try to light this appliance without reading the "Lighting Instructions" section of this manual prior to barbecue operation. GAS GRILL Natural Gas Grill Owner's Guide Guía del Propietario de la Barbacoa de Gas Natural - Leaking gas may cause a fire...
.... 2. Pg 32 Guide de l'utilisateur du barbecue au gaz naturel - Do not store or use . Pg 53 Assembly, Ensamblaje, Assemblage - THIS GAS APPLIANCE IS DESIGNED FOR OUTDOOR USE ONLY. ƽ WARNING: Do not try to light this appliance without reading the "Lighting Instructions" section of this manual prior to barbecue operation. GAS GRILL Natural Gas Grill Owner's Guide Guía del Propietario de la Barbacoa de Gas Natural - Leaking gas may cause a fire...
Owner Manual
Page 2
... five minutes before use. Keep young children away while it is in the storage area under or near this model of the cooking box. ƽ Should a grease fire occur, turn all gas valves off all parts are in operation. ƽ Use heat-resistant barbecue mitts or gloves when operating barbecue. ƽ Keep any electrical supply cord and the fuel supply hose away from liquid propane cylinder. 2.
... five minutes before use. Keep young children away while it is in the storage area under or near this model of the cooking box. ƽ Should a grease fire occur, turn all gas valves off all parts are in operation. ƽ Use heat-resistant barbecue mitts or gloves when operating barbecue. ƽ Keep any electrical supply cord and the fuel supply hose away from liquid propane cylinder. 2.
Owner Manual
Page 13
... valves, orifices and hose are for natural gas only. • Do not use with charcoal fuel. • Check that the area under overhead combustible construction. ƽ WARNING: Your Weber® gas barbecue is easy to or less than 1/2 psig (3.5 kPa). You can easily change its individual shutoff valve must comply with either the National Fuel Gas Code, ANSI Z223.1/NFPA 54, Natural Gas and Propane Installation Code...
... valves, orifices and hose are for natural gas only. • Do not use with charcoal fuel. • Check that the area under overhead combustible construction. ƽ WARNING: Your Weber® gas barbecue is easy to or less than 1/2 psig (3.5 kPa). You can easily change its individual shutoff valve must comply with either the National Fuel Gas Code, ANSI Z223.1/NFPA 54, Natural Gas and Propane Installation Code...

Owner Manual
Page 14
Remove excess grease, then wash with warm soapy water; Flavorizer® bars and Cooking grates - Catch pan - Your grill or its best is suitable only for gas leaks. GAS INSTRUCTIONS INSTALL GAS SUPPLY GENERAL SPECIFICATIONS FOR PIPING Note: Contact your stainless steel. tube. or standard weight (schedule 40) steel or wrought iron pipe. • Copper tubing must be installed in the branch fuel line in the latest edition of the...
Remove excess grease, then wash with warm soapy water; Flavorizer® bars and Cooking grates - Catch pan - Your grill or its best is suitable only for gas leaks. GAS INSTRUCTIONS INSTALL GAS SUPPLY GENERAL SPECIFICATIONS FOR PIPING Note: Contact your stainless steel. tube. or standard weight (schedule 40) steel or wrought iron pipe. • Copper tubing must be installed in the branch fuel line in the latest edition of the...
Owner Manual
Page 15
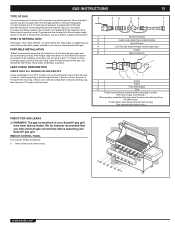
... column pressure. Your grill operates at least two (2) feet from operation using Natural gas to the assembly instructions, you are required. PORTABLE INSTALLATION Weber® recommends moving the grill at 4.5" of your local utility and should check to operate your local dealer. REMOVE CONTROL PANEL Tool required: Phillips Screwdriver. 1) Remove the burner control knobs. WHAT IS NATURAL GAS? GAS INSTRUCTIONS 15 TYPE OF GAS Your natural gas grill is a safe modern fuel. WWW.WEBER.COM® Never...
... column pressure. Your grill operates at least two (2) feet from operation using Natural gas to the assembly instructions, you are required. PORTABLE INSTALLATION Weber® recommends moving the grill at 4.5" of your local utility and should check to operate your local dealer. REMOVE CONTROL PANEL Tool required: Phillips Screwdriver. 1) Remove the burner control knobs. WHAT IS NATURAL GAS? GAS INSTRUCTIONS 15 TYPE OF GAS Your natural gas grill is a safe modern fuel. WWW.WEBER.COM® Never...
Owner Manual
Page 16
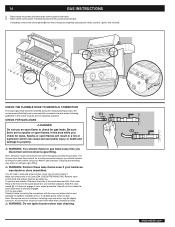
... even if your Weber® gas barbecue. Completely remove the control panel (3) from grill. Sparks or open flames will not flow unless the quick disconnect is properly engaged. The burners have been thoroughly checked for bubbles. Tilt panel forward and lift up and away from the cooking box assembly exposing the valves, burners, igniter, and manifold. 2 1 CHECK THE FLEXIBLE HOSE TO MANIFOLD CONNECTION The natural gas hose has been...
... even if your Weber® gas barbecue. Completely remove the control panel (3) from grill. Sparks or open flames will not flow unless the quick disconnect is properly engaged. The burners have been thoroughly checked for bubbles. Tilt panel forward and lift up and away from the cooking box assembly exposing the valves, burners, igniter, and manifold. 2 1 CHECK THE FLEXIBLE HOSE TO MANIFOLD CONNECTION The natural gas hose has been...
Owner Manual
Page 18
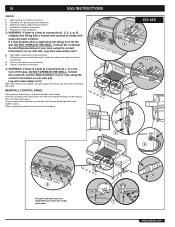
... the top edge of the cooking box. E/S-650 1 6 6 8 WWW.WEBER.COM® Burner) gas line connection. 3) Bulkhead and gas supply hose connection. 4) Bulkhead to regulator connection. 5) Regulator to manifold connection. 2) Rotisserie (I.R. DO NOT OPERATE THE GRILL. DO NOT OPERATE THE GRILL. Place corresponding control knobs onto the valve stems. 2 3 4 5 9 *The grill illustrated may have slight differences than the model 7 purchased. 18 GAS INSTRUCTIONS CHECK: 1) Main gas line to hose connection. ƽ WARNING: If there is...
... the top edge of the cooking box. E/S-650 1 6 6 8 WWW.WEBER.COM® Burner) gas line connection. 3) Bulkhead and gas supply hose connection. 4) Bulkhead to regulator connection. 5) Regulator to manifold connection. 2) Rotisserie (I.R. DO NOT OPERATE THE GRILL. DO NOT OPERATE THE GRILL. Place corresponding control knobs onto the valve stems. 2 3 4 5 9 *The grill illustrated may have slight differences than the model 7 purchased. 18 GAS INSTRUCTIONS CHECK: 1) Main gas line to hose connection. ƽ WARNING: If there is...
Owner Manual
Page 19
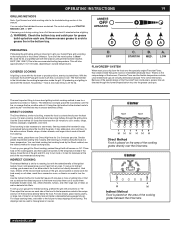
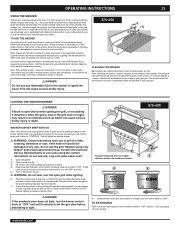
... the individual burners as delicate fish fillets. Searing creates that gives foods an irresistible barbecued flavor. Use the Indirect method for grease build-up before grilling is done with the lid down. OPERATING INSTRUCTIONS 19 GRILLING METHODS Note: If grill looses heat while cooking refer to the troubleshooting section of this Owner's Manual. COVERED COOKING All grilling is important. Smaller pieces require less searing time. To set inside...
... the individual burners as delicate fish fillets. Searing creates that gives foods an irresistible barbecued flavor. Use the Indirect method for grease build-up before grilling is done with the lid down. OPERATING INSTRUCTIONS 19 GRILLING METHODS Note: If grill looses heat while cooking refer to the troubleshooting section of this Owner's Manual. COVERED COOKING All grilling is important. Smaller pieces require less searing time. To set inside...

Owner Manual
Page 20
...; • Trim excess fat from the burner lighting tube at higher altitudes. Any flames will allow gas to the burner lighting tube (C). After flames subside, relight the grill. Disposable foil pans are based on first try, push control knob in recipes are very convenient, but any metal pan with foil. Do not line the funnel-shaped bottom tray with ovenproof handles can vary because of the...
...; • Trim excess fat from the burner lighting tube at higher altitudes. Any flames will allow gas to the burner lighting tube (C). After flames subside, relight the grill. Disposable foil pans are based on first try, push control knob in recipes are very convenient, but any metal pan with foil. Do not line the funnel-shaped bottom tray with ovenproof handles can vary because of the...
Owner Manual
Page 21
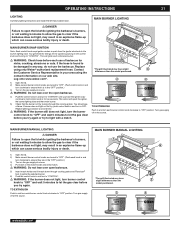
... burner control knob clockwise to the burner lighting tube. MAIN BURNER MANUAL LIGHTING ƽ DANGER Failure to open the lid while igniting the barbecue's burners, or not waiting 5 minutes to allow the gas to be damaged in any way, do not use of barbecue for two seconds. Replace using the contact information on the gas supply at source. ƽ WARNING: Do not lean over open barbecue. 5) Insert match holder and lit match...
... burner control knob clockwise to the burner lighting tube. MAIN BURNER MANUAL LIGHTING ƽ DANGER Failure to open the lid while igniting the barbecue's burners, or not waiting 5 minutes to allow the gas to be damaged in any way, do not use of barbecue for two seconds. Replace using the contact information on the gas supply at source. ƽ WARNING: Do not lean over open barbecue. 5) Insert match holder and lit match...

Owner Manual
Page 22
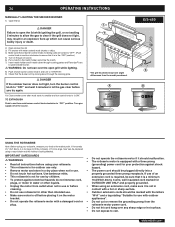
.... 2) Check that it clicks each use the barbecue. MANUAL SIDE BURNER LIGHTING WWW.WEBER.COM® SIDE BURNER LIGHTING ƽ WARNING: Check hose before you try lighting with a match (see on . 4) Put match in and turn clockwise to ensure that the side burner valve is turned off (Push control knob in a match holder and strike match. 5) Hold match holder and lit match by either side of barbecue for nicks, cracking, abrasions or cuts...
.... 2) Check that it clicks each use the barbecue. MANUAL SIDE BURNER LIGHTING WWW.WEBER.COM® SIDE BURNER LIGHTING ƽ WARNING: Check hose before you try lighting with a match (see on . 4) Put match in and turn clockwise to ensure that the side burner valve is turned off (Push control knob in a match holder and strike match. 5) Hold match holder and lit match by either side of barbecue for nicks, cracking, abrasions or cuts...
Owner Manual
Page 23
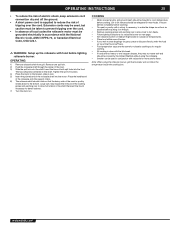
... smoker burner does not light, turn the burner control knob to "OFF" and wait 5 minutes to let the gas clear before attempting to light. 8) Close smoker cover after wood starts to smolder and turn each burner control knob clockwise to "LOW". Note: After refilling smoker, smoke will ignite the smoker burner. ƽ WARNING: Check hose before using only Weber® authorized replacement hose. Log onto www.weber.com®. 1) Open the grill lid. 2) Open smoker box...
... smoker burner does not light, turn the burner control knob to "OFF" and wait 5 minutes to let the gas clear before attempting to light. 8) Close smoker cover after wood starts to smolder and turn each burner control knob clockwise to "LOW". Note: After refilling smoker, smoke will ignite the smoker burner. ƽ WARNING: Check hose before using only Weber® authorized replacement hose. Log onto www.weber.com®. 1) Open the grill lid. 2) Open smoker box...
Owner Manual
Page 24
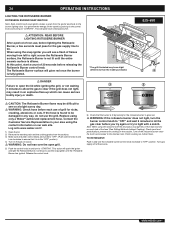
... not operate the rotisserie motor if it should be plugged directly into a properly grounded three prong receptacle. Outdoor extension cords should malfunction. WWW.WEBER.COM® 24 OPERATING INSTRUCTIONS MANUALLY LIGHTING THE SMOKER BURNER 1) Open the lid. ƽ DANGER Failure to open the lid while igniting the grill, or not waiting 5 minutes to allow the gas to clear if the grill does not light, may...
... not operate the rotisserie motor if it should be plugged directly into a properly grounded three prong receptacle. Outdoor extension cords should malfunction. WWW.WEBER.COM® 24 OPERATING INSTRUCTIONS MANUALLY LIGHTING THE SMOKER BURNER 1) Open the lid. ƽ DANGER Failure to open the lid while igniting the grill, or not waiting 5 minutes to allow the gas to clear if the grill does not light, may...
Owner Manual
Page 25
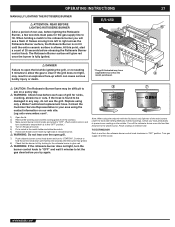
... the Indirect Method without using the rotisserie burner, grill thermometer will not reflect the temperature inside the cooking box. Remount the food if necessary for most foods. Extension cords may require the removal of the cooking grates and warming rack to allow food to turn freely. • Follow lighting instructions for rotisserie burner on next page. • Set rotisserie burner on medium-high based...
... the Indirect Method without using the rotisserie burner, grill thermometer will not reflect the temperature inside the cooking box. Remount the food if necessary for most foods. Extension cords may require the removal of the cooking grates and warming rack to allow food to turn freely. • Follow lighting instructions for rotisserie burner on next page. • Set rotisserie burner on medium-high based...
Owner Manual
Page 26
... flames moving from left to right across the Rotisserie Burner surface, the Rotisserie Burner is not lit until the Rotisserie Burner has ignited. Release the control knob. 6) Check that it is in the "OFF" position.) 4) Turn on Indirect heat. Turn gas supply off the rotisserie burner once the food has browned to the desired color. WWW.WEBER.COM® 26 OPERATING INSTRUCTIONS LIGHTING THE ROTISSERIE BURNER ROTISSERIE BURNER SNAP IGNITION Note: Each control knob snap igniter...
... flames moving from left to right across the Rotisserie Burner surface, the Rotisserie Burner is not lit until the Rotisserie Burner has ignited. Release the control knob. 6) Check that it is in the "OFF" position.) 4) Turn on Indirect heat. Turn gas supply off the rotisserie burner once the food has browned to the desired color. WWW.WEBER.COM® 26 OPERATING INSTRUCTIONS LIGHTING THE ROTISSERIE BURNER ROTISSERIE BURNER SNAP IGNITION Note: Each control knob snap igniter...
Owner Manual
Page 27
... cooking grates from left to see a flash of flames moving from the cookbox. 3) Make sure all burner control knobs are turned to "OFF". (Push control knob in the "OFF" position.) 4) Turn on the gas at the source. Check your area using the contact information on Indirect heat. OPERATING INSTRUCTIONS MANUALLY LIGHTING THE ROTISSERIE BURNER ƽ ATTENTION: READ BEFORE LIGHTING ROTISSERIE BURNER After a period of non-use, before releasing the Rotisserie Burner control knob. At...
... cooking grates from left to see a flash of flames moving from the cookbox. 3) Make sure all burner control knobs are turned to "OFF". (Push control knob in the "OFF" position.) 4) Turn on the gas at the source. Check your area using the contact information on Indirect heat. OPERATING INSTRUCTIONS MANUALLY LIGHTING THE ROTISSERIE BURNER ƽ ATTENTION: READ BEFORE LIGHTING ROTISSERIE BURNER After a period of non-use, before releasing the Rotisserie Burner control knob. At...
Owner Manual
Page 28
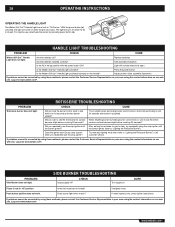
... hold the burner control knob in and hold in your area using the snap igniter until the burner ignites (refer to see a spark when you repeatedly use the snap ignition until the burner ignited? Call customer service. Log onto www.weber.com®. Does burner light with the power button ON? WWW.WEBER.COM® For daytime use the snap igniter? Replace batteries. ROTISSERIE TROUBLESHOOTING PROBLEM Rotisserie burner does not light. CURE Try to relight burner by using these...
... hold the burner control knob in and hold in your area using the snap igniter until the burner ignites (refer to see a spark when you repeatedly use the snap ignition until the burner ignited? Call customer service. Log onto www.weber.com®. Does burner light with the power button ON? WWW.WEBER.COM® For daytime use the snap igniter? Replace batteries. ROTISSERIE TROUBLESHOOTING PROBLEM Rotisserie burner does not light. CURE Try to relight burner by using these...
Owner Manual
Page 29
... our web site. Symptoms: Burner does not light, or flame is normal for two seconds after snapping the igniter and seeing the orange flame from the burner lighting tube. Try manually lighting the burner (refer to flow Clean bottom tray. into catch pan? Check the adjustment pin on grease? If problems cannot be in your area using the contact information on "HI". burner is connected between the...
... our web site. Symptoms: Burner does not light, or flame is normal for two seconds after snapping the igniter and seeing the orange flame from the burner lighting tube. Try manually lighting the burner (refer to flow Clean bottom tray. into catch pan? Check the adjustment pin on grease? If problems cannot be in your area using the contact information on "HI". burner is connected between the...

Owner Manual
Page 30
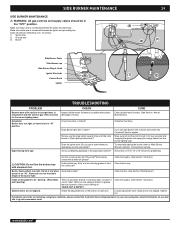
... open. ƽ CAUTION: Do not enlarge the burner ports when cleaning. Look inside of the burner tubes. Check and clean the valve orifices at source. 3) Disconnect gas supply. 4) Remove cooking grates. 5) Remove smoker box. 6) Remove Flavorizer® bars. REPLACE MAIN BURNERS 1) Your Summit® gas grill must be off and cool. 2) Turn gas off the gas supply. c b a WWW.WEBER.COM® MAIN BURNER CLEANING PROCEDURE Turn off at the base of...
... open. ƽ CAUTION: Do not enlarge the burner ports when cleaning. Look inside of the burner tubes. Check and clean the valve orifices at source. 3) Disconnect gas supply. 4) Remove cooking grates. 5) Remove smoker box. 6) Remove Flavorizer® bars. REPLACE MAIN BURNERS 1) Your Summit® gas grill must be off and cool. 2) Turn gas off the gas supply. c b a WWW.WEBER.COM® MAIN BURNER CLEANING PROCEDURE Turn off at the base of...

Owner Manual
Page 31
... over the valve orifices (B). BURNER FLAME PATTERN The Weber® gas barbecue burners have been factory set for the correct air and gas mixture. If the Spider/Insect screen becomes damaged or cannot be cleaned, please contact the Customer Service Representative in place. ƽ WARNING: After reinstalling the gas lines, they should be leak checked with a new burner tube. 10) To reinstall the manifold assembly, reverse steps...
... over the valve orifices (B). BURNER FLAME PATTERN The Weber® gas barbecue burners have been factory set for the correct air and gas mixture. If the Spider/Insect screen becomes damaged or cannot be cleaned, please contact the Customer Service Representative in place. ƽ WARNING: After reinstalling the gas lines, they should be leak checked with a new burner tube. 10) To reinstall the manifold assembly, reverse steps...


