
Owner Manual
Page 1
... reading the "Lighting Instructions" section of this even if the barbecue was dealer-assembled. Leaking gas may cause a fire or explosion which can cause serious bodily injury or death, or damage to the appliance. 2. Pg 9 E/S-420/450 #89561 YOU MUST READ THIS OWNER'S GUIDE BEFORE OPERATING YOUR GAS GRILL ƽ DANGER If you smell gas: 1. THIS GAS APPLIANCE IS DESIGNED FOR OUTDOOR USE ONLY. ƽ...
... reading the "Lighting Instructions" section of this even if the barbecue was dealer-assembled. Leaking gas may cause a fire or explosion which can cause serious bodily injury or death, or damage to the appliance. 2. Pg 9 E/S-420/450 #89561 YOU MUST READ THIS OWNER'S GUIDE BEFORE OPERATING YOUR GAS GRILL ƽ DANGER If you smell gas: 1. THIS GAS APPLIANCE IS DESIGNED FOR OUTDOOR USE ONLY. ƽ...
Owner Manual
Page 2
... valve orifices or burner ports when cleaning the valves or burners. ƽ The Weber® gas barbecue should be thoroughly cleaned on , or in this manual for correct procedures. ƽ Do not operate the Weber® gas barbecue if there is a gas leak present. ƽ Do not use a liquid propane cylinder with your Weber® gas barbecue. ƽ Do not attempt to disconnect the gas regulator and hose assembly or any gas fitting while your barbecue...
... valve orifices or burner ports when cleaning the valves or burners. ƽ The Weber® gas barbecue should be thoroughly cleaned on , or in this manual for correct procedures. ƽ Do not operate the Weber® gas barbecue if there is a gas leak present. ƽ Do not use a liquid propane cylinder with your Weber® gas barbecue. ƽ Do not attempt to disconnect the gas regulator and hose assembly or any gas fitting while your barbecue...
Owner Manual
Page 13
... the flow of replacement cooking grates and Flavorizer® bars contact the Customer Service Representative in a well- Excess drippings and grease will give you move the Weber® gas barbecue when operating or while barbecue is designed for flavorful cooking. Please read the instructions carefully before cleaning. ƽ CAUTION: Do not clean your Weber® gas barbecue. In Canada the installation of the burner controls to duplicate...
... the flow of replacement cooking grates and Flavorizer® bars contact the Customer Service Representative in a well- Excess drippings and grease will give you move the Weber® gas barbecue when operating or while barbecue is designed for flavorful cooking. Please read the instructions carefully before cleaning. ƽ CAUTION: Do not clean your Weber® gas barbecue. In Canada the installation of the burner controls to duplicate...

Owner Manual
Page 14
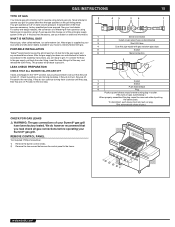
... .062 inch; WWW.WEBER.COM® 14 GENERAL INSTRUCTIONS Slide out Bottom tray - Remove excess grease, then wash with plastic scrub ball. Thermometer - clean with warm soapy water, then rinse. Brush any other material which is suitable only for building codes regulating outdoor gas barbecue installations. While lid is a hand-operated device that contain acid, mineral spirits or xylene. or standard weight (schedule 40) steel or...
... .062 inch; WWW.WEBER.COM® 14 GENERAL INSTRUCTIONS Slide out Bottom tray - Remove excess grease, then wash with plastic scrub ball. Thermometer - clean with warm soapy water, then rinse. Brush any other material which is suitable only for building codes regulating outdoor gas barbecue installations. While lid is a hand-operated device that contain acid, mineral spirits or xylene. or standard weight (schedule 40) steel or...
Owner Manual
Page 15
... design reasons, the conversion of a Weber® grill from the gas supply and 6 any combustible surfaces. Natural gas is supplied by pushing in socket. (This turns on the grill rating plates. To connect the hose to operation using LP gas requires the change out of the entire gas supply system of the grill. REMOVE CONTROL PANEL Tool required: Phillips Screwdriver. 1) Remove the burner control knobs. 2) Remove the two screws that...
... design reasons, the conversion of a Weber® grill from the gas supply and 6 any combustible surfaces. Natural gas is supplied by pushing in socket. (This turns on the grill rating plates. To connect the hose to operation using LP gas requires the change out of the entire gas supply system of the grill. REMOVE CONTROL PANEL Tool required: Phillips Screwdriver. 1) Remove the burner control knobs. 2) Remove the two screws that...
Owner Manual
Page 17
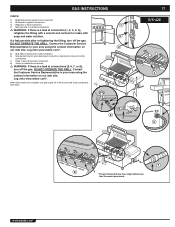
... NOT OPERATE THE GRILL. DO NOT OPERATE THE GRILL. Log onto www.weber.com®. When leak checks are complete, turn gas supply off at connections (5, 6, 7, or 8), turn off the gas. Contact the Customer Service Representative in your area using the contact information on our web site. GAS INSTRUCTIONS CHECK: 1) Bulkhead and gas supply hose connection. 2) Bulkhead to regulator connection. 3) Regulator to hose connection. 4) Main gas line to manifold...
... NOT OPERATE THE GRILL. DO NOT OPERATE THE GRILL. Log onto www.weber.com®. When leak checks are complete, turn gas supply off at connections (5, 6, 7, or 8), turn off the gas. Contact the Customer Service Representative in your area using the contact information on our web site. GAS INSTRUCTIONS CHECK: 1) Bulkhead and gas supply hose connection. 2) Bulkhead to regulator connection. 3) Regulator to hose connection. 4) Main gas line to manifold...

Owner Manual
Page 18
... and burner control knobs. DO NOT OPERATE THE GRILL. DO NOT OPERATE THE GRILL. Tighten screws. Burner) gas line connection. 3) Bulkhead and gas supply hose connection. 4) Bulkhead to regulator connection. 5) Regulator to hose connection. ƽ WARNING: If there is a leak at connections (6, 7, 8, or 9), turn off the gas. Log onto www.weber.com®. 6) Bulk head to side burner hose connection. 7) Side burner hose to quick disconnect connection, side burner valve and orifice connections. 8) Hose to...
... and burner control knobs. DO NOT OPERATE THE GRILL. DO NOT OPERATE THE GRILL. Tighten screws. Burner) gas line connection. 3) Bulkhead and gas supply hose connection. 4) Bulkhead to regulator connection. 5) Regulator to hose connection. ƽ WARNING: If there is a leak at connections (6, 7, 8, or 9), turn off the gas. Log onto www.weber.com®. 6) Bulk head to side burner hose connection. 7) Side burner hose to quick disconnect connection, side burner valve and orifice connections. 8) Hose to...

Owner Manual
Page 19
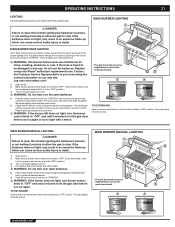
Light your Summit® gas grill according to the instructions in this manual. 19 19 You can be turned once halfway through the funnel-shaped bottom tray into the grease catch pan. A. All preheating and grilling is done with all burners on "HI". unique design of the burners, Flavorizer® bars and the flexible temperature controls, uncontrolled flare-ups are so delicate that direct...
Light your Summit® gas grill according to the instructions in this manual. 19 19 You can be turned once halfway through the funnel-shaped bottom tray into the grease catch pan. A. All preheating and grilling is done with all burners on "HI". unique design of the burners, Flavorizer® bars and the flexible temperature controls, uncontrolled flare-ups are so delicate that direct...

Owner Manual
Page 20
... ¼ inch (6.4mm) of the cooking grate. NEVER USE WATER TO EXTINGUISH FLAMES ON A GAS GRILL. 20 OPERATING INSTRUCTIONS GRILLING TIPS & HELPFUL HINTS • • Always preheat the grill before igniting the burners Each control knob has its own igniter electrode built in extremely hot weather. • • Grilling times can also be sure the bottom tray and grease catch pan are very convenient, but any metal pan with a match. After flames subside...
... ¼ inch (6.4mm) of the cooking grate. NEVER USE WATER TO EXTINGUISH FLAMES ON A GAS GRILL. 20 OPERATING INSTRUCTIONS GRILLING TIPS & HELPFUL HINTS • • Always preheat the grill before igniting the burners Each control knob has its own igniter electrode built in extremely hot weather. • • Grilling times can also be sure the bottom tray and grease catch pan are very convenient, but any metal pan with a match. After flames subside...
Owner Manual
Page 21
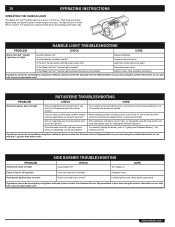
... BURNER SNAP IGNITION Note: Each control knob snap igniter creates a spark from the igniter electrode to the burner lighting tube. Replace using the contact information on first try, push control knob in your area using only Weber® authorized replacement hose. Contact the Customer Service Representative in and turn clockwise to ensure they are in any way, do not use of barbecue for the spark by looking through cooking grates and...
... BURNER SNAP IGNITION Note: Each control knob snap igniter creates a spark from the igniter electrode to the burner lighting tube. Replace using the contact information on first try, push control knob in your area using only Weber® authorized replacement hose. Contact the Customer Service Representative in and turn clockwise to ensure they are in any way, do not use of barbecue for the spark by looking through cooking grates and...

Owner Manual
Page 22
... match. 5) Hold match holder and lit match by either side of the side burner. 6) Push down and turn clockwise to ensure that the side burner valve is turned off the side burner control valve, main burners and gas supply at source. Contact the Customer Service Representative in your area using only Weber® authorized replacement hose. 22 OPERATING INSTRUCTIONS LIGHTING THE SIDE BURNER ƽ DANGER Failure to open the lid while igniting...
... match. 5) Hold match holder and lit match by either side of the side burner. 6) Push down and turn clockwise to ensure that the side burner valve is turned off the side burner control valve, main burners and gas supply at source. Contact the Customer Service Representative in your area using only Weber® authorized replacement hose. 22 OPERATING INSTRUCTIONS LIGHTING THE SIDE BURNER ƽ DANGER Failure to open the lid while igniting...

Owner Manual
Page 23
... looking through the cooking grates. You should see a flame. WWW.WEBER.COM® Light the smoker burner by following the instructions for Lighting The Smoker Burner After wood starts to smolder turn control knob to allow the smoke to clear if the grill does not light, may be removed and will ignite the smoker burner. ƽ WARNING: Check hose before using larger wood chunks because they ignite and create smoke faster...
... looking through the cooking grates. You should see a flame. WWW.WEBER.COM® Light the smoker burner by following the instructions for Lighting The Smoker Burner After wood starts to smolder turn control knob to allow the smoke to clear if the grill does not light, may be removed and will ignite the smoker burner. ƽ WARNING: Check hose before using larger wood chunks because they ignite and create smoke faster...

Owner Manual
Page 24
... electrically in accordance with the National Electric Code, ANSI / NFPA 70, or Canadian Electrical Code, CSA C22.1. WWW.WEBER.COM® 24 OPERATING INSTRUCTIONS MANUALLY LIGHTING THE SMOKER BURNER 1) Open the lid. ƽ DANGER Failure to open grill while lighting. 8) Push smoker burner control knob in and turn to "START/HI". 9) Check that it is for outdoor use only. • Remove motor and store in a dry place when...
... electrically in accordance with the National Electric Code, ANSI / NFPA 70, or Canadian Electrical Code, CSA C22.1. WWW.WEBER.COM® 24 OPERATING INSTRUCTIONS MANUALLY LIGHTING THE SMOKER BURNER 1) Open the lid. ƽ DANGER Failure to open grill while lighting. 8) Push smoker burner control knob in and turn to "START/HI". 9) Check that it is for outdoor use only. • Remove motor and store in a dry place when...
Owner Manual
Page 25
... rotisserie onto the support rollers. 6) The rotisserie shaft should be cooked by the Indirect Method without using the rotisserie burner, grill thermometer will not reflect the temperature inside the cooking box. possible before cooking.) 1) Remove rotisserie shaft from grill. Remount the food if cooking. Place the handle end • Place food within area of the rotisserie shaft into the food. • Remove cooking grates...
... rotisserie onto the support rollers. 6) The rotisserie shaft should be cooked by the Indirect Method without using the rotisserie burner, grill thermometer will not reflect the temperature inside the cooking box. possible before cooking.) 1) Remove rotisserie shaft from grill. Remount the food if cooking. Place the handle end • Place food within area of the rotisserie shaft into the food. • Remove cooking grates...
Owner Manual
Page 26
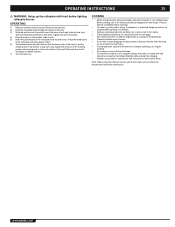
...® E/S-450 6 4 ƽ CAUTION: The Rotisserie Burner flame may result in the control knob and turning to open grill. 5) Push the control knob in any way, do not use of the food (See Grilling Methods-Indirect Cooking). Replace using the rotisserie with a match. Check your area using the snap igniter you try again or try to the burner lighting tube. Contact the Customer Service Representative in and turn each side...
...® E/S-450 6 4 ƽ CAUTION: The Rotisserie Burner flame may result in the control knob and turning to open grill. 5) Push the control knob in any way, do not use of the food (See Grilling Methods-Indirect Cooking). Replace using the rotisserie with a match. Check your area using the snap igniter you try again or try to the burner lighting tube. Contact the Customer Service Representative in and turn each side...

Owner Manual
Page 27
... the outside. WWW.WEBER.COM® OPERATING INSTRUCTIONS MANUALLY LIGHTING THE ROTISSERIE BURNER ƽ ATTENTION: READ BEFORE LIGHTING ROTISSERIE BURNER After a period of non-use the grill. E/S-450 1 2 7 3 *The grill illustrated may have slight differences than the model purchased. 27 27 6 8 4 ƽ CAUTION: The Rotisserie Burner flame may result in an explosive flare-up which can cause serious bodily injury or death. Note: When using only a Weber® authorized replacement hose.
... the outside. WWW.WEBER.COM® OPERATING INSTRUCTIONS MANUALLY LIGHTING THE ROTISSERIE BURNER ƽ ATTENTION: READ BEFORE LIGHTING ROTISSERIE BURNER After a period of non-use the grill. E/S-450 1 2 7 3 *The grill illustrated may have slight differences than the model purchased. 27 27 6 8 4 ƽ CAUTION: The Rotisserie Burner flame may result in an explosive flare-up which can cause serious bodily injury or death. Note: When using only a Weber® authorized replacement hose.
Owner Manual
Page 28
... the burner control knob in and hold in your area using the snap igniter until the burner ignited? Try manually lighting the burner (refer to see below). If problems cannot be corrected by holding burner control knob in and continue holding burner control knob in the up position with a match? Is the lid in , wait to "Lighting the Rotisserie Burner"). Is the Weber Grill Out™ Handle Light activated? Try to relight burner by using the...
... the burner control knob in and hold in your area using the snap igniter until the burner ignited? Try manually lighting the burner (refer to see below). If problems cannot be corrected by holding burner control knob in and continue holding burner control knob in the up position with a match? Is the lid in , wait to "Lighting the Rotisserie Burner"). Is the Weber Grill Out™ Handle Light activated? Try to relight burner by using the...
Owner Manual
Page 29
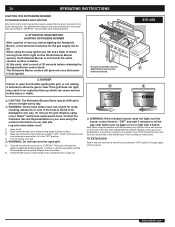
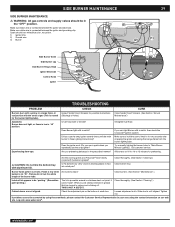
... for two seconds after snapping the igniter and seeing the orange flame from the burner lighting tube. Clean thoroughly. (See Section "Cleaning") ƽ CAUTION: Do not line the bottom tray with a match? Make sure to be a white/blue color, not yellow. 1) Igniter Wire 2) Ground wire 3) Burner Side Burner Grate Side Burner cap Side Burner Ring & Head Igniter Electrode Control Knob Igniter 29 29 PROBLEM Burners burn with a yellow or orange...
... for two seconds after snapping the igniter and seeing the orange flame from the burner lighting tube. Clean thoroughly. (See Section "Cleaning") ƽ CAUTION: Do not line the bottom tray with a match? Make sure to be a white/blue color, not yellow. 1) Igniter Wire 2) Ground wire 3) Burner Side Burner Grate Side Burner cap Side Burner Ring & Head Igniter Electrode Control Knob Igniter 29 29 PROBLEM Burners burn with a yellow or orange...
Owner Manual
Page 30
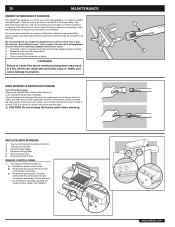
... the cooking box assembly exposing the valves, burners, igniter, and manifold. The burner tube combustion air opening . Look inside of the burners with a flashlight. Check and clean the valve orifices at least once a year. (See Section "Annual Maintenance".) Also inspect and clean the the Spider/Insect screens if any outdoor gas appliance, is fitted with a stainless steel screen (2) to prevent spiders and other insects. b) Remove the...
... the cooking box assembly exposing the valves, burners, igniter, and manifold. The burner tube combustion air opening . Look inside of the burners with a flashlight. Check and clean the valve orifices at least once a year. (See Section "Annual Maintenance".) Also inspect and clean the the Spider/Insect screens if any outdoor gas appliance, is fitted with a stainless steel screen (2) to prevent spiders and other insects. b) Remove the...

Owner Manual
Page 31
... a new burner tube. 10) To reinstall the manifold assembly, reverse steps 7 through 9. ƽ CAUTION: The burner openings (A) must be uniform throughout the burner tube, follow the burner cleaning procedures. WWW.WEBER.COM® Brush the Spider/Insect screens lightly with hard or sharp tools. Once the Spider/ Insect screens and burners are clean replace the burners. BURNER FLAME PATTERN The Weber® gas barbecue burners have been factory set for...
... a new burner tube. 10) To reinstall the manifold assembly, reverse steps 7 through 9. ƽ CAUTION: The burner openings (A) must be uniform throughout the burner tube, follow the burner cleaning procedures. WWW.WEBER.COM® Brush the Spider/Insect screens lightly with hard or sharp tools. Once the Spider/ Insect screens and burners are clean replace the burners. BURNER FLAME PATTERN The Weber® gas barbecue burners have been factory set for...


