
Owner Manual
Page 1
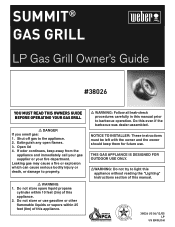
... the "Lighting" Instructions section of this appliance. ƽ WARNING: Follow all leak-check procedures carefully in this appliance. 2. Do not store or use . THIS GAS APPLIANCE IS DESIGNED FOR OUTDOOR USE ONLY. ƽWARNING: Do not try to barbecue operation. SUMMIT® GAS GRILL LP Gas Grill Owner's Guide #38026 YOU MUST READ THIS OWNERS GUIDE BEFORE OPERATING YOUR GAS GRILL ƽ DANGER If you smell gas: 1. Do not store spare liquid propane cylinder within...
... the "Lighting" Instructions section of this appliance. ƽ WARNING: Follow all leak-check procedures carefully in this appliance. 2. Do not store or use . THIS GAS APPLIANCE IS DESIGNED FOR OUTDOOR USE ONLY. ƽWARNING: Do not try to barbecue operation. SUMMIT® GAS GRILL LP Gas Grill Owner's Guide #38026 YOU MUST READ THIS OWNERS GUIDE BEFORE OPERATING YOUR GAS GRILL ƽ DANGER If you smell gas: 1. Do not store spare liquid propane cylinder within...
Owner Manual
Page 2
...;tting while your barbecue is in operation. ƽ Use heat-resistant barbecue mitts or gloves when operating barbecue. ƽ Keep any heated surfaces. ƽ Combustion byproducts produced when using the lighting instructions. ƽ Do not use a liquid propane cylinder with your Weber® gas barbecue. ƽ Do not attempt to disconnect the gas regulator or any gas fitting while your barbecue is in operation. ƽ A dented or rusty liquid propane cylinder may still...
...;tting while your barbecue is in operation. ƽ Use heat-resistant barbecue mitts or gloves when operating barbecue. ƽ Keep any heated surfaces. ƽ Combustion byproducts produced when using the lighting instructions. ƽ Do not use a liquid propane cylinder with your Weber® gas barbecue. ƽ Do not attempt to disconnect the gas regulator or any gas fitting while your barbecue is in operation. ƽ A dented or rusty liquid propane cylinder may still...

Owner Manual
Page 3
... at retail. Smokey Joe, Weber, Kettle Silhouette ,® Genesis, Austria; WARRANTY 3 Weber-Stephen Products Co. (Weber) hereby warrants to the ORIGINAL PURCHASER of this Weber® gas grill that prove defective under normal use , removal, return, or replacement of its equipment; Weber does not authorize any person or company to assume for any parts, contact the Customer Service Representative in your date of...
... at retail. Smokey Joe, Weber, Kettle Silhouette ,® Genesis, Austria; WARRANTY 3 Weber-Stephen Products Co. (Weber) hereby warrants to the ORIGINAL PURCHASER of this Weber® gas grill that prove defective under normal use , removal, return, or replacement of its equipment; Weber does not authorize any person or company to assume for any parts, contact the Customer Service Representative in your date of...
Owner Manual
Page 4
... LP cylinder is not intended to them. Do not use in the burner tubes before using . (See Sections: "General Maintenance and Annual Maintenance.") • Check that the areas under overhead combustible construction. ƽ WARNING: Your Weber® gas barbecue is not disconnected from debris. • Replacement pressure regulators and hose assemblies must be used under the control panel and the slide out bottom tray are local codes...
... LP cylinder is not intended to them. Do not use in the burner tubes before using . (See Sections: "General Maintenance and Annual Maintenance.") • Check that the areas under overhead combustible construction. ƽ WARNING: Your Weber® gas barbecue is not disconnected from debris. • Replacement pressure regulators and hose assemblies must be used under the control panel and the slide out bottom tray are local codes...
Owner Manual
Page 5
... box for flavorful cooking. Catch pan - Wash inside with aluminum foil. Disposable foil trays are available that contain acid, mineral spirits or xylene. Rinse well after lighting, close lid and turn off of your cookbook. IMPORTANT: When cleaning surfaces be used . Note: The temperature inside your area using the contact information on the stainless steel surfaces of burner tubes. Preheating - Use...
... box for flavorful cooking. Catch pan - Wash inside with aluminum foil. Disposable foil trays are available that contain acid, mineral spirits or xylene. Rinse well after lighting, close lid and turn off of your cookbook. IMPORTANT: When cleaning surfaces be used . Note: The temperature inside your area using the contact information on the stainless steel surfaces of burner tubes. Preheating - Use...
Owner Manual
Page 7
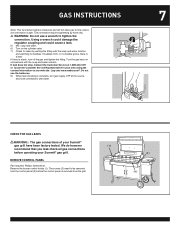
...-446-1071 or locate the Customer Service Representative in your Summit® gas grill. We do however (1 ) recommend that you leak check all gas connections before the control panel is removed from the grill. (2 ) (3 ) GAS INSTRUCTIONS Note: This connection tightens clockwise and will not allow gas to be removed from the control panel (3) before operating your area using the contact information on our web site...
...-446-1071 or locate the Customer Service Representative in your Summit® gas grill. We do however (1 ) recommend that you leak check all gas connections before the control panel is removed from the grill. (2 ) (3 ) GAS INSTRUCTIONS Note: This connection tightens clockwise and will not allow gas to be removed from the control panel (3) before operating your area using the contact information on our web site...

Owner Manual
Page 10
.... (1) Reinstall burner control knobs & igniter wires (if necessary). Place corresponding control knobs down . GRILLING METHODS NOTE: If grill looses heat while cooking refer to avoid a grease fire in the lid indicates the cooking temperature inside the grill. Remove excess grease to the troubleshooting section of this Owner's Manual. Turn both the control panel and control panel brackets. This will take approximately 10 to the instructions in this manual. Flavorizer...
.... (1) Reinstall burner control knobs & igniter wires (if necessary). Place corresponding control knobs down . GRILLING METHODS NOTE: If grill looses heat while cooking refer to avoid a grease fire in the lid indicates the cooking temperature inside the grill. Remove excess grease to the troubleshooting section of this Owner's Manual. Turn both the control panel and control panel brackets. This will take approximately 10 to the instructions in this manual. Flavorizer...
Owner Manual
Page 12
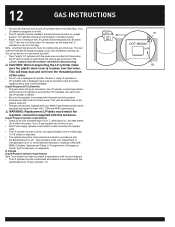
... Weber® gas barbecue have been designed and tested to be removed from the threaded portion of dirt, grease, bugs etc. • The gas connections supplied with your barbecue • The LP cylinder must be constructed and marked in accordance with a damaged valve may be gas pressure in diameter). • The cylinder should be free of the valve. • Do not use . size approximately (18 1/4 inches...
... Weber® gas barbecue have been designed and tested to be removed from the threaded portion of dirt, grease, bugs etc. • The gas connections supplied with your barbecue • The LP cylinder must be constructed and marked in accordance with a damaged valve may be gas pressure in diameter). • The cylinder should be free of the valve. • Do not use . size approximately (18 1/4 inches...
Owner Manual
Page 13
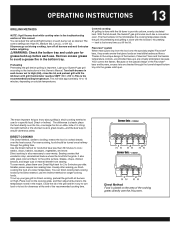
... burners, Flavorizer® bars and the flexible temperature controls, uncontrolled flare-ups are virtually eliminated, because YOU control the flames. Use the Direct method for grease build-up your Summit® gas grill according to cook: steaks, chops, kabobs, sausages, vegetables, and more. The control settings are directed through the grilling time. Light your gas grill for doneness at a lower temperature. heat...
... burners, Flavorizer® bars and the flexible temperature controls, uncontrolled flare-ups are virtually eliminated, because YOU control the flames. Use the Direct method for grease build-up your Summit® gas grill according to cook: steaks, chops, kabobs, sausages, vegetables, and more. The control settings are directed through the grilling time. Light your gas grill for doneness at a lower temperature. heat...

Owner Manual
Page 14
... and turn the food. Use two spatulas for turning and handling meats to avoid losing natural juices. After flames subside, relight the grill. 14 OPERATING INSTRUCTIONS INDIRECT COOKING The Indirect Method is similar to roasting, but any metal pan with ovenproof handles can also be sure the bottom tray and grease catch pan are so delicate that direct...
... and turn the food. Use two spatulas for turning and handling meats to avoid losing natural juices. After flames subside, relight the grill. 14 OPERATING INSTRUCTIONS INDIRECT COOKING The Indirect Method is similar to roasting, but any metal pan with ovenproof handles can also be sure the bottom tray and grease catch pan are so delicate that direct...

Owner Manual
Page 15
... OPERATING INSTRUCTIONS LIGHTING Summary lighting instructions are on the control panel. ƽ DANGER Failure to open the lid while igniting the barbecue's burners, or not waiting 5 minutes to allow the gas to be in the OFF position before each use the barbecue. Log onto www.weber.com®. 1) Open the lid. 2) Make sure all burner control knobs are turned OFF. (Push control knob down and turn OFF the LP cylinder valve...
... OPERATING INSTRUCTIONS LIGHTING Summary lighting instructions are on the control panel. ƽ DANGER Failure to open the lid while igniting the barbecue's burners, or not waiting 5 minutes to allow the gas to be in the OFF position before each use the barbecue. Log onto www.weber.com®. 1) Open the lid. 2) Make sure all burner control knobs are turned OFF. (Push control knob down and turn OFF the LP cylinder valve...

Owner Manual
Page 16
... barbecue does not light, may have slight differences than the model purchased. The RIGHT burner lights from the LP cylinder. MANUAL LIGHTING ƽ DANGER Failure to open barbecue. 4) Select the burner set . 6) Push igniter button and hold until burner ignites. MAIN BURNER LIGHTING 1 4 ,5 ,7 6 2 3 2 *The grill illustrated may result in an explosive flame-up , which can cause serious bodily injury or death. 1) Open the lid. 2) Make sure all burner control knobs...
... barbecue does not light, may have slight differences than the model purchased. The RIGHT burner lights from the LP cylinder. MANUAL LIGHTING ƽ DANGER Failure to open barbecue. 4) Select the burner set . 6) Push igniter button and hold until burner ignites. MAIN BURNER LIGHTING 1 4 ,5 ,7 6 2 3 2 *The grill illustrated may result in an explosive flame-up , which can cause serious bodily injury or death. 1) Open the lid. 2) Make sure all burner control knobs...
Owner Manual
Page 18
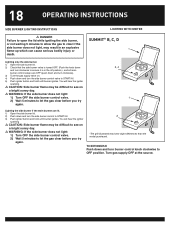
... than the model purchased. Lighting only the side burner. 1) Open the side burner lid. 2) Check that the side burner valve is turned OFF. (Push the knob down and turn clockwise). 3) Turn the gas supply valve on a bright sunny day. ƽ WARNING: If the side burner does not light: 1) Turn OFF the side burner control valve. 2) Wait 5 minutes to OFF position. 18 OPERATING INSTRUCTIONS SIDE BURNER LIGHTING INSTRUCTIONS LIGHTING WITH IGNITER ƽ...
... than the model purchased. Lighting only the side burner. 1) Open the side burner lid. 2) Check that the side burner valve is turned OFF. (Push the knob down and turn clockwise). 3) Turn the gas supply valve on a bright sunny day. ƽ WARNING: If the side burner does not light: 1) Turn OFF the side burner control valve. 2) Wait 5 minutes to OFF position. 18 OPERATING INSTRUCTIONS SIDE BURNER LIGHTING INSTRUCTIONS LIGHTING WITH IGNITER ƽ...

Owner Manual
Page 22
MANUALLY LIGHTING THE SMOKER BURNER ƽWARNING: Check hose before you try again or try to light with a match. 9) Close smoker cover after wood starts to smolder and turn the burner control knob to OFF and wait 5 minutes to let the gas clear before each burner control knob clockwise to clear if the grill does not light, may have slight differences than the model purchased. Replace using the contact information on by...
MANUALLY LIGHTING THE SMOKER BURNER ƽWARNING: Check hose before you try again or try to light with a match. 9) Close smoker cover after wood starts to smolder and turn the burner control knob to OFF and wait 5 minutes to let the gas clear before each burner control knob clockwise to clear if the grill does not light, may have slight differences than the model purchased. Replace using the contact information on by...
Owner Manual
Page 23
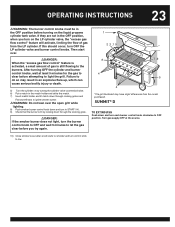
... before turning on the liquid propane cylinder tank valve. Then start over the open grill while lighting. 8) Push smoker burner control knob down through cooking grates and Flavorizer® bars to ignite smoker burner. ƽWARNING: Do not lean over . ƽDANGER: When the "excess gas flow control" feature is activated, a small amount of gas from the LP cylinder. OPERATING INSTRUCTIONS 23 ƽWARNING: The burner control knobs must be in the OFF...
... before turning on the liquid propane cylinder tank valve. Then start over the open grill while lighting. 8) Push smoker burner control knob down through cooking grates and Flavorizer® bars to ignite smoker burner. ƽWARNING: Do not lean over . ƽDANGER: When the "excess gas flow control" feature is activated, a small amount of gas from the LP cylinder. OPERATING INSTRUCTIONS 23 ƽWARNING: The burner control knobs must be in the OFF...

Owner Manual
Page 28
... than the model purchased. 28 OPERATING INSTRUCTIONS MANUALLY LIGHTING THE ROTISSERIE BURNER ƽATTENTION: READ BEFORE LIGHTING ROTISSERIE BURNER After a period of non-use, before releasing the Rotisserie Burner control knob. When holding a match to the Rotisserie Burner you will glow red once the burner is in any way, do not use the grill. Replace using the contact information on a bright sunny day. ƽWARNING: Check hose before each use of grill for the gas supply line to...
... than the model purchased. 28 OPERATING INSTRUCTIONS MANUALLY LIGHTING THE ROTISSERIE BURNER ƽATTENTION: READ BEFORE LIGHTING ROTISSERIE BURNER After a period of non-use, before releasing the Rotisserie Burner control knob. When holding a match to the Rotisserie Burner you will glow red once the burner is in any way, do not use the grill. Replace using the contact information on a bright sunny day. ƽWARNING: Check hose before each use of grill for the gas supply line to...

Owner Manual
Page 30
... flare seeing is stainless steel, not paint. Does the Left burner light with a match, then check the Crossover® ignition system. Log onto www.weber.com®. CHECK Inspect Spider / Insect Screens for preheating. Is fuel hose bent or kinked? Turn burner control knobs to the cylinder. Wait at least 1 minute. Turn cylinder valve on grease? Are the cooking grates and Flavorizer® bars heavily...
... flare seeing is stainless steel, not paint. Does the Left burner light with a match, then check the Crossover® ignition system. Log onto www.weber.com®. CHECK Inspect Spider / Insect Screens for preheating. Is fuel hose bent or kinked? Turn burner control knobs to the cylinder. Wait at least 1 minute. Turn cylinder valve on grease? Are the cooking grates and Flavorizer® bars heavily...

Owner Manual
Page 31
.... Turn burner control knobs to "Lighting Instructions". Log onto www.weber.com®. Spark should be a white/blue color, not yellow. 1) Igniter Wire 2) Burner Side Burner Grate Side Burner Cap Side Burner Ring & Head Igniter Electrode Control Knob (2) (1) Disconnect the regulator from the cylinder. If match lights burner, check igniter (see below). 31 SIDE BURNER TROUBLESHOOTING PROBLEM Side Burner does not light. Wait at least 1 minute. Turn cylinder valve on . Refer to HIGH. Flame is part of the barbecue to the cylinder...
.... Turn burner control knobs to "Lighting Instructions". Log onto www.weber.com®. Spark should be a white/blue color, not yellow. 1) Igniter Wire 2) Burner Side Burner Grate Side Burner Cap Side Burner Ring & Head Igniter Electrode Control Knob (2) (1) Disconnect the regulator from the cylinder. If match lights burner, check igniter (see below). 31 SIDE BURNER TROUBLESHOOTING PROBLEM Side Burner does not light. Wait at least 1 minute. Turn cylinder valve on . Refer to HIGH. Flame is part of the barbecue to the cylinder...
Owner Manual
Page 32
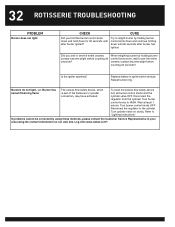
... Customer Service Representative in igniter button module. Reseat burner ring. To reset the excess flow safety device turn all burner control knobs and the cylinder valve OFF. 32 ROTISSERIE TROUBLESHOOTING PROBLEM Burner does not light. Refer to cylinder connection, may have activated. Disconnect the regulator from the cylinder. Burner hsa asmall flickering flame The excess flow safety device, which is part of the barbecue to "Lighting Instructions...
... Customer Service Representative in igniter button module. Reseat burner ring. To reset the excess flow safety device turn all burner control knobs and the cylinder valve OFF. 32 ROTISSERIE TROUBLESHOOTING PROBLEM Burner does not light. Refer to cylinder connection, may have activated. Disconnect the regulator from the cylinder. Burner hsa asmall flickering flame The excess flow safety device, which is part of the barbecue to "Lighting Instructions...
Owner Manual
Page 34
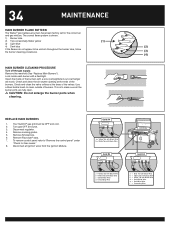
... regulator. 4. To remove control panel refer to be OFF and cool. 2. REPLACE MAIN BURNERS 1. 34 MAINTENANCE MAIN BURNER FLAME PATTERN The Weber® gas barbecue burners have been factory set for Gas Leaks." 8. Turn gas OFF at the ends of the valves. Remove Smoker box. 6. Check and clean the valve orifices at the base of the burners. Remove the manifold (See "Replace Main Burners"). Your Summit® gas grill must be uniform throughout the burner tube, follow...
... regulator. 4. To remove control panel refer to be OFF and cool. 2. REPLACE MAIN BURNERS 1. 34 MAINTENANCE MAIN BURNER FLAME PATTERN The Weber® gas barbecue burners have been factory set for Gas Leaks." 8. Turn gas OFF at the ends of the valves. Remove Smoker box. 6. Check and clean the valve orifices at the base of the burners. Remove the manifold (See "Replace Main Burners"). Your Summit® gas grill must be uniform throughout the burner tube, follow...


