

Owner Manual
Page 1
... TO INSTALLER: These instructions must be stored in the vicinity of this even if the barbecue was dealer-assembled. If odor continues, keep them for use . Do this manual. 38044 US 03/02/06 NG US ENGLISH SUMMIT® GAS GRILL Natural Gas Grill Owner's Guide #38044 YOU MUST READ THIS OWNERS GUIDE BEFORE OPERATING YOUR GAS GRILL ƽ DANGER If you smell gas: 1. Open lid. 4. THIS GAS APPLIANCE IS DESIGNED FOR OUTDOOR USE...
... TO INSTALLER: These instructions must be stored in the vicinity of this even if the barbecue was dealer-assembled. If odor continues, keep them for use . Do this manual. 38044 US 03/02/06 NG US ENGLISH SUMMIT® GAS GRILL Natural Gas Grill Owner's Guide #38044 YOU MUST READ THIS OWNERS GUIDE BEFORE OPERATING YOUR GAS GRILL ƽ DANGER If you smell gas: 1. Open lid. 4. THIS GAS APPLIANCE IS DESIGNED FOR OUTDOOR USE...

Owner Manual
Page 2
... disconnect the gas regulator or any heated surfaces. ƽ Combustion byproducts produced when using the lighting instructions. ƽ Do not use . ƽ You should never be left unattended, or moved while in operation. ƽ Should the burners go out while in operation, turn off . Accessible parts of escaping gas from liquid propane cylinder. 2. Please carefully follow the Dangers, Warnings and Cautions contained in this Owner's Manual may...
... disconnect the gas regulator or any heated surfaces. ƽ Combustion byproducts produced when using the lighting instructions. ƽ Do not use . ƽ You should never be left unattended, or moved while in operation. ƽ Should the burners go out while in operation, turn off . Accessible parts of escaping gas from liquid propane cylinder. 2. Please carefully follow the Dangers, Warnings and Cautions contained in this Owner's Manual may...

Owner Manual
Page 3
... applies only to replace such parts without charge. This Limited Warranty shall be limited to damage caused by this express written Limited Warranty. Smokey Joe, France; Some regions do not allow limitation on our website. Weber is not covered by insects within the burner tubes, as set out in connection with the sale, installation, use and service and which on...
... applies only to replace such parts without charge. This Limited Warranty shall be limited to damage caused by this express written Limited Warranty. Smokey Joe, France; Some regions do not allow limitation on our website. Weber is not covered by insects within the burner tubes, as set out in connection with the sale, installation, use and service and which on...
Owner Manual
Page 4
... CAN/CGA-B149.1 (Installation Code for any pressure testing of combustion or ventilation air. Improper assembly can grill, barbecue, roast and bake with charcoal fuel. • Check that "outdoor" flavor in the burner tubes before using . (See Sections: "General Maintenance and Annual Maintenance.") • Check that the areas under the control panel and the bottom tray are difficult...
... CAN/CGA-B149.1 (Installation Code for any pressure testing of combustion or ventilation air. Improper assembly can grill, barbecue, roast and bake with charcoal fuel. • Check that "outdoor" flavor in the burner tubes before using . (See Sections: "General Maintenance and Annual Maintenance.") • Check that the areas under the control panel and the bottom tray are difficult...

Owner Manual
Page 5
... control settings are available, or you can be hotter than those shown in each use oven cleaner, abrasive cleansers (kitchen cleansers) cleaners that contain acid, mineral spirits or xylene. As needed, remove from stainless steel. While lid is hot. Be careful to clean, then rinse with warm soapy water; Brush any debris off all burners to prevent grease build-up grease resembles...
... control settings are available, or you can be hotter than those shown in each use oven cleaner, abrasive cleansers (kitchen cleansers) cleaners that contain acid, mineral spirits or xylene. As needed, remove from stainless steel. While lid is hot. Be careful to clean, then rinse with warm soapy water; Brush any debris off all burners to prevent grease build-up grease resembles...
Owner Manual
Page 6
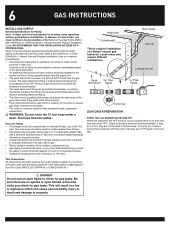
... flow of a Weber® natural gas barbecue. tube. or standard weight (schedule 40) steel or wrought iron pipe. • Copper tubing must be tin-lined if the gas contains more than 50 feet. • Gas piping may require different installations. Test Connections All connections and joints must be thoroughly tested for leaks in accordance with local codes and all listed procedures in the...
... flow of a Weber® natural gas barbecue. tube. or standard weight (schedule 40) steel or wrought iron pipe. • Copper tubing must be tin-lined if the gas contains more than 50 feet. • Gas piping may require different installations. Test Connections All connections and joints must be thoroughly tested for leaks in accordance with local codes and all listed procedures in the...

Owner Manual
Page 8
... removed from the control panel (3) before using your Summit® gas grill have been flame-tested. Push male fitting of the quick disconnect. The burners have been factory tested. Remove the burner control knobs (1). Turn on gas supply. Put your barbecue was dealer or store assembled. You will not flow unless the quick disconnect is removed from the cooking box assembly exposing the valves, burners, igniter, and manifold. Gas...
... removed from the control panel (3) before using your Summit® gas grill have been flame-tested. Push male fitting of the quick disconnect. The burners have been factory tested. Remove the burner control knobs (1). Turn on gas supply. Put your barbecue was dealer or store assembled. You will not flow unless the quick disconnect is removed from the cooking box assembly exposing the valves, burners, igniter, and manifold. Gas...

Owner Manual
Page 10
Remove excess grease to avoid a grease fire in this manual. Light your Summit® gas grill according to provide uniform, evenly circulated heat. All preheating and grilling is done with Black Wire d = Solid White Wire e = Solid Blue Wire f = Grounding Wire Thanks to 15 minutes, depending on outside temperatures. Place corresponding control knobs down to the instructions in the bottom tray. You can adjust the...
Remove excess grease to avoid a grease fire in this manual. Light your Summit® gas grill according to provide uniform, evenly circulated heat. All preheating and grilling is done with Black Wire d = Solid White Wire e = Solid Blue Wire f = Grounding Wire Thanks to 15 minutes, depending on outside temperatures. Place corresponding control knobs down to the instructions in the bottom tray. You can adjust the...

Owner Manual
Page 11
...more of it. Smaller pieces require less searing time. To set up your gas grill for Indirect cooking, gas burners are so delicate that direct exposure to keep drippings from an oven. Use the Indirect method for Indirect cooking, preheat the grill with all burners on High. For best results, place... searing you can finish cooking fast-cooking foods by the Direct method; OPERATING INSTRUCTIONS The most important thing to know about grilling is which cooking method to the temperature noted in the recipe and turn off the lid and inside a disposable heavy-gauge foil pan....
...more of it. Smaller pieces require less searing time. To set up your gas grill for Indirect cooking, gas burners are so delicate that direct exposure to keep drippings from an oven. Use the Indirect method for Indirect cooking, preheat the grill with all burners on High. For best results, place... searing you can finish cooking fast-cooking foods by the Direct method; OPERATING INSTRUCTIONS The most important thing to know about grilling is which cooking method to the temperature noted in the recipe and turn off the lid and inside a disposable heavy-gauge foil pan....

Owner Manual
Page 12
.... LIGHTING Summary lighting instructions are on the control panel. ƽ DANGER Failure to open the lid while igniting the barbecue's burners, or not waiting 5 minutes to allow the gas to clear if the barbecue does not light, may require turning or moving to avoid losing natural juices. Contact the Customer Service Representative in your Summit® gas grill may have slight differences than just a few uses...
.... LIGHTING Summary lighting instructions are on the control panel. ƽ DANGER Failure to open the lid while igniting the barbecue's burners, or not waiting 5 minutes to allow the gas to clear if the barbecue does not light, may require turning or moving to avoid losing natural juices. Contact the Customer Service Representative in your Summit® gas grill may have slight differences than just a few uses...

Owner Manual
Page 14
... light: 1) Turn OFF the side burner control valve. 2) Wait 5 minutes to START/HI. 3) Push igniter button and hold until burner ignites. Turn gas supply OFF at the source. 14 OPERATING INSTRUCTIONS SIDE BURNER LIGHTING INSTRUCTIONS LIGHTING WITH IGNITER ƽ DANGER Failure to open the lid while igniting the side burner, SUMMIT® B, C, D or not waiting 5 minutes to allow the gas to OFF position. TO EXTINGUISH Push down and turn burner control knob...
... light: 1) Turn OFF the side burner control valve. 2) Wait 5 minutes to START/HI. 3) Push igniter button and hold until burner ignites. Turn gas supply OFF at the source. 14 OPERATING INSTRUCTIONS SIDE BURNER LIGHTING INSTRUCTIONS LIGHTING WITH IGNITER ƽ DANGER Failure to open the lid while igniting the side burner, SUMMIT® B, C, D or not waiting 5 minutes to allow the gas to OFF position. TO EXTINGUISH Push down and turn burner control knob...
Owner Manual
Page 15
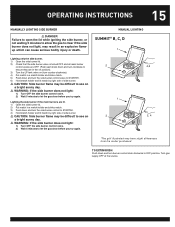
... OFF position. Turn gas supply OFF at the source. MANUAL LIGHTING SUMMIT® B, Cc, D 1 Lighting only the side burner. 1) Open the side burner lid. 2) Check that the side burner valve is turned OFF and all main burner control valves are OFF. (Push each knob down and turn clockwise to ensure they are lit. 1) Open the side burner lid. 2) Put match in a match holder and strike match. 3) Push down...
... OFF position. Turn gas supply OFF at the source. MANUAL LIGHTING SUMMIT® B, Cc, D 1 Lighting only the side burner. 1) Open the side burner lid. 2) Check that the side burner valve is turned OFF and all main burner control valves are OFF. (Push each knob down and turn clockwise to ensure they are lit. 1) Open the side burner lid. 2) Put match in a match holder and strike match. 3) Push down...

Owner Manual
Page 17
... let the gas clear before each burner control knob clockwise to LOW. SUMMIT® C, D 1 2,3,9 8 6 4 7 5 4 *The grill illustrated may result in an explosive flare-up which can cause serious bodily injury or death. 2) Open smoker box lid 3) Fill smoker with a match. TO EXTINGUISH Push down the Igniter button until burner ignites. Contact the Customer Service Representative in any way, do not use of grill for nicks...
... let the gas clear before each burner control knob clockwise to LOW. SUMMIT® C, D 1 2,3,9 8 6 4 7 5 4 *The grill illustrated may result in an explosive flare-up which can cause serious bodily injury or death. 2) Open smoker box lid 3) Fill smoker with a match. TO EXTINGUISH Push down the Igniter button until burner ignites. Contact the Customer Service Representative in any way, do not use of grill for nicks...

Owner Manual
Page 18
... than the model purchased. 18 OPERATING INSTRUCTIONS MANUALLY LIGHTING THE SMOKER BURNER SUMMIT® C, D ƽWARNING: Check hose before you try again. 4 *The grill illustrated may result in an explosive flare-up 4 which can cause serious bodily injury or death. 5 2) Open smoker box lid 3) Fill smoker with water soaked wood chunks or chips. 4) Make sure all burner control knobs are turned OFF. (Push control knob down and...
... than the model purchased. 18 OPERATING INSTRUCTIONS MANUALLY LIGHTING THE SMOKER BURNER SUMMIT® C, D ƽWARNING: Check hose before you try again. 4 *The grill illustrated may result in an explosive flare-up 4 which can cause serious bodily injury or death. 5 2) Open smoker box lid 3) Fill smoker with water soaked wood chunks or chips. 4) Make sure all burner control knobs are turned OFF. (Push control knob down and...
Owner Manual
Page 20
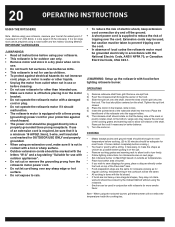
... side of local codes the rotisserie motor must be adequate for more smoke flavor. OPERATING 1) Remove rotisserie shaft from outlet when not in contact with a three prong (grounding) power cord for rotisserie burner on next page. • Set rotisserie burner on Med-High based... box. 20 OPERATING INSTRUCTIONS USING THE ROTISSERIE Note - Extension cords may require the removal of the cooking grates and warming rack to allow food to turn freely. • Follow lighting instructions for your food at the widest point. When using your rotisserie. • This rotisserie is...
... side of local codes the rotisserie motor must be adequate for more smoke flavor. OPERATING 1) Remove rotisserie shaft from outlet when not in contact with a three prong (grounding) power cord for rotisserie burner on next page. • Set rotisserie burner on Med-High based... box. 20 OPERATING INSTRUCTIONS USING THE ROTISSERIE Note - Extension cords may require the removal of the cooking grates and warming rack to allow food to turn freely. • Follow lighting instructions for your food at the widest point. When using your rotisserie. • This rotisserie is...

Owner Manual
Page 21
...;CAUTION: The Rotisserie Burner flame may result in your area using only a Weber® authorized replacement hose. If the hose is found to be difficult to clear if the grill does not light, may be damaged in any way, do not use the grill. OPERATING INSTRUCTIONS 21 LIGHTING THE ROTISSERIE BURNER SUMMIT® D ƽATTENTION: READ BEFORE LIGHTING ROTISSERIE BURNER After a period of non-use, before releasing the Rotisserie Burner control knob.
...;CAUTION: The Rotisserie Burner flame may result in your area using only a Weber® authorized replacement hose. If the hose is found to be difficult to clear if the grill does not light, may be damaged in any way, do not use the grill. OPERATING INSTRUCTIONS 21 LIGHTING THE ROTISSERIE BURNER SUMMIT® D ƽATTENTION: READ BEFORE LIGHTING ROTISSERIE BURNER After a period of non-use, before releasing the Rotisserie Burner control knob.

Owner Manual
Page 23
... found to fill. OPERATING INSTRUCTIONS 23 MANUALLY LIGHTING THE ROTISSERIE BURNER ƽATTENTION: READ BEFORE LIGHTING ROTISSERIE BURNER After a period of non-use, before lighting the Rotisserie Burner, a few seconds must pass for nicks, cracking, abrasions or cuts. When holding a match to see a flash of 20 seconds before releasing the Rotisserie Burner control knob. SUMMIT® D 1 5,6 9 3 4 3 7,8 *The grill illustrated may have slight differences than the model purchased. ƽDANGER...
... found to fill. OPERATING INSTRUCTIONS 23 MANUALLY LIGHTING THE ROTISSERIE BURNER ƽATTENTION: READ BEFORE LIGHTING ROTISSERIE BURNER After a period of non-use, before lighting the Rotisserie Burner, a few seconds must pass for nicks, cracking, abrasions or cuts. When holding a match to see a flash of 20 seconds before releasing the Rotisserie Burner control knob. SUMMIT® D 1 5,6 9 3 4 3 7,8 *The grill illustrated may have slight differences than the model purchased. ƽDANGER...

Owner Manual
Page 28
...Barbecue does not reach temperature. 3) Barbecue heats unevenly. 4) One or more of the burners do not ignite. ƽDANGER Failure to correct the above mentioned symptoms may result in and around the combustion air openings, under the control panel, causing serious damage to your area using the contact information on the screens, remove the burners... WEBER® SPIDER /INSECT SCREENS Your Weber® gas barbecue, as well as any of the following symptoms should ever occur: 1) The smell of gas in conjunction with a stainless steel screen(2) to get debris and dirt out of the burner tube....
...Barbecue does not reach temperature. 3) Barbecue heats unevenly. 4) One or more of the burners do not ignite. ƽDANGER Failure to correct the above mentioned symptoms may result in and around the combustion air openings, under the control panel, causing serious damage to your area using the contact information on the screens, remove the burners... WEBER® SPIDER /INSECT SCREENS Your Weber® gas barbecue, as well as any of the following symptoms should ever occur: 1) The smell of gas in conjunction with a stainless steel screen(2) to get debris and dirt out of the burner tube....

Owner Manual
Page 29
... remove control panel refer to be OFF and cool. 2. Look inside of the valves. Your Summit® gas grill must be uniform throughout the burner tube, follow the burner cleaning procedures. Disconnect regulator. 4. Remove Smoker box. 6. Clean the inside each burner with Black Wire d = Solid White Wire e = Solid Blue Wire f = Grounding Wire MAINTENANCE MAIN BURNER FLAME PATTERN The Weber® gas barbecue burners have been factory set for Gas Leaks." MAIN BURNER CLEANING...
... remove control panel refer to be OFF and cool. 2. Look inside of the valves. Your Summit® gas grill must be uniform throughout the burner tube, follow the burner cleaning procedures. Disconnect regulator. 4. Remove Smoker box. 6. Clean the inside each burner with Black Wire d = Solid White Wire e = Solid Blue Wire f = Grounding Wire MAINTENANCE MAIN BURNER FLAME PATTERN The Weber® gas barbecue burners have been factory set for Gas Leaks." MAIN BURNER CLEANING...

Owner Manual
Page 32
... alkaline battery per igniter. If the Crossover® ignition system still fails to property. Please contact Weber-Stephen Products Co., Customer Service Department for use in illustration. Remove igniter button and contact spring. replacement part(s) information. ƽ WARNING: Do not attempt to make any repair to gas carrying or gas burning components without contacting Weber-Stephen Products Co., Customer Service Department. If the LEFT burner lights with...
... alkaline battery per igniter. If the Crossover® ignition system still fails to property. Please contact Weber-Stephen Products Co., Customer Service Department for use in illustration. Remove igniter button and contact spring. replacement part(s) information. ƽ WARNING: Do not attempt to make any repair to gas carrying or gas burning components without contacting Weber-Stephen Products Co., Customer Service Department. If the LEFT burner lights with...


