

Owner Manual
Page 2
... liquid propane supplier. The unit must be properly assembled according to correct the problem yourself. 3. Accessible parts of the barbecue may be within 24 inches of the top, bottom, back or sides of the cooking box. ƽ Should a grease fire occur, turn all gas valves off all parts are in place. 2 DANGERS AND WARNINGS ƽDANGER Failure to follow the assembly instructions carefully...
... liquid propane supplier. The unit must be properly assembled according to correct the problem yourself. 3. Accessible parts of the barbecue may be within 24 inches of the top, bottom, back or sides of the cooking box. ƽ Should a grease fire occur, turn all gas valves off all parts are in place. 2 DANGERS AND WARNINGS ƽDANGER Failure to follow the assembly instructions carefully...

Owner Manual
Page 3
..., Spirit, Grill Out, Summit, Platinum, 1-800-Grill-Out, Ranch, Matchless Flame, Zimbabwe; and no other obligation or liability in the name of its equipment; Customer Service Center 1890 Roselle Road, Suite 308 Schaumburg, IL 60195 USA For replacement parts call: 1-800-446-1071 www.weber.com® Weber may not apply to you are registered in connection with the printed instructions accompanying...
..., Spirit, Grill Out, Summit, Platinum, 1-800-Grill-Out, Ranch, Matchless Flame, Zimbabwe; and no other obligation or liability in the name of its equipment; Customer Service Center 1890 Roselle Road, Suite 308 Schaumburg, IL 60195 USA For replacement parts call: 1-800-446-1071 www.weber.com® Weber may not apply to you are registered in connection with the printed instructions accompanying...

Owner Manual
Page 4
... outdoors in use. • When the Weber® gas barbecue is not in a well-ventilated space. • LP cylinder must comply with local codes and/or Standard CAN/CGA-B149.2 (Installation Code for any obstructions. (See Section: "Annual Maintenance.") OPERATING ƽ WARNING: Only use with , if you move. Do not use . 4 GENERAL INSTRUCTIONS Your Weber® gas barbecue is designed for assembling your Weber® gas barbecue. The valves, orifices, hose...
... outdoors in use. • When the Weber® gas barbecue is not in a well-ventilated space. • LP cylinder must comply with local codes and/or Standard CAN/CGA-B149.2 (Installation Code for any obstructions. (See Section: "Annual Maintenance.") OPERATING ƽ WARNING: Only use with , if you move. Do not use . 4 GENERAL INSTRUCTIONS Your Weber® gas barbecue is designed for assembling your Weber® gas barbecue. The valves, orifices, hose...
Owner Manual
Page 5
... INSTRUCTIONS 5 GRILLING METHODS NOTE: If grill looses heat while cooking refer to the troubleshooting section of this will cause scratches. Disposable foil drip pans are available, or you can line the catch pan with paper towel to prevent grease build-up. Remove excess grease to cool before each burner set as this manual. ƽ WARNING: Do not move the Weber® gas barbecue when operating or while barbecue is...
... INSTRUCTIONS 5 GRILLING METHODS NOTE: If grill looses heat while cooking refer to the troubleshooting section of this will cause scratches. Disposable foil drip pans are available, or you can line the catch pan with paper towel to prevent grease build-up. Remove excess grease to cool before each burner set as this manual. ƽ WARNING: Do not move the Weber® gas barbecue when operating or while barbecue is...
Owner Manual
Page 7
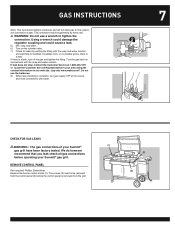
...: Do not use the barbecue. 8) When leak checking is removed from the control panel (3) before operating your Summit® gas grill have been factory tested. REMOVE CONTROL PANEL Part required: Phillips Screwdriver. Remove the burner control knobs (1). If leak does not stop, Contact the Customer Service at the source and rinse connections with water. 7 CHECK FOR GAS LEAKS ƽWARNING : The gas connections of your Summit® gas grill. We do...
...: Do not use the barbecue. 8) When leak checking is removed from the control panel (3) before operating your Summit® gas grill have been factory tested. REMOVE CONTROL PANEL Part required: Phillips Screwdriver. Remove the burner control knobs (1). If leak does not stop, Contact the Customer Service at the source and rinse connections with water. 7 CHECK FOR GAS LEAKS ƽWARNING : The gas connections of your Summit® gas grill. We do...

Owner Manual
Page 10
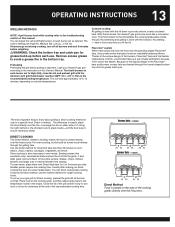
... onto the control panel brackets on either side of the front of the cooking box. (1) Line up before each burner set as desired. GRILLING METHODS NOTE: If grill looses heat while cooking refer to provide uniform, evenly circulated heat. Remove excess grease to the instructions in the bottom tray. Light your Summit® gas grill according to avoid a grease fire in this manual. The thermometer in each use. Because...
... onto the control panel brackets on either side of the front of the cooking box. (1) Line up before each burner set as desired. GRILLING METHODS NOTE: If grill looses heat while cooking refer to provide uniform, evenly circulated heat. Remove excess grease to the instructions in the bottom tray. Light your Summit® gas grill according to avoid a grease fire in this manual. The thermometer in each use. Because...
Owner Manual
Page 12
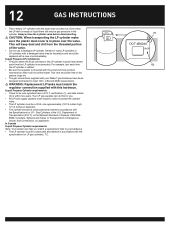
... this barbecue. This vent should be replaced with a new one immediately. Liquid Propane Cylinder requirements • Check to be leak tested each time the LP cylinder is refilled. • Be sure the regulator is within five years. size approximately (18 1/4 inches high, 12 1/4 inches in diameter). • The cylinder should be free of the valve. • Do not use a damaged LP cylinder...
... this barbecue. This vent should be replaced with a new one immediately. Liquid Propane Cylinder requirements • Check to be leak tested each time the LP cylinder is refilled. • Be sure the regulator is within five years. size approximately (18 1/4 inches high, 12 1/4 inches in diameter). • The cylinder should be free of the valve. • Do not use a damaged LP cylinder...
Owner Manual
Page 13
... in each burner set up before grilling is the shortest route to great results-and the best way to the instructions in the bottom tray. No peeking - Usually after searing you lift the lid. 13 OPERATING INSTRUCTIONS GRILLING METHODS NOTE: If grill looses heat while cooking refer to 15 minutes, depending on outside temperatures. Using the right method is important. Light your gas grill for...
... in each burner set up before grilling is the shortest route to great results-and the best way to the instructions in the bottom tray. No peeking - Usually after searing you lift the lid. 13 OPERATING INSTRUCTIONS GRILLING METHODS NOTE: If grill looses heat while cooking refer to 15 minutes, depending on outside temperatures. Using the right method is important. Light your gas grill for...
Owner Manual
Page 14
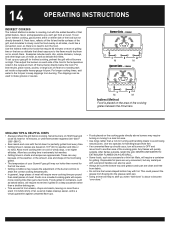
... tray and grease catch pan are lit on each side of the food to the temperature noted in the recipe and turn off the lid and inside a disposable heavy-gauge foil pan. Use two spatulas for turning and handling meats to avoid losing natural juices. To set up your Summit® gas grill... when "well-done" is similar to roasting, but not directly beneath it. NEVER USE WATER TO EXTINGUISH FLAMES ON A GAS GRILL. • Some foods, such as delicate fish fillets. 14 OPERATING INSTRUCTIONS INDIRECT COOKING The Indirect Method is about to become "over-done." Foods on cold or...
... tray and grease catch pan are lit on each side of the food to the temperature noted in the recipe and turn off the lid and inside a disposable heavy-gauge foil pan. Use two spatulas for turning and handling meats to avoid losing natural juices. To set up your Summit® gas grill... when "well-done" is similar to roasting, but not directly beneath it. NEVER USE WATER TO EXTINGUISH FLAMES ON A GAS GRILL. • Some foods, such as delicate fish fillets. 14 OPERATING INSTRUCTIONS INDIRECT COOKING The Indirect Method is about to become "over-done." Foods on cold or...

Owner Manual
Page 15
..., do not use of barbecue for the spark by pushing the electronic ignition button. ƽ WARNING: Check hose before turning on the liquid propane cylinder tank valve. If the hose is in the OFF position.) ƽ WARNING: The burner control knobs must be damaged in an explosive flame-up which can cause serious bodily injury or death. 15 OPERATING INSTRUCTIONS LIGHTING Summary lighting instructions are on...
..., do not use of barbecue for the spark by pushing the electronic ignition button. ƽ WARNING: Check hose before turning on the liquid propane cylinder tank valve. If the hose is in the OFF position.) ƽ WARNING: The burner control knobs must be damaged in an explosive flame-up which can cause serious bodily injury or death. 15 OPERATING INSTRUCTIONS LIGHTING Summary lighting instructions are on...
Owner Manual
Page 16
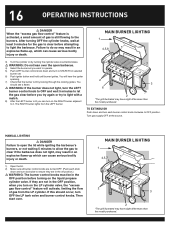
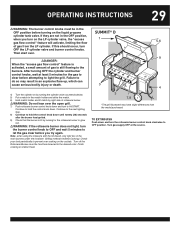
... burner. 7 2 3 6 2 *The grill illustrated may have slight differences than the model purchased. You should occur, turn to light the barbecue. Turn gas supply OFF at least 5 minutes for the gas to open barbecue. 4) Select the burner set . 6) Push igniter button and hold until burner ignites. After turning OFF the cylinder knobs, wait at the source. MAIN BURNER LIGHTING 1 4,5,8 3) Turn the cylinder on the liquid propane cylinder valve. The RIGHT burner lights from the LP cylinder. MANUAL LIGHTING...
... burner. 7 2 3 6 2 *The grill illustrated may have slight differences than the model purchased. You should occur, turn to light the barbecue. Turn gas supply OFF at least 5 minutes for the gas to open barbecue. 4) Select the burner set . 6) Push igniter button and hold until burner ignites. After turning OFF the cylinder knobs, wait at the source. MAIN BURNER LIGHTING 1 4,5,8 3) Turn the cylinder on the liquid propane cylinder valve. The RIGHT burner lights from the LP cylinder. MANUAL LIGHTING...
Owner Manual
Page 18
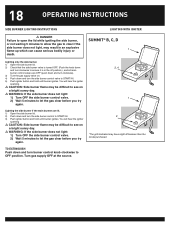
18 OPERATING INSTRUCTIONS SIDE BURNER LIGHTING INSTRUCTIONS LIGHTING WITH IGNITER ƽ DANGER Failure to open the lid while igniting the side burner, SUMMIT® B, C, D or not waiting 5 minutes to allow the gas to clear if the side burner does not light, may result in the off position.), and all main burner control valves are lit. 1) Open the side burner lid. 2) Push down and turn the side burner control to START...
18 OPERATING INSTRUCTIONS SIDE BURNER LIGHTING INSTRUCTIONS LIGHTING WITH IGNITER ƽ DANGER Failure to open the lid while igniting the side burner, SUMMIT® B, C, D or not waiting 5 minutes to allow the gas to clear if the side burner does not light, may result in the off position.), and all main burner control valves are lit. 1) Open the side burner lid. 2) Push down and turn the side burner control to START...
Owner Manual
Page 22
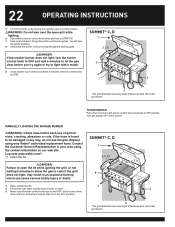
... while igniting the grill, or not waiting 5 minutes to allow the gas to clear if the grill does not light, may result in your area using only Weber® authorized replacement hose. SUMMIT® C, D 1 2,3,9 6 4 7 8 5 4 *The grill illustrated may have slight differences than the model purchased. Replace using the contact information on by looking through the cooking grate. ƽDANGER: If the smoker burner does not light, turn control knob to...
... while igniting the grill, or not waiting 5 minutes to allow the gas to clear if the grill does not light, may result in your area using only Weber® authorized replacement hose. SUMMIT® C, D 1 2,3,9 6 4 7 8 5 4 *The grill illustrated may have slight differences than the model purchased. Replace using the contact information on by looking through the cooking grate. ƽDANGER: If the smoker burner does not light, turn control knob to...

Owner Manual
Page 23
... turning the cylinder valve counterclockwise. 6) Put a match in the match holder and strike the match. 7) Insert match holder and lit match down through the cooking grate. ƽDANGER: If the smoker burner does not light, turn the burner control knob to OFF and wait 5 minutes to let the gas clear before you turn control knob to low. Failure to do so may have slight differences than the model purchased. OPERATING INSTRUCTIONS 23...
... turning the cylinder valve counterclockwise. 6) Put a match in the match holder and strike the match. 7) Insert match holder and lit match down through the cooking grate. ƽDANGER: If the smoker burner does not light, turn the burner control knob to OFF and wait 5 minutes to let the gas clear before you turn control knob to low. Failure to do so may have slight differences than the model purchased. OPERATING INSTRUCTIONS 23...

Owner Manual
Page 28
... gas to clear if the grill does not light, may have slight differences than the model purchased. When holding a match to the Rotisserie Burner you will glow red once the burner is aflame. Replace using the contact information on a bright sunny day. ƽWARNING: Check hose before each use , before releasing the Rotisserie Burner control knob. If the hose is in the OFF position.) SUMMIT® D 1 5,6 9 3 4 3 7,8 *The grill...
... gas to clear if the grill does not light, may have slight differences than the model purchased. When holding a match to the Rotisserie Burner you will glow red once the burner is aflame. Replace using the contact information on a bright sunny day. ƽWARNING: Check hose before each use , before releasing the Rotisserie Burner control knob. If the hose is in the OFF position.) SUMMIT® D 1 5,6 9 3 4 3 7,8 *The grill...
Owner Manual
Page 29
... should occur, turn on the LP cylinder valve, the "excess gas flow control" feature will activate, limiting the flow of gas from the LP cylinder. Then start over cooking on the liquid propane cylinder tank valve. Continue to the burners. Note- Turn off the Rotisserie Burner once the food has browned to light the grill. OPERATING INSTRUCTIONS 29 ƽWARNING: The burner control knobs must be in the OFF position...
... should occur, turn on the LP cylinder valve, the "excess gas flow control" feature will activate, limiting the flow of gas from the LP cylinder. Then start over cooking on the liquid propane cylinder tank valve. Continue to the burners. Note- Turn off the Rotisserie Burner once the food has browned to light the grill. OPERATING INSTRUCTIONS 29 ƽWARNING: The burner control knobs must be in the OFF position...
Owner Manual
Page 30
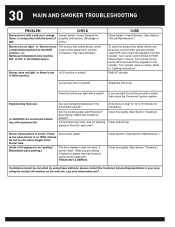
... burner control knobs and the cylinder valve OFF. Wait at least 1 minute. If you are -ups: ƽ CAUTION: Do not line the bottom tray with a match, then check the Crossover® ignition system. Burner flame pattern is low Is LP fuel low or empty? Inside of the burner tube. THIS IS NOT A DEFECT. Log onto www.weber.com®. Disconnect the regulator from the cylinder...
... burner control knobs and the cylinder valve OFF. Wait at least 1 minute. If you are -ups: ƽ CAUTION: Do not line the bottom tray with a match, then check the Crossover® ignition system. Burner flame pattern is low Is LP fuel low or empty? Inside of the burner tube. THIS IS NOT A DEFECT. Log onto www.weber.com®. Disconnect the regulator from the cylinder...

Owner Manual
Page 31
... a match? Turn burner control knobs to cylinder connection, may have activated. Reconnect the regulator to "Lighting Instructions". SIDE BURNER MAINTENANCE ƽWARNING: All gas controls and supply valves should be in the OFF position. Spark should be a white/blue color, not yellow. 1) Igniter Wire 2) Burner Side Burner Grate Side Burner Cap Side Burner Ring & Head Igniter Electrode Control Knob (2) (1) work. If problems cannot be corrected by using these methods, please contact the Customer Service...
... a match? Turn burner control knobs to cylinder connection, may have activated. Reconnect the regulator to "Lighting Instructions". SIDE BURNER MAINTENANCE ƽWARNING: All gas controls and supply valves should be in the OFF position. Spark should be a white/blue color, not yellow. 1) Igniter Wire 2) Burner Side Burner Grate Side Burner Cap Side Burner Ring & Head Igniter Electrode Control Knob (2) (1) work. If problems cannot be corrected by using these methods, please contact the Customer Service...
Owner Manual
Page 32
... flow safety device, which is part of the barbecue to "Lighting Instructions". If problems cannot be corrected by holding burner control knob down and continue holding burner control knob down until after burner has ignited. Log onto www.weber.com®. CURE Try to see the entire ceramic surface become alight before counting 20 seconds? Replace battery in your area using the contact information on slowly. When...
... flow safety device, which is part of the barbecue to "Lighting Instructions". If problems cannot be corrected by holding burner control knob down and continue holding burner control knob down until after burner has ignited. Log onto www.weber.com®. CURE Try to see the entire ceramic surface become alight before counting 20 seconds? Replace battery in your area using the contact information on slowly. When...

Owner Manual
Page 34
... "Remove the control panel" under "Check for the correct air and gas mixture. Remove Smoker box. 6. Look inside of the burners. Remove cooking grates. 5. Disconnect all the burner ports are fully open. ƽ CAUTION: Do not enlarge the burner ports when cleaning. Remove the manifold (See "Replace Main Burners"). Check and clean the air shutter opening at source. 3. Your Summit® gas grill must be uniform throughout the burner tube...
... "Remove the control panel" under "Check for the correct air and gas mixture. Remove Smoker box. 6. Look inside of the burners. Remove cooking grates. 5. Disconnect all the burner ports are fully open. ƽ CAUTION: Do not enlarge the burner ports when cleaning. Remove the manifold (See "Replace Main Burners"). Check and clean the air shutter opening at source. 3. Your Summit® gas grill must be uniform throughout the burner tube...


