
Owners Manual
Page 1
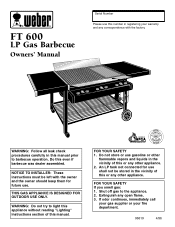
... your warranty and any correspondence with the owner and the owner should keep them for use shall not be left with the factory. NOTICE TO INSTALLER: These instructions must be stored in the vicinity of this or any other appliance. 2. Extinguish any open flame. 3. Shut off gas to barbecue operation. FT 600 LP Gas Barbecue Owners' Manual Serial Number Please use gasoline or other flammable vapors and liquids...
... your warranty and any correspondence with the owner and the owner should keep them for use shall not be left with the factory. NOTICE TO INSTALLER: These instructions must be stored in the vicinity of this or any other appliance. 2. Extinguish any open flame. 3. Shut off gas to barbecue operation. FT 600 LP Gas Barbecue Owners' Manual Serial Number Please use gasoline or other flammable vapors and liquids...
Owners Manual
Page 2
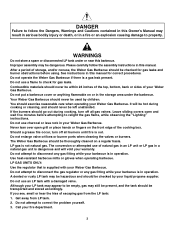
... not use of escaping gas from LP tank. 2. Never lean over open and wait five minutes before using. The conversion or attempted use charcoal or lava rock in your Weber Gas Barbecue. DANGER Failure to follow the assembly instructions in this manual for gas leaks and burner obstructions before attempting to relight the gas flame, while observing the "Lighting" instructions. Do not enlarge valve orifices or burner ports when cleaning the valves or burners. LP gas...
... not use of escaping gas from LP tank. 2. Never lean over open and wait five minutes before using. The conversion or attempted use charcoal or lava rock in your Weber Gas Barbecue. DANGER Failure to follow the assembly instructions in this manual for gas leaks and burner obstructions before attempting to relight the gas flame, while observing the "Lighting" instructions. Do not enlarge valve orifices or burner ports when cleaning the valves or burners. LP gas...
Owners Manual
Page 3
... Limited Warranty. Weber is not covered by insects within the burner tubes, as set out in this owner's manual. WARRANTY Weber-Stephen Products Co. (Weber) hereby warrants to the ORIGINAL PURCHASER of this Weber Gas Barbecue that it will be free of defects in material and workmanship from the date of purchase as follows: Aluminum Castings, 10 years, Stainless Steel Flavorizer Bars, 5 years, Cooking Grill, 3 years...
... Limited Warranty. Weber is not covered by insects within the burner tubes, as set out in this owner's manual. WARRANTY Weber-Stephen Products Co. (Weber) hereby warrants to the ORIGINAL PURCHASER of this Weber Gas Barbecue that it will be free of defects in material and workmanship from the date of purchase as follows: Aluminum Castings, 10 years, Stainless Steel Flavorizer Bars, 5 years, Cooking Grill, 3 years...

Owners Manual
Page 5
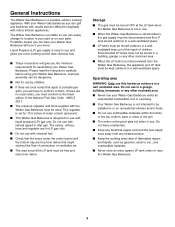
... temperature control. h) Separate burners for additional portability. 5 c) Splash guards reduce grease spatters. Contents WARNINGS 2 Warranty & Patents 3-4 General Instructions 6 Assembly 7-29 Operating Instructions Lighting 30-31 Cooking 32-33 Storage and/or Nonuse 33 Cleaning 33 Gas supply tank Information 34-36 Troubleshooting & Maintenance Annual Maintenance 36-37 General Maintenance 38-41 Troubleshooting 42 Parts Listing 44-45 c b a d b e a i h g FEATURES: a) Convenient work surfaces and racks. b) Crossover Ignition...
... temperature control. h) Separate burners for additional portability. 5 c) Splash guards reduce grease spatters. Contents WARNINGS 2 Warranty & Patents 3-4 General Instructions 6 Assembly 7-29 Operating Instructions Lighting 30-31 Cooking 32-33 Storage and/or Nonuse 33 Cleaning 33 Gas supply tank Information 34-36 Troubleshooting & Maintenance Annual Maintenance 36-37 General Maintenance 38-41 Troubleshooting 42 Parts Listing 44-45 c b a d b e a i h g FEATURES: a) Convenient work surfaces and racks. b) Crossover Ignition...
Owners Manual
Page 6
... stored outdoors in your Weber Gas Barbecue. Do not use by children. ■ If there are for use with liquid propane (LP) gas only. Please read the instructions carefully before using your Weber Gas Barbecue you can grill and barbecue with indoor kitchen appliances. This regulator is set for 10.5 inches of water column (pressure). ■ This Weber Gas Barbecue is not intended to portable gas grills, you the minimum requirements for use . The valves, orifices, hose and regulator are local codes...
... stored outdoors in your Weber Gas Barbecue. Do not use by children. ■ If there are for use with liquid propane (LP) gas only. Please read the instructions carefully before using your Weber Gas Barbecue you can grill and barbecue with indoor kitchen appliances. This regulator is set for 10.5 inches of water column (pressure). ■ This Weber Gas Barbecue is not intended to portable gas grills, you the minimum requirements for use . The valves, orifices, hose and regulator are local codes...
Owners Manual
Page 7
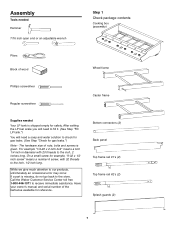
... (2) 7 For example "1/4-20 x 2 inch bolt" means a bolt 1/4 inch in diameter with 32 threads to the inch, 2 inches long. Assembly Tools needed Your LP tank is shipped empty for example, "6-32 x 1/2 inch screw" means a number 6 screw, with 20 threads to the inch, 1/2 inch long. Have your owner's manual and serial number of the barbecue available for gas leaks.") Note - Call the Weber Customer Service Center toll free 1-800-446-1071...
... (2) 7 For example "1/4-20 x 2 inch bolt" means a bolt 1/4 inch in diameter with 32 threads to the inch, 2 inches long. Assembly Tools needed Your LP tank is shipped empty for example, "6-32 x 1/2 inch screw" means a number 6 screw, with 20 threads to the inch, 1/2 inch long. Have your owner's manual and serial number of the barbecue available for gas leaks.") Note - Call the Weber Customer Service Center toll free 1-800-446-1071...

Owners Manual
Page 19
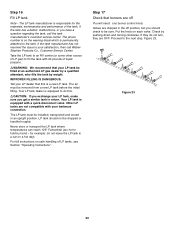
... to E with the valve facing front. Step 14 Check burner alignment Your Weber Gas Barbecue burner assembly has been factory assembled, pressure and flame tested. Figure 21 (c). (b) (a) (c) Step 15 Set LP fuel scale You will need: LP tank (empty). Figure 22 (a). Figure 21 Tank lock wing nut E F (a) (b) E F Scale setting wing nut Figure 22 19 We utilize various LP tank manufacturers. After adjusting tank scale, push tank down a couple of...
... to E with the valve facing front. Step 14 Check burner alignment Your Weber Gas Barbecue burner assembly has been factory assembled, pressure and flame tested. Figure 21 (c). (b) (a) (c) Step 15 Set LP fuel scale You will need: LP tank (empty). Figure 22 (a). Figure 21 Tank lock wing nut E F (a) (b) E F Scale setting wing nut Figure 22 19 We utilize various LP tank manufacturers. After adjusting tank scale, push tank down a couple of...
Owners Manual
Page 20
... call the tank manufacturer's customer service center. The LP tank manufacturer is permanently attached to hold by pushing down and turning clockwise. for the materials, workmanship and performance of LP tanks, see Section "Operating Instructions". Put the knob on the warning decal which is responsible for example: do not leave the LP tank in the off You will need: one burner control knob. Proceed...
... call the tank manufacturer's customer service center. The LP tank manufacturer is permanently attached to hold by pushing down and turning clockwise. for the materials, workmanship and performance of LP tanks, see Section "Operating Instructions". Put the knob on the warning decal which is responsible for example: do not leave the LP tank in the off You will need: one burner control knob. Proceed...

Owners Manual
Page 22
...gas. Contact your Weber Gas Barbecue. The burners have loosened or damaged a gas fitting. To perform leak checks: Open tank valve by wetting the connections with water. Figure 27 (a). c) Right valves...gas. Figure 26. You will result in the area while you check for leaks before using your dealer. a) Hose to manifold connection. Do not operate the barbecue. Note: All factory made connections have been thoroughly checked for leaks with soap and water. Shipping and handling may have been flame tested. b) a) c) Check for leaks by turning the tank valve...
...gas. Contact your Weber Gas Barbecue. The burners have loosened or damaged a gas fitting. To perform leak checks: Open tank valve by wetting the connections with water. Figure 27 (a). c) Right valves...gas. Figure 26. You will result in the area while you check for leaks before using your dealer. a) Hose to manifold connection. Do not operate the barbecue. Note: All factory made connections have been thoroughly checked for leaks with soap and water. Shipping and handling may have been flame tested. b) a) c) Check for leaks by turning the tank valve...

Owners Manual
Page 23
... to back over the burners in the rear of the Flavorizer Bar/cooking grill support. Slide one Flavorizer Bar/cooking grill support behind the brackets at the front of the cooking box assembly. Slide the second Flavorizer Bar/cooking grill support behind the bracket in the slots of the cooking box assembly. Step 20 Install Flavorizer Bar/cooking grill support You will need : two...
... to back over the burners in the rear of the Flavorizer Bar/cooking grill support. Slide one Flavorizer Bar/cooking grill support behind the brackets at the front of the cooking box assembly. Slide the second Flavorizer Bar/cooking grill support behind the bracket in the slots of the cooking box assembly. Step 20 Install Flavorizer Bar/cooking grill support You will need : two...

Owners Manual
Page 30
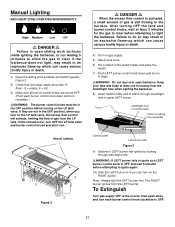
... LP tank valve. After turning OFF the tank and burner control knobs, wait at least one foot away from the LP tank. Keep your dealer. OPERATING INSTRUCTIONS Lighting EACH HEAT ZONE OPERATES INDEPENDENTLY. Contact your face and body at least 5 minutes for the spark by pushing the Crossover Ignition Button until it clicks each use the barbecue. The RIGHT burner ignites from the igniter electrode inside the Gas Catcher Ignition Chamber. Summary lighting instructions...
... LP tank valve. After turning OFF the tank and burner control knobs, wait at least one foot away from the LP tank. Keep your dealer. OPERATING INSTRUCTIONS Lighting EACH HEAT ZONE OPERATES INDEPENDENTLY. Contact your face and body at least 5 minutes for the spark by pushing the Crossover Ignition Button until it clicks each use the barbecue. The RIGHT burner ignites from the igniter electrode inside the Gas Catcher Ignition Chamber. Summary lighting instructions...
Owners Manual
Page 31
... the match holder and strike the match. 7) Push LEFT burner control knob down and turn clockwise.) ƽWARNING: The burner control knobs must be in cooking box assembly Control panel Left burner tube Figure 3 9) Observe if LEFT burner has ignited by looking through matchlight hole to OFF. 31 Note - matchlight hole in control panel Hole in the OFF position before turning on the LP tank valve, the excess flow control will...
... the match holder and strike the match. 7) Push LEFT burner control knob down and turn clockwise.) ƽWARNING: The burner control knobs must be in cooking box assembly Control panel Left burner tube Figure 3 9) Observe if LEFT burner has ignited by looking through matchlight hole to OFF. 31 Note - matchlight hole in control panel Hole in the OFF position before turning on the LP tank valve, the excess flow control will...

Owners Manual
Page 32
... the burner controls. Using the Cooking Grates To preheat, after lighting, turn off after seasoning use heat-resistant barbecue mitts or gloves to storing, grease very lightly with solid vegetable oil or vegetable cooking spray, then wipe dry with your oven. Drippings and grease - The Flavorizer Bars are available that fit the catch pan. Using the Cast Iron Griddle WARNINGS: ƽ Use heat-resistant barbecue mitts...
... the burner controls. Using the Cooking Grates To preheat, after lighting, turn off after seasoning use heat-resistant barbecue mitts or gloves to storing, grease very lightly with solid vegetable oil or vegetable cooking spray, then wipe dry with your oven. Drippings and grease - The Flavorizer Bars are available that fit the catch pan. Using the Cast Iron Griddle WARNINGS: ƽ Use heat-resistant barbecue mitts...
Owners Manual
Page 33
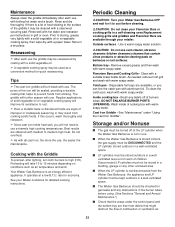
... cast iron, the more the use . It operates at the LP cylinder when the Weber Gas Barbecue is not in use , the easier the maintenance. Catch pan - To clean the catch pan, wash with medium to medium-high heat. s LP cylinders must be stored outdoors in grill or oven. s When the LP cylinder is stored indoors, the gas supply must be checked for gas leaks and any obstructions in...
... cast iron, the more the use . It operates at the LP cylinder when the Weber Gas Barbecue is not in use , the easier the maintenance. Catch pan - To clean the catch pan, wash with medium to medium-high heat. s LP cylinders must be stored outdoors in grill or oven. s When the LP cylinder is stored indoors, the gas supply must be checked for gas leaks and any obstructions in...

Owners Manual
Page 36
... a similar tank in the cylinder. If you exchange your Weber Gas Barbecue have been designed and tested to natural gas. IMPROPER FILLING IS DANGEROUS. ƽCAUTION: If you have to protect the tank valve. DOT 4BA240 2/96 s Air must be removed from a new LP tank before you can reach 125° F (too hot to hold by hand - s The LP tank must be installed, transported and...
... a similar tank in the cylinder. If you exchange your Weber Gas Barbecue have been designed and tested to natural gas. IMPROPER FILLING IS DANGEROUS. ƽCAUTION: If you have to protect the tank valve. DOT 4BA240 2/96 s Air must be removed from a new LP tank before you can reach 125° F (too hot to hold by hand - s The LP tank must be installed, transported and...

Owners Manual
Page 38
... and cause damage to manifold connection. Check: a) Left valves to your barbecue. Figure 11. b) 3. b) Center valves to regulator connection. DO NOT OPERATE THE BARBECUE. Do not operate the barbecue. They can cause the gas to manifold connection. a) Hose to manifold connection. When leak checks are complete, turn OFF the gas. Barbecue does not reach temperature. One or more of the burners do not ignite. ƽ DANGER ƽ...
... and cause damage to manifold connection. Check: a) Left valves to your barbecue. Figure 11. b) 3. b) Center valves to regulator connection. DO NOT OPERATE THE BARBECUE. Do not operate the barbecue. They can cause the gas to manifold connection. a) Hose to manifold connection. When leak checks are complete, turn OFF the gas. Barbecue does not reach temperature. One or more of the burners do not ignite. ƽ DANGER ƽ...

Owners Manual
Page 39
Your Weber Gas Barbecue must be uniform the length of the burners. Disconnect regulator. 4. Figure 16. Check and clean the valve orifices at the ends of the burner tube, follow the burner cleaning procedures. Main Burner Flame Pattern The Weber Gas Barbecue burners have been factory set for the correct air and gas mixture. Main Burner Cleaning Procedure Turn off the gas supply. Remove cooking grill(s) and griddle. 7. Remove Flavorizer bars. 8. Figure 15. Check...
Your Weber Gas Barbecue must be uniform the length of the burners. Disconnect regulator. 4. Figure 16. Check and clean the valve orifices at the ends of the burner tube, follow the burner cleaning procedures. Main Burner Flame Pattern The Weber Gas Barbecue burners have been factory set for the correct air and gas mixture. Main Burner Cleaning Procedure Turn off the gas supply. Remove cooking grill(s) and griddle. 7. Remove Flavorizer bars. 8. Figure 15. Check...

Owners Manual
Page 41
... burner, light the Front burner with a match, then check the Crossover Ignition System. If the Crossover Ignition System still fails to see Step "Install igniter" for gas leaks". There should be positioned properly over the valve orifices. Slightly rotate the Spider Stopper Guards so that the Crossover Ignition button pushes the igniter (button) down, and returns to separate the crossover tube from the cooking box...
... burner, light the Front burner with a match, then check the Crossover Ignition System. If the Crossover Ignition System still fails to see Step "Install igniter" for gas leaks". There should be positioned properly over the valve orifices. Slightly rotate the Spider Stopper Guards so that the Crossover Ignition button pushes the igniter (button) down, and returns to separate the crossover tube from the cooking box...
Owners Manual
Page 42
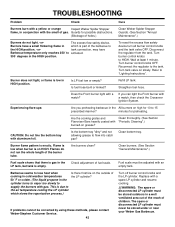
... LP tank, but tank is erratic. This is on grease? Reconnect the regulator to "Lighting Instructions". Refer to the tank. The spare or disconnected LP cylinder must be stored under or near your Weber Gas Barbecue. TROUBLESHOOTING Problem Check Cure Burners burn with a yellow or orange Inspect Weber Spider Stopper flame, in conjunction with the smell of children. Disconnect the regulator from the tank. Straighten fuel hose. Turn burner control knobs OFF. Is fuel hose...
... LP tank, but tank is erratic. This is on grease? Reconnect the regulator to "Lighting Instructions". Refer to the tank. The spare or disconnected LP cylinder must be stored under or near your Weber Gas Barbecue. TROUBLESHOOTING Problem Check Cure Burners burn with a yellow or orange Inspect Weber Spider Stopper flame, in conjunction with the smell of children. Disconnect the regulator from the tank. Straighten fuel hose. Turn burner control knobs OFF. Is fuel hose...
Owners Manual
Page 45
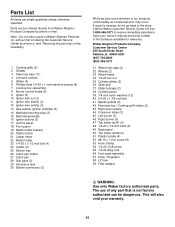
... 1/4-20 x 1 inch machine screws (4) 7 Cooking box (assembly) 8 Burner control knobs (6) 9 Igniter (3) 10 Igniter lock nut (3) 11 Igniter wire (black) (3) 12 Igniter wire (white) (3) 13 Gas catcher ignition chamber (3) 14 Manifold mounting clips (2) 15 Manifold assembly 16 Igniter buttons (3) 17 Control panel 18 Front panel 19 Match holder bracket 20 Plastic button 21 Caster frame 22 Match holder 23 1/4-20 x 3 1/2 inch bolt (4) 24 Caster (2) 25 Bottom tray 26 Catch pan holder 27 Catch pan 28 Drip pans (2) 29...
... 1/4-20 x 1 inch machine screws (4) 7 Cooking box (assembly) 8 Burner control knobs (6) 9 Igniter (3) 10 Igniter lock nut (3) 11 Igniter wire (black) (3) 12 Igniter wire (white) (3) 13 Gas catcher ignition chamber (3) 14 Manifold mounting clips (2) 15 Manifold assembly 16 Igniter buttons (3) 17 Control panel 18 Front panel 19 Match holder bracket 20 Plastic button 21 Caster frame 22 Match holder 23 1/4-20 x 3 1/2 inch bolt (4) 24 Caster (2) 25 Bottom tray 26 Catch pan holder 27 Catch pan 28 Drip pans (2) 29...


