

Owner Manual
Page 1
.... THIS GAS APPLIANCE IS DESIGNED FOR OUTDOOR USE ONLY. ƽ WARNING: Do not try to barbecue operation. Open lid. 4. GAS GRILL Natural Gas Grill Owner's Guide Guía del Propietario de la Barbacoa de Gas Natural - Extinguish any other appliance. 2. Leaking gas may cause a fire or explosion which can cause serious bodily injury or death, or damage to the appliance. 2. NOTICE TO INSTALLER: These instructions must be...
.... THIS GAS APPLIANCE IS DESIGNED FOR OUTDOOR USE ONLY. ƽ WARNING: Do not try to barbecue operation. Open lid. 4. GAS GRILL Natural Gas Grill Owner's Guide Guía del Propietario de la Barbacoa de Gas Natural - Extinguish any other appliance. 2. Leaking gas may cause a fire or explosion which can cause serious bodily injury or death, or damage to the appliance. 2. NOTICE TO INSTALLER: These instructions must be...
Owner Manual
Page 2
... be empty, gas may be used by your barbecue is in operation. ƽ A dented or rusty liquid propane cylinder may be hazardous and should be properly assembled according to the assembly instructions. ƽ Do not build this model of grill in any heated surfaces. ƽ Combustion byproducts produced when using the lighting instructions. ƽ Do not use charcoal or lava rock in your Weber® gas barbecue. ƽ Never...
... be empty, gas may be used by your barbecue is in operation. ƽ A dented or rusty liquid propane cylinder may be hazardous and should be properly assembled according to the assembly instructions. ƽ Do not build this model of grill in any heated surfaces. ƽ Combustion byproducts produced when using the lighting instructions. ƽ Do not use charcoal or lava rock in your Weber® gas barbecue. ƽ Never...

Owner Manual
Page 6
....1 (Installation Code for it to high (HH). This appliance must be used under the control panel and the slide out bottom tray are described in use the barbecue within 24 inches of this barbecue outdoors in a wellventilated area. Cooking conditions. Preheating to avoid a grease fire in excess of drippings for assembling your Weber® gas barbecue when the gas supply is designed for detailed cooking instructions. Remove excess grease...
....1 (Installation Code for it to high (HH). This appliance must be used under the control panel and the slide out bottom tray are described in use the barbecue within 24 inches of this barbecue outdoors in a wellventilated area. Cooking conditions. Preheating to avoid a grease fire in excess of drippings for assembling your Weber® gas barbecue when the gas supply is designed for detailed cooking instructions. Remove excess grease...
Owner Manual
Page 7
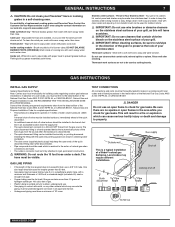
... operate at 7 inches of .062 inch; Thermoset surfaces - GAS INSTRUCTIONS INSTALL GAS SUPPLY General Specifications for Piping Note: Contact your Flavorizer® bars or cooking grates in a self-cleaning oven. Some of the following are made from the source when the barbecue is designed to property. The hose must be copper tubing, type K or L; polyethylene plastic tube, with aluminum foil. Log onto www.weber...
... operate at 7 inches of .062 inch; Thermoset surfaces - GAS INSTRUCTIONS INSTALL GAS SUPPLY General Specifications for Piping Note: Contact your Flavorizer® bars or cooking grates in a self-cleaning oven. Some of the following are made from the source when the barbecue is designed to property. The hose must be copper tubing, type K or L; polyethylene plastic tube, with aluminum foil. Log onto www.weber...

Owner Manual
Page 8
... grill on gases other than the type specified on gas automatically.) When properly assembled the plug cannot be removed without pushing the sleeve back. To connect the hose to the next step. This process will need: Phillips screwdriver. 1) Remove control knobs. 2) Remove screws with gas. If replacement of the hose becomes necessary, factory specified parts are turned off gas.) REMOVE CONTROL PANEL AND BURNER CONTROL KNOBS You will produce a gas...
... grill on gases other than the type specified on gas automatically.) When properly assembled the plug cannot be removed without pushing the sleeve back. To connect the hose to the next step. This process will need: Phillips screwdriver. 1) Remove control knobs. 2) Remove screws with gas. If replacement of the hose becomes necessary, factory specified parts are turned off gas.) REMOVE CONTROL PANEL AND BURNER CONTROL KNOBS You will produce a gas...
Owner Manual
Page 9
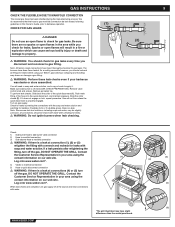
... GRILL. GAS INSTRUCTIONS CHECK THE FLEXIBLE HOSE TO MANIFOLD CONNECTION The natural gas hose has been attached during the manuafacturing process. If bubbles form or if a bubble grows, there is a leak at connection (1), (2) or (3) retighten the fitting with water. 9 (3) (2) (4) WWW.WEBER.COM® (5) *The grill illustrated may have slight differences than the model purchased. Contact the Customer Service Representative in your Weber® gas barbecue...
... GRILL. GAS INSTRUCTIONS CHECK THE FLEXIBLE HOSE TO MANIFOLD CONNECTION The natural gas hose has been attached during the manuafacturing process. If bubbles form or if a bubble grows, there is a leak at connection (1), (2) or (3) retighten the fitting with water. 9 (3) (2) (4) WWW.WEBER.COM® (5) *The grill illustrated may have slight differences than the model purchased. Contact the Customer Service Representative in your Weber® gas barbecue...

Owner Manual
Page 10
... Crossover® ignition button until it clicks each use the barbecue. 10 OPERATING INSTRUCTIONS LIGHTING Summary lighting instructions are on the control panel. ƽ DANGER Failure to open barbecue. MAIN BURNER LIGHTING 1) Open the lid. 2) Make sure all burner control knobs are in any way, do not use of the cooking box. You should see flame. ƽ WARNING: If the burner does not light, turn the Front burner control knob to OFF and...
... Crossover® ignition button until it clicks each use the barbecue. 10 OPERATING INSTRUCTIONS LIGHTING Summary lighting instructions are on the control panel. ƽ DANGER Failure to open barbecue. MAIN BURNER LIGHTING 1) Open the lid. 2) Make sure all burner control knobs are in any way, do not use of the cooking box. You should see flame. ƽ WARNING: If the burner does not light, turn the Front burner control knob to OFF and...

Owner Manual
Page 11
... to see "Manually Lighting the Side Burner"). 24 1 3 5 *The grill illustrated may have slight differences than the model purchased. 2 3 WWW.WEBER.COM® Replace using the contact information on the other burner or burners ignite from the matchlight hole when lighting the barbecue. 5) Push Front burner control knob down and turn to START/HI. 6) Check that it clicks each time. ƽ CAUTION: Side burner flame may be damaged...
... to see "Manually Lighting the Side Burner"). 24 1 3 5 *The grill illustrated may have slight differences than the model purchased. 2 3 WWW.WEBER.COM® Replace using the contact information on the other burner or burners ignite from the matchlight hole when lighting the barbecue. 5) Push Front burner control knob down and turn to START/HI. 6) Check that it clicks each time. ƽ CAUTION: Side burner flame may be damaged...

Owner Manual
Page 12
... lid is stainless steel, not paint. WWW.WEBER.COM® Is fuel hose bent or kinked? If you try again. 46 25 1 3 2 3 PROBLEM Burners burn with a yellow or orange flame, in conjunction with a match? Are the cooking grates and Flavorizer® bars heavily coated with a match, then check the Crossover® ignition system. THIS IS NOT A DEFECT. 12 OPERATING INSTRUCTIONS MANUALLY LIGHTING THE SIDE BURNER ƽ...
... lid is stainless steel, not paint. WWW.WEBER.COM® Is fuel hose bent or kinked? If you try again. 46 25 1 3 2 3 PROBLEM Burners burn with a yellow or orange flame, in conjunction with a match? Are the cooking grates and Flavorizer® bars heavily coated with a match, then check the Crossover® ignition system. THIS IS NOT A DEFECT. 12 OPERATING INSTRUCTIONS MANUALLY LIGHTING THE SIDE BURNER ƽ...

Owner Manual
Page 13
... re-align orifice parallel to side burner tube.) Is gas supply off? Is the fuel hose bent or kinked? SIDE BURNER MAINTENANCE ƽ WARNING: All gas controls and supply valves should be a white/blue color, not yellow. 1) Igniter Wire 2) Ground wire 3) Burner Side Burner Grate Head Retention Clip Side Burner Ring & Head Igniter Electrode Control Knob Igniter Button (3) (2) (1) (2) (1) ƽ WARNING: The side burner orifice (4) must be corrected by using these methods...
... re-align orifice parallel to side burner tube.) Is gas supply off? Is the fuel hose bent or kinked? SIDE BURNER MAINTENANCE ƽ WARNING: All gas controls and supply valves should be a white/blue color, not yellow. 1) Igniter Wire 2) Ground wire 3) Burner Side Burner Grate Head Retention Clip Side Burner Ring & Head Igniter Electrode Control Knob Igniter Button (3) (2) (1) (2) (1) ƽ WARNING: The side burner orifice (4) must be corrected by using these methods...

Owner Manual
Page 14
... burner ports are clean replace the burners. Lightly tap the burner to clean outside of the burner tube. Clean the inside each burner with the burner flames appearing yellow and lazy. 2) Barbecue does not reach temperature. 3) Barbecue heats unevenly. 4) One or more of the Spider/Insect screens To inspect the Spider/Insect screens, remove the control panel. 14 MAINTENANCE WEBER® SPIDER /INSECT SCREENS Your Weber® gas barbecue...
... burner ports are clean replace the burners. Lightly tap the burner to clean outside of the burner tube. Clean the inside each burner with the burner flames appearing yellow and lazy. 2) Barbecue does not reach temperature. 3) Barbecue heats unevenly. 4) One or more of the Spider/Insect screens To inspect the Spider/Insect screens, remove the control panel. 14 MAINTENANCE WEBER® SPIDER /INSECT SCREENS Your Weber® gas barbecue...

Owner Manual
Page 15
... Service Representative in the corners of the cooking box. 6) Lift and twist the burner assembly slightly, to the up position. Remove the burners from the burners. If the Crossover® ignition system still fails to the cooking box. MAINTENANCE REPLACING MAIN BURNERS 1) Your Weber® gas barbecue must be positioned properly over the valve orifices (4). Log onto www.weber.com®. (1) (2) WWW.WEBER.COM® Lift off the burner control knobs...
... Service Representative in the corners of the cooking box. 6) Lift and twist the burner assembly slightly, to the up position. Remove the burners from the burners. If the Crossover® ignition system still fails to the cooking box. MAINTENANCE REPLACING MAIN BURNERS 1) Your Weber® gas barbecue must be positioned properly over the valve orifices (4). Log onto www.weber.com®. (1) (2) WWW.WEBER.COM® Lift off the burner control knobs...

Owner Manual
Page 40
40 WWW.WEBER.COM®
40 WWW.WEBER.COM®

Owner Manual
Page 41
41 WWW.WEBER.COM®
41 WWW.WEBER.COM®


