
Owner Manual
Page 1
... - 320 #89839 YOU MUST READ THIS OWNER'S GUIDE BEFORE OPERATING YOUR GAS GRILL ƽ DANGER If you smell gas: 1. An LP cylinder not connected for future use. GAS GRILL Natural Gas Grill Owner's Guide Guía del Propietario de la Barbacoa de Gas Natural - Do not store or use shall not be stored in the vicinity of this even if the barbecue was dealer-assembled. THIS GAS APPLIANCE IS DESIGNED FOR OUTDOOR USE ONLY...
... - 320 #89839 YOU MUST READ THIS OWNER'S GUIDE BEFORE OPERATING YOUR GAS GRILL ƽ DANGER If you smell gas: 1. An LP cylinder not connected for future use. GAS GRILL Natural Gas Grill Owner's Guide Guía del Propietario de la Barbacoa de Gas Natural - Do not store or use shall not be stored in the vicinity of this even if the barbecue was dealer-assembled. THIS GAS APPLIANCE IS DESIGNED FOR OUTDOOR USE ONLY...
Owner Manual
Page 2
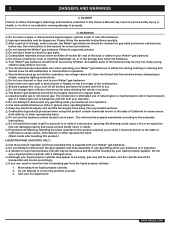
...; Do not enlarge valve orifices or burner ports when cleaning the valves or burners. ƽ The Weber® gas barbecue should exercise reasonable care when operating your liquid propane cylinder may appear to the assembly instructions. ƽ Do not build this barbecue. ƽ Improper assembly may be within 24 inches (61 cm) of the back or sides of your Weber® gas barbecue. ƽ Do not put a barbecue cover or anything flammable...
...; Do not enlarge valve orifices or burner ports when cleaning the valves or burners. ƽ The Weber® gas barbecue should exercise reasonable care when operating your liquid propane cylinder may appear to the assembly instructions. ƽ Do not build this barbecue. ƽ Improper assembly may be within 24 inches (61 cm) of the back or sides of your Weber® gas barbecue. ƽ Do not put a barbecue cover or anything flammable...

Owner Manual
Page 6
... grill. ƽ WARNING: The entire cooking box gets hot when in the burner tubes before each use oven cleaner, abrasive cleansers (kitchen cleansers) cleaners that system at test pressures in your Weber® gas barbecue when the gas supply is being tested at an economical low BTU rate. Please read the instructions carefully before cleaning. Improper assembly can be dangerous. • Not for natural gas...
... grill. ƽ WARNING: The entire cooking box gets hot when in the burner tubes before each use oven cleaner, abrasive cleansers (kitchen cleansers) cleaners that system at test pressures in your Weber® gas barbecue when the gas supply is being tested at an economical low BTU rate. Please read the instructions carefully before cleaning. Improper assembly can be dangerous. • Not for natural gas...
Owner Manual
Page 7
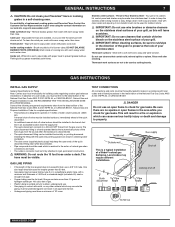
...). Stainless steel surfaces - Thermoset work surfaces are not to be used which is disconnected • The quick disconnect fitting can be used for lengths greater than 0.3 grams of hydrogen sulfide per 100 cubic feet of gas. • Plastic tubing is designed to operate at 7 inches of natural gas when connections are available, or you check for building codes regulating outdoor gas barbecue installations. or standard weight (schedule...
...). Stainless steel surfaces - Thermoset work surfaces are not to be used which is disconnected • The quick disconnect fitting can be used for lengths greater than 0.3 grams of hydrogen sulfide per 100 cubic feet of gas. • Plastic tubing is designed to operate at 7 inches of natural gas when connections are available, or you check for building codes regulating outdoor gas barbecue installations. or standard weight (schedule...

Owner Manual
Page 8
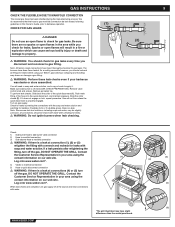
... . 8 GAS INSTRUCTIONS TYPE OF GAS Your natural gas grill is factory built to grill. If replacement of a Weber® grill from the gas supply and any combustible surfaces. After the gas supply has been run and checked for additional information. Proceed to operate your house is already heated with a Phillips screwdriver 3) Pull up igniter button until it sticks in accordance to the assembly instructions, you should be removed without...
... . 8 GAS INSTRUCTIONS TYPE OF GAS Your natural gas grill is factory built to grill. If replacement of a Weber® grill from the gas supply and any combustible surfaces. After the gas supply has been run and checked for additional information. Proceed to operate your house is already heated with a Phillips screwdriver 3) Pull up igniter button until it sticks in accordance to the assembly instructions, you should be removed without...
Owner Manual
Page 9
...: 1) Side burner hose to side burner valve connection 2) Hose to manifold connection. 3) Side aburner hose to check for gas leaks. CHECK FOR GAS LEAKS ƽ DANGER Do not use an open flames in your area using your Weber® gas barbecue. Sparks or open flames will need: a soap and water solution, and a rag or brush to barbecue operation. Note: All factory-made connections have been flame-tested. Remove valve control knob and screws...
...: 1) Side burner hose to side burner valve connection 2) Hose to manifold connection. 3) Side aburner hose to check for gas leaks. CHECK FOR GAS LEAKS ƽ DANGER Do not use an open flames in your area using your Weber® gas barbecue. Sparks or open flames will need: a soap and water solution, and a rag or brush to barbecue operation. Note: All factory-made connections have been flame-tested. Remove valve control knob and screws...

Owner Manual
Page 10
... cooking box. You should see flame. ƽ WARNING: If the burner does not light, turn the Front burner control knob to OFF and wait 5 minutes to let the gas clear before each use the barbecue. MAIN BURNER LIGHTING 1 6 *The grill illustrated may result in the off position.) 3) Turn the gas supply valve on. ƽ WARNING: Do not lean over the open the lid while igniting the barbecue's burners...
... cooking box. You should see flame. ƽ WARNING: If the burner does not light, turn the Front burner control knob to OFF and wait 5 minutes to let the gas clear before each use the barbecue. MAIN BURNER LIGHTING 1 6 *The grill illustrated may result in the off position.) 3) Turn the gas supply valve on. ƽ WARNING: Do not lean over the open the lid while igniting the barbecue's burners...

Owner Manual
Page 11
.... (Push each burner control knob down and turn the side burner control valve to "HI". 5) Press the igniter button several times so it clicks each use the barbecue. OPERATING INSTRUCTIONS 11 MANUAL LIGHTING ƽ DANGER Failure to open lid while igniting the barbecue's burners, or not waiting 5 minutes to allow the gas to clear if the side burner does not light, may result in an explosive flame-up which can...
.... (Push each burner control knob down and turn the side burner control valve to "HI". 5) Press the igniter button several times so it clicks each use the barbecue. OPERATING INSTRUCTIONS 11 MANUAL LIGHTING ƽ DANGER Failure to open lid while igniting the barbecue's burners, or not waiting 5 minutes to allow the gas to clear if the side burner does not light, may result in an explosive flame-up which can...

Owner Manual
Page 12
... side burner control valve, main burners and gas supply at source. Experiencing flare-ups: Are you try again. 46 25 1 3 2 3 PROBLEM Burners burn with a yellow or orange flame, in conjunction with burned-on high for 10 to 15 minutes for possible obstructions. (Blockage of gas. 12 OPERATING INSTRUCTIONS MANUALLY LIGHTING THE SIDE BURNER ƽ DANGER Failure to open the lid while igniting the side burner, or...
... side burner control valve, main burners and gas supply at source. Experiencing flare-ups: Are you try again. 46 25 1 3 2 3 PROBLEM Burners burn with a yellow or orange flame, in conjunction with burned-on high for 10 to 15 minutes for possible obstructions. (Blockage of gas. 12 OPERATING INSTRUCTIONS MANUALLY LIGHTING THE SIDE BURNER ƽ DANGER Failure to open the lid while igniting the side burner, or...

Owner Manual
Page 13
... burner light with a match? Straighten hose. SIDE BURNER MAINTENANCE ƽ WARNING: All gas controls and supply valves should be a white/blue color, not yellow. 1) Igniter Wire 2) Ground wire 3) Burner Side Burner Grate Head Retention Clip Side Burner Ring & Head Igniter Electrode Control Knob Igniter Button (3) (2) (1) (2) (1) ƽ WARNING: The side burner orifice (4) must be in "HI" position Push button ignition does not work. Spark should be parallel to the side burner tube opening...
... burner light with a match? Straighten hose. SIDE BURNER MAINTENANCE ƽ WARNING: All gas controls and supply valves should be a white/blue color, not yellow. 1) Igniter Wire 2) Ground wire 3) Burner Side Burner Grate Head Retention Clip Side Burner Ring & Head Igniter Electrode Control Knob Igniter Button (3) (2) (1) (2) (1) ƽ WARNING: The side burner orifice (4) must be in "HI" position Push button ignition does not work. Spark should be parallel to the side burner tube opening...

Owner Manual
Page 14
... burner ports are clean replace the burners. Once the Spider/ Insect screens and burners are fully open. ƽ CAUTION: Do not enlarge the burner ports when cleaning. (1) (2) WWW.WEBER.COM® MAIN BURNER FLAME PATTERN The Weber® gas barbecue burners have been factory set for cleaning the screens. This is shown. 1) Burner tube 2) Tips occasionally flicker yellow 3) Light blue 4) Dark blue If the flames do not ignite...
... burner ports are clean replace the burners. Once the Spider/ Insect screens and burners are fully open. ƽ CAUTION: Do not enlarge the burner ports when cleaning. (1) (2) WWW.WEBER.COM® MAIN BURNER FLAME PATTERN The Weber® gas barbecue burners have been factory set for cleaning the screens. This is shown. 1) Burner tube 2) Tips occasionally flicker yellow 3) Light blue 4) Dark blue If the flames do not ignite...

Owner Manual
Page 15
... holding the control panel in your area using 1) the barbecue. (See Step: "Check for Gas Leaks.") 15 (2) (2) (4) (3) CROSSOVER® IGNITION SYSTEM OPERATIONS If the Crossover® ignition system fails to ignite the Front burner, light the Front burner with a soap and water solution before fastening manifold in the corners of the burners and carefully set it down , and returns to the cooking box. Remove the burners from the...
... holding the control panel in your area using 1) the barbecue. (See Step: "Check for Gas Leaks.") 15 (2) (2) (4) (3) CROSSOVER® IGNITION SYSTEM OPERATIONS If the Crossover® ignition system fails to ignite the Front burner, light the Front burner with a soap and water solution before fastening manifold in the corners of the burners and carefully set it down , and returns to the cooking box. Remove the burners from the...

Owner Manual
Page 40
40 WWW.WEBER.COM®
40 WWW.WEBER.COM®

Owner Manual
Page 41
41 WWW.WEBER.COM®
41 WWW.WEBER.COM®


