
Owner Manual
Page 1
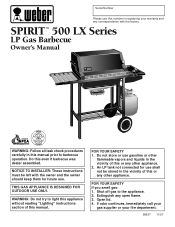
... assembled. Shut off gas to barbecue operation. FOR YOUR SAFETY 1. An LP tank not connected for future use. Serial Number Please use this number in registering your fire department. 98637 11/97 SPIRIT™ 500 LX Series LP Gas Barbecue Owner's Manual WEBER WEBE R ® NationalPROPANEGAS Association WARNING: Follow all leak check procedures carefully in this manual prior to the appliance. 2. WARNING: Do not try to light this appliance without reading "Lighting" instructions...
... assembled. Shut off gas to barbecue operation. FOR YOUR SAFETY 1. An LP tank not connected for future use. Serial Number Please use this number in registering your fire department. 98637 11/97 SPIRIT™ 500 LX Series LP Gas Barbecue Owner's Manual WEBER WEBE R ® NationalPROPANEGAS Association WARNING: Follow all leak check procedures carefully in this manual prior to the appliance. 2. WARNING: Do not try to light this appliance without reading "Lighting" instructions...
Owner Manual
Page 2
... tank with your Weber Gas Barbecue. ƽ Do not attempt to correct the problem yourself. 3. LP GAS UNITS ONLY: ƽ Use the regulator that is out. ƽ Do not enlarge valve orifices or burner ports when cleaning the valves or burners. ƽ The Weber Gas Barbecue should be thoroughly cleaned on or in operation. ƽ Use heat-resistant barbecue mitts or gloves when operating barbecue. Do not use of the cooking box. ƽ Should a grease...
... tank with your Weber Gas Barbecue. ƽ Do not attempt to correct the problem yourself. 3. LP GAS UNITS ONLY: ƽ Use the regulator that is out. ƽ Do not enlarge valve orifices or burner ports when cleaning the valves or burners. ƽ The Weber Gas Barbecue should be thoroughly cleaned on or in operation. ƽ Use heat-resistant barbecue mitts or gloves when operating barbecue. Do not use of the cooking box. ƽ Should a grease...

Owner Manual
Page 3
.... The phone number is not covered by insects within the burner tubes, as set out in accordance with the sale, installation, use and service and which is permanently attached to the tank. If the tank manufacturer has not resolved the issue to replace such parts without charge. ... parts, transportation charges must be limited to the repair or replacement of parts which prove defective under normal use , removal, return, or replacement of its equipment; Weber is responsible for it any other express warrants except as set forth herein and any parts, contact Weber-Stephen...
.... The phone number is not covered by insects within the burner tubes, as set out in accordance with the sale, installation, use and service and which is permanently attached to the tank. If the tank manufacturer has not resolved the issue to replace such parts without charge. ... parts, transportation charges must be limited to the repair or replacement of parts which prove defective under normal use , removal, return, or replacement of its equipment; Weber is responsible for it any other express warrants except as set forth herein and any parts, contact Weber-Stephen...

Owner Manual
Page 5
... the use of gas is made. 3. h) Catch pan catches excess grease. b) Heavy gauge porcelain-on-steel lid seals in heat. g) Fuel scale indicates LP gas supply. Contents WARNINGS 2 Warranty & Patents 3-4 General Instructions 6 Assembly 7-20 Operating Instructions Lighting 21-22 Cooking 23 Storage and/or Nonuse 23 Cleaning 23 LP Tank Information 24-26 a Troubleshooting & Maintenance Annual Maintenance 27 General Maintenance 28-30 Troubleshooting 31 Parts Listing 33...
... the use of gas is made. 3. h) Catch pan catches excess grease. b) Heavy gauge porcelain-on-steel lid seals in heat. g) Fuel scale indicates LP gas supply. Contents WARNINGS 2 Warranty & Patents 3-4 General Instructions 6 Assembly 7-20 Operating Instructions Lighting 21-22 Cooking 23 Storage and/or Nonuse 23 Cleaning 23 LP Tank Information 24-26 a Troubleshooting & Maintenance Annual Maintenance 27 General Maintenance 28-30 Troubleshooting 31 Parts Listing 33...

Owner Manual
Page 6
... with the Weber Gas Barbecue must be stored outdoors in a building, garage or any heated surface. Please read the instructions carefully before using your Weber Gas Barbecue with piping above and below ground. s Check that the area under the control panel and the bottom tray are difficult to be installed in use with charcoal fuel. s When the Weber Gas Barbecue is easy to them. Disconnected LP tanks must be...
... with the Weber Gas Barbecue must be stored outdoors in a building, garage or any heated surface. Please read the instructions carefully before using your Weber Gas Barbecue with piping above and below ground. s Check that the area under the control panel and the bottom tray are difficult to be installed in use with charcoal fuel. s When the Weber Gas Barbecue is easy to them. Disconnected LP tanks must be...

Owner Manual
Page 7
... Weber Customer Service Center toll free 1-800-446-1071 to the store. Assembly Tools needed Hammer 7/16 open-end or an adjustable wrench Step 1 Check package contents Cooking box (assembly) Pliers Block of wood Lid (assembly) ® ® Phillips screwdriver Supplies needed Your LP tank is given. Have your owner's manual and serial number of the barbecue available for gas leaks.") Note - If a part...
... Weber Customer Service Center toll free 1-800-446-1071 to the store. Assembly Tools needed Hammer 7/16 open-end or an adjustable wrench Step 1 Check package contents Cooking box (assembly) Pliers Block of wood Lid (assembly) ® ® Phillips screwdriver Supplies needed Your LP tank is given. Have your owner's manual and serial number of the barbecue available for gas leaks.") Note - If a part...

Owner Manual
Page 12
... inch wrench. Figure 6. Figure 8 (a). Figure 8 (b). If you answered YES to a, b and c, the burners are only guides. Contact Weber-Stephen Customer Service. Frame cross piece (a) Spacer bracket (b) Keps nut (b) Figure 8 (a) View from (c) behind cooking box Wing Nuts Tab Bolt Nylon washer Figure 7 12 Burner tubes Frame brace Your Weber Gas Barbecue burner assembly has been factory assembled, pressure and flame tested. Figure 7 (a). Figure 8 (c). Set the cooking box in...
... inch wrench. Figure 6. Figure 8 (a). Figure 8 (b). If you answered YES to a, b and c, the burners are only guides. Contact Weber-Stephen Customer Service. Frame cross piece (a) Spacer bracket (b) Keps nut (b) Figure 8 (a) View from (c) behind cooking box Wing Nuts Tab Bolt Nylon washer Figure 7 12 Burner tubes Frame brace Your Weber Gas Barbecue burner assembly has been factory assembled, pressure and flame tested. Figure 7 (a). Figure 8 (c). Set the cooking box in...

Owner Manual
Page 14
... the fuel scale assembly through the large part of the keyhole in the tank panel. Step 11 Install igniter Note - The igniter lock nut is on the igniter. The igniter wires are already attached to factory test the ignition system. Insert the top of the wheel frame. Tighten the igniter lock nut. If the igniter works loose, carefully tighten the igniter lock nut...
... the fuel scale assembly through the large part of the keyhole in the tank panel. Step 11 Install igniter Note - The igniter lock nut is on the igniter. The igniter wires are already attached to factory test the ignition system. Insert the top of the wheel frame. Tighten the igniter lock nut. If the igniter works loose, carefully tighten the igniter lock nut...

Owner Manual
Page 15
... the tank, call Weber-Stephen Products Co., Customer Service Center. These types of tanks are not compatible with an empty tank. After adjusting tank scale, push tank down a couple of times to check that the tank scale is set with your LP tank, make sure you have differing top collar assemblies. (... which is the metal protective ring around the valve.) One series of LP gas. ƽWARNING: We recommend that this . ƽWARNING: If you exchange your barbecue connection. The LP tank must be set on safe handling of LP tanks, see Section "Safe handling tips for the materials...
... the tank, call Weber-Stephen Products Co., Customer Service Center. These types of tanks are not compatible with an empty tank. After adjusting tank scale, push tank down a couple of times to check that the tank scale is set with your LP tank, make sure you have differing top collar assemblies. (... which is the metal protective ring around the valve.) One series of LP gas. ƽWARNING: We recommend that this . ƽWARNING: If you exchange your barbecue connection. The LP tank must be set on safe handling of LP tanks, see Section "Safe handling tips for the materials...

Owner Manual
Page 17
... OFF the gas. Contact Weber-Stephen Customer Service. DO NOT OPERATE THE BARBECUE. Note - Be sure there are complete, turn OFF the gas. To perform leak checks: open tank valve by wetting the connections with soap and water solution. b) Regulator to manifold connections. Figure...ignite burners when leak checking. Figure 19 (a). All factory made connections have been flame tested. Figure 18. Contact Weber-Stephen Customer Service. Step 16 Check for gas leaks ƽ DANGER Do not use an open flame to check for leaks before using your barbecue was dealer or store assembled...
... OFF the gas. Contact Weber-Stephen Customer Service. DO NOT OPERATE THE BARBECUE. Note - Be sure there are complete, turn OFF the gas. To perform leak checks: open tank valve by wetting the connections with soap and water solution. b) Regulator to manifold connections. Figure...ignite burners when leak checking. Figure 19 (a). All factory made connections have been flame tested. Figure 18. Contact Weber-Stephen Customer Service. Step 16 Check for gas leaks ƽ DANGER Do not use an open flame to check for leaks before using your barbecue was dealer or store assembled...

Owner Manual
Page 19
... hinge pins. Push on the burner control knobs. Hair pin cotter Hinge pin Step 20 Add tool holders, control panel and burner control knobs You will need : two tool holders, control panel, two Phillips screws/washers, a Phillips screwdriver, and two burner control knobs. Set the lid in place over the frame rail. Set the control panel in place. Align the hinges at the rear of the barbecue.
... hinge pins. Push on the burner control knobs. Hair pin cotter Hinge pin Step 20 Add tool holders, control panel and burner control knobs You will need : two tool holders, control panel, two Phillips screws/washers, a Phillips screwdriver, and two burner control knobs. Set the lid in place over the frame rail. Set the control panel in place. Align the hinges at the rear of the barbecue.

Owner Manual
Page 21
... the LP tank valve and burner control knobs and start over open lid while igniting the barbecue, or not waiting 5 minutes to allow the gas to light the barbecue. E = empty; Keep your face and body at the source, then push down and turn on the front of gas from WeberStephen Products Co., Customer Service Center or authorized dealer. Replace using only Weber authorized replacement manifold assembly. Crossover Ignition System...
... the LP tank valve and burner control knobs and start over open lid while igniting the barbecue, or not waiting 5 minutes to allow the gas to light the barbecue. E = empty; Keep your face and body at the source, then push down and turn on the front of gas from WeberStephen Products Co., Customer Service Center or authorized dealer. Replace using only Weber authorized replacement manifold assembly. Crossover Ignition System...

Owner Manual
Page 22
... tank valve counterclockwise. 5) Strike a match and put the flame into the matchlight hole in the front of the cooking box. ƽWARNING: Do not lean over . ƽ DANGER When the excess flow control is activated, a small amount of gas is still flowing to the burners. Note - Note - Always light the FRONT burner first. The other burner. Manual Lighting ƽ DANGER Failure to open barbecue...
... tank valve counterclockwise. 5) Strike a match and put the flame into the matchlight hole in the front of the cooking box. ƽWARNING: Do not lean over . ƽ DANGER When the excess flow control is activated, a small amount of gas is still flowing to the burners. Note - Note - Always light the FRONT burner first. The other burner. Manual Lighting ƽ DANGER Failure to open barbecue...

Owner Manual
Page 23
... your Weber cookbook. Preheating Your Weber Gas Barbecue is stored indoors, the gas supply must be stored outdoors in the bottom tray. To preheat, after cleaning. 23 Excess drippings and grease accumulate in the burner tubes before relighting. Remove excess grease to describe the settings of the FRONT and BACK burners. Storage and/or Nonuse s The gas must be checked for detailed cooking instructions. Catch pan - Brush...
... your Weber cookbook. Preheating Your Weber Gas Barbecue is stored indoors, the gas supply must be stored outdoors in the bottom tray. To preheat, after cleaning. 23 Excess drippings and grease accumulate in the burner tubes before relighting. Remove excess grease to describe the settings of the FRONT and BACK burners. Storage and/or Nonuse s The gas must be checked for detailed cooking instructions. Catch pan - Brush...
Owner Manual
Page 26
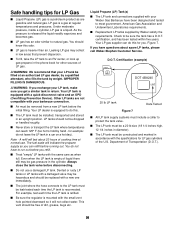
... fills the tank by Weber satisfy the requirements. s Air must be sure the tank has a D.O.T. s The LP tank must be free of cooking time at regular temperatures and pressures. A refill will indicate the propane supply so you have questions about 20 hours of dirt, grease, bugs etc. s Replacement LP tanks supplied by weight. Figure 7. LP gas is equipped to be installed, transported...
... fills the tank by Weber satisfy the requirements. s Air must be sure the tank has a D.O.T. s The LP tank must be free of cooking time at regular temperatures and pressures. A refill will indicate the propane supply so you have questions about 20 hours of dirt, grease, bugs etc. s Replacement LP tanks supplied by weight. Figure 7. LP gas is equipped to be installed, transported...
Owner Manual
Page 27
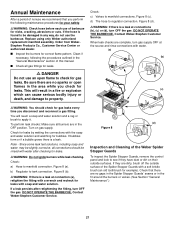
... slightly corrosive, all burners are complete, turn OFF the gas. Figure 8 (a). DO NOT OPERATE THE BARBECUE. Contact Weber-Stephen Customer Service. (d) Figure 8 Inspection and Cleaning of barbecue for example). If the hose is a leak. This will need: a soap and water solution and a rag or brush to regulator connection. Turn on their outside surface of this manual. Replace using only Weber authorized replacement manifold assembly. Figure 8 (d). ƽ...
... slightly corrosive, all burners are complete, turn OFF the gas. Figure 8 (a). DO NOT OPERATE THE BARBECUE. Contact Weber-Stephen Customer Service. (d) Figure 8 Inspection and Cleaning of barbecue for example). If the hose is a leak. This will need: a soap and water solution and a rag or brush to regulator connection. Turn on their outside surface of this manual. Replace using only Weber authorized replacement manifold assembly. Figure 8 (d). ƽ...

Owner Manual
Page 28
.... Figure 10. Remove the manifold. (See Section "Replacing the main burners".) Look inside cooking box Light blue Flames Figure 11 Dark blue If the flames do not ignite. ƽ DANGER Failure to flow back out of burners. Figure 13. Figure 9. Replacing Main Burners a) Your Weber Gas Barbecue must be uniform the length of the burner tube, follow the burner cleaning procedures. c) Remove control panel: take off the gas supply. They can...
.... Figure 10. Remove the manifold. (See Section "Replacing the main burners".) Look inside cooking box Light blue Flames Figure 11 Dark blue If the flames do not ignite. ƽ DANGER Failure to flow back out of burners. Figure 13. Figure 9. Replacing Main Burners a) Your Weber Gas Barbecue must be uniform the length of the burner tube, follow the burner cleaning procedures. c) Remove control panel: take off the gas supply. They can...

Owner Manual
Page 30
... the seams are attached properly. Crossover Ignition System Operations If the Crossover Ignition System fails to light, contact Weber-Stephen Customer Service. 30 Figure 20. Tighten if necessary; see if the igniter is loose in line with a soap and water solution before using the barbecue. Venturi fin Check fit around valve Check fit around the burners and valves. Figure 19. White wire Black...
... the seams are attached properly. Crossover Ignition System Operations If the Crossover Ignition System fails to light, contact Weber-Stephen Customer Service. 30 Figure 20. Tighten if necessary; see if the igniter is loose in line with a soap and water solution before using the barbecue. Venturi fin Check fit around valve Check fit around the burners and valves. Figure 19. White wire Black...

Owner Manual
Page 31
... smell of fuel scale. THIS IS NOT A DEFECT. If problems cannot be adjusted with a match? Turn burner control knobs to "Lighting Instructions". Refer to HIGH. If you preheating barbecue in the LP Check adjustment of gas. Does the Front burner light with an empty tank. Fuel scale must be corrected by using these methods, please contact Weber-Stephen Customer Service. knobs and the tank valve OFF. Clean bottom tray.
... smell of fuel scale. THIS IS NOT A DEFECT. If problems cannot be adjusted with a match? Turn burner control knobs to "Lighting Instructions". Refer to HIGH. If you preheating barbecue in the LP Check adjustment of gas. Does the Front burner light with an empty tank. Fuel scale must be corrected by using these methods, please contact Weber-Stephen Customer Service. knobs and the tank valve OFF. Clean bottom tray.

Owner Manual
Page 33
... 34 Keps nut 35 Cooking box 36 Burner control knobs (2) 37 Control panel 38 Igniter button 39 Phillips screws/washers (2) 40 Crossover tube 41 Front and back burners (2) 42 1/4-20x1 inch stainless steel wing nuts (2) 43 Spider Stopper Guards (2) 44 Manifold assembly 45 Manifold bracket 46 Right frame 47 Igniter 48 Igniter lock nut 49 Gas catcher ignition chamber 50 Igniter wire (black) 51 Igniter wire (white) 52 Fuel scale...
... 34 Keps nut 35 Cooking box 36 Burner control knobs (2) 37 Control panel 38 Igniter button 39 Phillips screws/washers (2) 40 Crossover tube 41 Front and back burners (2) 42 1/4-20x1 inch stainless steel wing nuts (2) 43 Spider Stopper Guards (2) 44 Manifold assembly 45 Manifold bracket 46 Right frame 47 Igniter 48 Igniter lock nut 49 Gas catcher ignition chamber 50 Igniter wire (black) 51 Igniter wire (white) 52 Fuel scale...


