
Owner Manual
Page 1
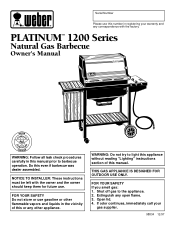
... "Lighting" instructions section of this manual. Extinguish any other flammable vapors and liquids in the vicinity of this or any open flame. 3. FOR YOUR SAFETY If you smell gas: 1. Shut off gas to barbecue operation. Do this manual prior to the appliance. 2. PLATINUM™ 1200 Series Natural Gas Barbecue Owner's Manual PSLEARTIIENSUM ® ® ® WARNING: Follow all leak check procedures carefully in this even if barbecue was dealer assembled...
... "Lighting" instructions section of this manual. Extinguish any other flammable vapors and liquids in the vicinity of this or any open flame. 3. FOR YOUR SAFETY If you smell gas: 1. Shut off gas to barbecue operation. Do this manual prior to the appliance. 2. PLATINUM™ 1200 Series Natural Gas Barbecue Owner's Manual PSLEARTIIENSUM ® ® ® WARNING: Follow all leak check procedures carefully in this even if barbecue was dealer assembled...
Owner Manual
Page 2
... cleaning the valves or burners. ƽ The Weber Gas Barbecue should be thoroughly cleaned on the front edge of escaping gas from LP tank. 2. Please carefully follow the Dangers, Warnings and Cautions contained in this Owner's Manual may result in serious bodily injury or death, or in operation. ƽ Use heat-resistant barbecue mitts or gloves when operating barbecue. Get away from the LP tank: 1. See instructions in...
... cleaning the valves or burners. ƽ The Weber Gas Barbecue should be thoroughly cleaned on the front edge of escaping gas from LP tank. 2. Please carefully follow the Dangers, Warnings and Cautions contained in this Owner's Manual may result in serious bodily injury or death, or in operation. ƽ Use heat-resistant barbecue mitts or gloves when operating barbecue. Get away from the LP tank: 1. See instructions in...
Owner Manual
Page 3
... defect and approves the claim, Weber will be limited to the repair or replacement of parts which prove defective under normal use , removal, return, or replacement of its equipment; This Limited Warranty does not cover any parts, contact your date of purchase. and no other obligation or liability in accordance with the sale, installation, use and service and which on how long...
... defect and approves the claim, Weber will be limited to the repair or replacement of parts which prove defective under normal use , removal, return, or replacement of its equipment; This Limited Warranty does not cover any parts, contact your date of purchase. and no other obligation or liability in accordance with the sale, installation, use and service and which on how long...

Owner Manual
Page 5
... Instructions 6 Assembly 7-21 Operating Instructions Lighting 22-23 Cooking 24 Storage and/or Nonuse 24 Cleaning 24 Troubleshooting & Maintenance Annual Maintenance 25 General Maintenance 26-27 Troubleshooting 29 Parts Listing 31 e a h i a b c d f g FEATURES: a) Convenient tables and racks. Flavorizer Bars heat just the right amount of drippings for precision cooking measures grill temperature, and can be removed and inserted into the food. g) Crossover Ignition System...
... Instructions 6 Assembly 7-21 Operating Instructions Lighting 22-23 Cooking 24 Storage and/or Nonuse 24 Cleaning 24 Troubleshooting & Maintenance Annual Maintenance 25 General Maintenance 26-27 Troubleshooting 29 Parts Listing 31 e a h i a b c d f g FEATURES: a) Convenient tables and racks. Flavorizer Bars heat just the right amount of drippings for precision cooking measures grill temperature, and can be removed and inserted into the food. g) Crossover Ignition System...

Owner Manual
Page 6
... outdoor cooking appliance. Gas supply testing s Disconnect your Weber Gas Barbecue when the gas supply is designed for assembling your Weber Gas Barbecue. General Instructions Your Weber Gas Barbecue is not intended to be installed in or on your patio. Do not use with indoor kitchen appliances. s If there are difficult to them. With the Weber Gas Barbecue you can be disconnected. s Do not use Liquid Propane (LP) bottled gas.The valves, orifices and hose are...
... outdoor cooking appliance. Gas supply testing s Disconnect your Weber Gas Barbecue when the gas supply is designed for assembling your Weber Gas Barbecue. General Instructions Your Weber Gas Barbecue is not intended to be installed in or on your patio. Do not use with indoor kitchen appliances. s If there are difficult to them. With the Weber Gas Barbecue you can be disconnected. s Do not use Liquid Propane (LP) bottled gas.The valves, orifices and hose are...
Owner Manual
Page 13
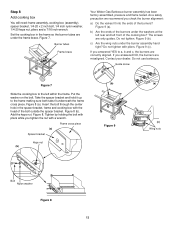
...box with the head of the cooking box? Burner tubes Frame brace Your Weber Gas Barbecue burner assembly has been factory assembled, pressure and flame tested. The screws are misaligned. If you answered YES to the frame making sure both tabs fit underneath the frame cross piece. Guide screw Figure 7 Slide the cooking box.... b) Are the ends of the burners? Figure 8 (a). Step 8 Add cooking box You will need: frame assembly, cooking box (assembly), spacer bracket, 1/4-20 x 2 inch bolt, 1/4 inch nylon washer, 1/4-20 keps nut, pliers and a 7/16 inch wrench. Figure 8. Take the spacer ...
...box with the head of the cooking box? Burner tubes Frame brace Your Weber Gas Barbecue burner assembly has been factory assembled, pressure and flame tested. The screws are misaligned. If you answered YES to the frame making sure both tabs fit underneath the frame cross piece. Guide screw Figure 7 Slide the cooking box.... b) Are the ends of the burners? Figure 8 (a). Step 8 Add cooking box You will need: frame assembly, cooking box (assembly), spacer bracket, 1/4-20 x 2 inch bolt, 1/4 inch nylon washer, 1/4-20 keps nut, pliers and a 7/16 inch wrench. Figure 8. Take the spacer ...

Owner Manual
Page 14
... igniter works loose, carefully tighten the igniter lock nut with an adjustable wrench or pliers. The igniter lock nut and igniter gasket are already attached to factory test the ignition system. Note - Place your hand underneath the bracket. Tighten the igniter lock nut. Step 9 Install manifold bracket You will need: manifold bracket Hook the bracket onto the manifold at the center burner valve...
... igniter works loose, carefully tighten the igniter lock nut with an adjustable wrench or pliers. The igniter lock nut and igniter gasket are already attached to factory test the ignition system. Note - Place your hand underneath the bracket. Tighten the igniter lock nut. Step 9 Install manifold bracket You will need: manifold bracket Hook the bracket onto the manifold at the center burner valve...
Owner Manual
Page 15
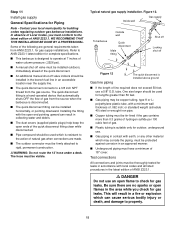
... a 3/8 inch NPT thread from the source when the barbecue is suitable only for gas supply installations. The quick disconnect fitting is installed above ground s If the length of natural gas when connections are general requirements taken from ANSI Z223.1, for outdoor, underground use a 5/8" O.D. s The dust covers (supplied plastic plugs) help keep the open flame to property. 15 or standard weight (schedule 40) steel...
... a 3/8 inch NPT thread from the source when the barbecue is suitable only for gas supply installations. The quick disconnect fitting is installed above ground s If the length of natural gas when connections are general requirements taken from ANSI Z223.1, for outdoor, underground use a 5/8" O.D. s The dust covers (supplied plastic plugs) help keep the open flame to property. 15 or standard weight (schedule 40) steel...

Owner Manual
Page 16
...using your barbecue was dealer or store assembled. Push male fitting of the quick disconnect. Slide the collar closed. If it . Valves are off Outside house wall Male fitting (b) Collar Quick disconnect engaged Figure 14 Turn on each valve. Figure 13 Step 13 Check for gas leaks ƽ DANGER Do not use an open flames... To barbecue (a) Locking shut off You will need : one burner control knob. Check for gas leaks. Since some leak test solutions, including soap and water, may have been flame tested. To perform leak checks: Slide back the collar of the hose into ...
...using your barbecue was dealer or store assembled. Push male fitting of the quick disconnect. Slide the collar closed. If it . Valves are off Outside house wall Male fitting (b) Collar Quick disconnect engaged Figure 14 Turn on each valve. Figure 13 Step 13 Check for gas leaks ƽ DANGER Do not use an open flames... To barbecue (a) Locking shut off You will need : one burner control knob. Check for gas leaks. Since some leak test solutions, including soap and water, may have been flame tested. To perform leak checks: Slide back the collar of the hose into ...

Owner Manual
Page 19
... holders, control panel, two Phillips screws/washers, a Phillips screwdriver, and three burner control knobs. Do not overtighten. Allow the slide bar to hang down. Figure 22 (a). Insert in frame brace (a) Crossover Ignition Button Step 18 Install swing table You will need : swing table end bracket, two 10-24 hex nuts, two 10-24 x 1 3/4 inch machine screws, slide bar assembly...
... holders, control panel, two Phillips screws/washers, a Phillips screwdriver, and three burner control knobs. Do not overtighten. Allow the slide bar to hang down. Figure 22 (a). Insert in frame brace (a) Crossover Ignition Button Step 18 Install swing table You will need : swing table end bracket, two 10-24 hex nuts, two 10-24 x 1 3/4 inch machine screws, slide bar assembly...
Owner Manual
Page 21
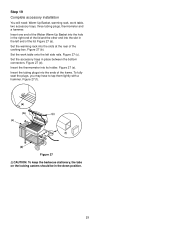
... of the Weber Warm-Up Basket into the hole in the right end of the lid and the other end into the slots at the rear of the cooking box. Set the accessory trays in the left side rails. Insert the thermometer into the ends of the frame. Insert the tubing plugs into its holder. Figure...
... of the Weber Warm-Up Basket into the hole in the right end of the lid and the other end into the slots at the rear of the cooking box. Set the accessory trays in the left side rails. Insert the thermometer into the ends of the frame. Insert the tubing plugs into its holder. Figure...

Owner Manual
Page 22
... flame-up which can turn on the front of the cooking box. ƽWARNING: If the burner does not light, turn each burner control knob clockwise to OFF. 2 7 5 3 6 4 Figure 1 22 Replace the hose. The other burners. The Crossover Ignition System ignites the Front burner with a match. 7) After the FRONT burner is lit through the matchlight hole on the other burners ignite from the igniter electrode inside the Gas Catcher Ignition...
... flame-up which can turn on the front of the cooking box. ƽWARNING: If the burner does not light, turn each burner control knob clockwise to OFF. 2 7 5 3 6 4 Figure 1 22 Replace the hose. The other burners. The Crossover Ignition System ignites the Front burner with a match. 7) After the FRONT burner is lit through the matchlight hole on the other burners ignite from the igniter electrode inside the Gas Catcher Ignition...

Owner Manual
Page 23
... down and turn clockwise.) 3) Turn gas supply valve on the other burners ignite from the matchlight hole when lighting the barbecue. 5) Push Front burner control knob down and turn each burner control knob clockwise to clear if the barbecue does not light, may result in the front of the cooking box. ƽWARNING: If the burner does not light, turn the Front burner control knob to OFF and wait 5 minutes...
... down and turn clockwise.) 3) Turn gas supply valve on the other burners ignite from the matchlight hole when lighting the barbecue. 5) Push Front burner control knob down and turn each burner control knob clockwise to clear if the barbecue does not light, may result in the front of the cooking box. ƽWARNING: If the burner does not light, turn the Front burner control knob to OFF and wait 5 minutes...

Owner Manual
Page 24
... the burner controls to high (HHH). You can line the catch pan with warm soapy water. Preheating - Excess drippings and grease accumulate in the bottom tray. Brush any household cleaners on barbecue or cart surfaces. Rinse well after lighting, close lid and turn off of the FRONT, CENTER, and BACK burners. Cooking ƽWARNING: Do not move the Weber Gas Barbecue when operating...
... the burner controls to high (HHH). You can line the catch pan with warm soapy water. Preheating - Excess drippings and grease accumulate in the bottom tray. Brush any household cleaners on barbecue or cart surfaces. Rinse well after lighting, close lid and turn off of the FRONT, CENTER, and BACK burners. Cooking ƽWARNING: Do not move the Weber Gas Barbecue when operating...
Owner Manual
Page 25
...: Check hose before each use the barbecue. b) Valves to be rinsed with a soft bristle brush (an old toothbrush for correct flame pattern. Figure 3 (b). Figure 3 (c). ƽWARNING: If there is found to manifold connections. When leak checks are dirty, brush off the outside surfaces. If they have dust or dirt on gas supply. ƽWARNING: Do not ignite burners while...
...: Check hose before each use the barbecue. b) Valves to be rinsed with a soft bristle brush (an old toothbrush for correct flame pattern. Figure 3 (b). Figure 3 (c). ƽWARNING: If there is found to manifold connections. When leak checks are dirty, brush off the outside surfaces. If they have dust or dirt on gas supply. ƽWARNING: Do not ignite burners while...
Owner Manual
Page 26
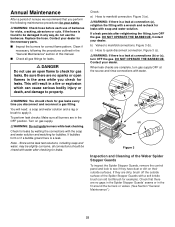
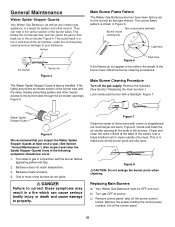
... yellowish Burner inside cooking box Light blue Air shutter Venturi fin Figure 4 The Weber Spider Stopper Guard is a target for the correct air and gas mixture. Figure 6 Dark blue If the flames do not ignite. ƽ DANGER Failure to correct these symptoms may result in Figure 6. Main Burner Cleaning Procedure Turn off the burner control knobs. Remove the manifold. (See Section "Replacing the main burners...
... yellowish Burner inside cooking box Light blue Air shutter Venturi fin Figure 4 The Weber Spider Stopper Guard is a target for the correct air and gas mixture. Figure 6 Dark blue If the flames do not ignite. ƽ DANGER Failure to correct these symptoms may result in Figure 6. Main Burner Cleaning Procedure Turn off the burner control knobs. Remove the manifold. (See Section "Replacing the main burners...

Owner Manual
Page 28
... 28 s Check to light, See Section "Manual Lighting", and contact your dealer. ƽWARNING: After reinstalling the gas lines, they should be leak checked with a match, then check the Crossover Ignition System. Tighten if necessary; Crossover Ignition System Operations If the Crossover Ignition System fails to the up position. Venturi fin Check fit around valve Check fit around burner Figure 14 ƽ...
... 28 s Check to light, See Section "Manual Lighting", and contact your dealer. ƽWARNING: After reinstalling the gas lines, they should be leak checked with a match, then check the Crossover Ignition System. Tighten if necessary; Crossover Ignition System Operations If the Crossover Ignition System fails to the up position. Venturi fin Check fit around valve Check fit around burner Figure 14 ƽ...

Owner Manual
Page 29
...: ṇCAUTION: Do not line the bottom tray with a match? Flames do not run the whole length of holes.) Cure Clean Weber Spider Stopper Guards. (See Section "Annual Maintenance".) Burner does not light, or flame is porcelain-on grease that has turned to flow into catch pan? Is fuel hose bent or kinked? If you preheating barbecue in HIGH position. Clean bottom...
...: ṇCAUTION: Do not line the bottom tray with a match? Flames do not run the whole length of holes.) Cure Clean Weber Spider Stopper Guards. (See Section "Annual Maintenance".) Burner does not light, or flame is porcelain-on grease that has turned to flow into catch pan? Is fuel hose bent or kinked? If you preheating barbecue in HIGH position. Clean bottom...
Owner Manual
Page 31
... back burners (2) 46 Center burner 47 1/4-20 wing nuts (2) 48 Spider Stopper Guards (3) 49 Manifold assembly 50 Manifold bracket 51 Igniter 52 Igniter lock nut 53 Igniter gasket 54 Gas catcher ignition chamber 55 Igniter wire (black) 56 Igniter wire (white) 57 Right frame 58 Hose 59 Control panel inserts (2) ṇWARNING: Use only Weber factory authorized parts. This will also void your owner's manual and serial number of any part...
... back burners (2) 46 Center burner 47 1/4-20 wing nuts (2) 48 Spider Stopper Guards (3) 49 Manifold assembly 50 Manifold bracket 51 Igniter 52 Igniter lock nut 53 Igniter gasket 54 Gas catcher ignition chamber 55 Igniter wire (black) 56 Igniter wire (white) 57 Right frame 58 Hose 59 Control panel inserts (2) ṇWARNING: Use only Weber factory authorized parts. This will also void your owner's manual and serial number of any part...

Owner Manual
Page 32
... Products Company Customer Service Center 200 East Daniels Road Palatine, Illinois 60067-6266 Call our toll free number 1-800-446-1071. For quicker service, please have regarding our products. We wish your owner's manual available for your satisfaction. While we give much attention to our products, an occasional error may occur. We also welcome any problems with parts or assembly.
... Products Company Customer Service Center 200 East Daniels Road Palatine, Illinois 60067-6266 Call our toll free number 1-800-446-1071. For quicker service, please have regarding our products. We wish your owner's manual available for your satisfaction. While we give much attention to our products, an occasional error may occur. We also welcome any problems with parts or assembly.


