
Owner Manual
Page 1
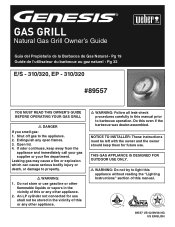
... if the barbecue was dealer-assembled. THIS GAS APPLIANCE IS DESIGNED FOR OUTDOOR USE ONLY. ƽ WARNING: Do not try to barbecue operation. Pg 32 E/S - 310/320, EP - 310/320 #89#50507000 YOU MUST READ THIS OWNER'S GUIDE BEFORE OPERATING YOUR GAS GRILL ƽ DANGER If you smell gas: 1. Shut off gas to property. ƽ WARNING: 1. Do this manual prior to light this appliance without reading the "Lighting Instructions" section...
... if the barbecue was dealer-assembled. THIS GAS APPLIANCE IS DESIGNED FOR OUTDOOR USE ONLY. ƽ WARNING: Do not try to barbecue operation. Pg 32 E/S - 310/320, EP - 310/320 #89#50507000 YOU MUST READ THIS OWNER'S GUIDE BEFORE OPERATING YOUR GAS GRILL ƽ DANGER If you smell gas: 1. Shut off gas to property. ƽ WARNING: 1. Do this manual prior to light this appliance without reading the "Lighting Instructions" section...
Owner Manual
Page 2
... propane gas in a natural gas unit is dangerous and will be hot during cooking or cleaning and should never be properly assembled according to correct the problem yourself. 3. Move away from any heated surfaces. ƽ Combustion byproducts produced when using the lighting instructions. ƽ Do not use a liquid propane cylinder with your Weber® gas barbecue. ƽ Do not attempt to disconnect the gas regulator and hose assembly or any gas...
... propane gas in a natural gas unit is dangerous and will be hot during cooking or cleaning and should never be properly assembled according to correct the problem yourself. 3. Move away from any heated surfaces. ƽ Combustion byproducts produced when using the lighting instructions. ƽ Do not use a liquid propane cylinder with your Weber® gas barbecue. ƽ Do not attempt to disconnect the gas regulator and hose assembly or any gas...
Owner Manual
Page 8
... Flavorizer® bars produce that the area under the slide out bottom tray. The valves, orifices and hose are for natural gas only. • Do not use with charcoal fuel. • Check that "outdoor" flavor in the catch pan under the control panel and the bottom tray are free from the gas supply piping system during any obstructions. (See Section: "Maintenance/Annual Maintenance...
... Flavorizer® bars produce that the area under the slide out bottom tray. The valves, orifices and hose are for natural gas only. • Do not use with charcoal fuel. • Check that "outdoor" flavor in the catch pan under the control panel and the bottom tray are free from the gas supply piping system during any obstructions. (See Section: "Maintenance/Annual Maintenance...
Owner Manual
Page 9
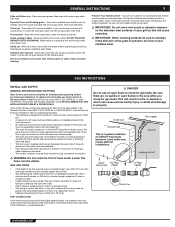
....1, Natural Gas and Propane Installation Code. Rinse well after cleaning. GAS INSTRUCTIONS INSTALL GAS SUPPLY GENERAL SPECIFICATIONS FOR PIPING Note: Contact your grill as this will result in an approved manner. • Underground piping must be used which is designed to operate at 7 inches of water column pressure (.2526 psi). • A manual shut-off of 18" cover. Remove excess grease, then wash with the open flame to property. GENERAL INSTRUCTIONS...
....1, Natural Gas and Propane Installation Code. Rinse well after cleaning. GAS INSTRUCTIONS INSTALL GAS SUPPLY GENERAL SPECIFICATIONS FOR PIPING Note: Contact your grill as this will result in an approved manner. • Underground piping must be used which is designed to operate at 7 inches of water column pressure (.2526 psi). • A manual shut-off of 18" cover. Remove excess grease, then wash with the open flame to property. GENERAL INSTRUCTIONS...
Owner Manual
Page 10
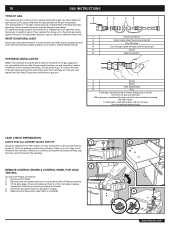
... fitting, insert the hose fitting all of the hose becomes necessary, factory specified parts are turned off. REMOVE CONTROL KNOBS & CONTROL PANEL FOR LEAK TESTING You will produce a gas joint. WWW.WEBER.COM® Check by your 3 local utility and should check to operate your house is completed. 10 GAS INSTRUCTIONS TYPE OF GAS Your natural gas grill is disconnected Shut Off Valve Coat this becomes necessary...
... fitting, insert the hose fitting all of the hose becomes necessary, factory specified parts are turned off. REMOVE CONTROL KNOBS & CONTROL PANEL FOR LEAK TESTING You will produce a gas joint. WWW.WEBER.COM® Check by your 3 local utility and should check to operate your house is completed. 10 GAS INSTRUCTIONS TYPE OF GAS Your natural gas grill is disconnected Shut Off Valve Coat this becomes necessary...
Owner Manual
Page 11
...: 1) Hose to barbecue operation. GAS INSTRUCTIONS 11 CHECK THE FLEXIBLE HOSE TO MANIFOLD CONNECTION The natural gas hose has been attached during the manuafacturing process. Sparks or open flames will result in this Owner's Guide, prior to manifold connection. ƽ WARNING: If there is a leak at connections(1) or(2) turn gas supply OFF at connection(1), retighten the fitting with soap and water solution. The burners have been flame...
...: 1) Hose to barbecue operation. GAS INSTRUCTIONS 11 CHECK THE FLEXIBLE HOSE TO MANIFOLD CONNECTION The natural gas hose has been attached during the manuafacturing process. Sparks or open flames will result in this Owner's Guide, prior to manifold connection. ƽ WARNING: If there is a leak at connections(1) or(2) turn gas supply OFF at connection(1), retighten the fitting with soap and water solution. The burners have been flame...
Owner Manual
Page 12
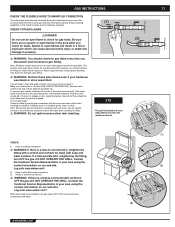
... electronic ignition button.You will hear it sparking. ƽ WARNING: Check hose before each use the barbecue. Contact the Customer Service Representative in your area using the contact information on our web site. 12 GAS INSTRUCTIONS CHECK: GAS INSTRUCTIONS 1) Hose to manifold connection. 2) Side burner hose to manifold connection and side burner hose to clear if the barbecue does not light, may have slight differences than the model purchased. 3) Hose to...
... electronic ignition button.You will hear it sparking. ƽ WARNING: Check hose before each use the barbecue. Contact the Customer Service Representative in your area using the contact information on our web site. 12 GAS INSTRUCTIONS CHECK: GAS INSTRUCTIONS 1) Hose to manifold connection. 2) Side burner hose to manifold connection and side burner hose to clear if the barbecue does not light, may have slight differences than the model purchased. 3) Hose to...
Owner Manual
Page 13
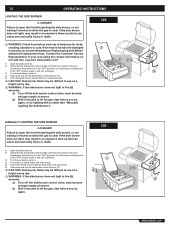
... burner control knobs are in the OFF position.) 3) Turn the gas supply valve on. 4) Insert match holder with lit match into the matchlight hole in the OFF position.) 3) Turn the gas supply valve on. ƽ WARNING: Do not lean over open barbecue. WWW.WEBER.COM® MAIN BURNER MANUAL LIGHTING 2 TE /OFF APAGAD 1 O ARRE 5 *The grill illustrated may have slight differences than the model purchased. OPERATING INSTRUCTIONS 13 MAIN BURNER LIGHTING...
... burner control knobs are in the OFF position.) 3) Turn the gas supply valve on. 4) Insert match holder with lit match into the matchlight hole in the OFF position.) 3) Turn the gas supply valve on. ƽ WARNING: Do not lean over open barbecue. WWW.WEBER.COM® MAIN BURNER MANUAL LIGHTING 2 TE /OFF APAGAD 1 O ARRE 5 *The grill illustrated may have slight differences than the model purchased. OPERATING INSTRUCTIONS 13 MAIN BURNER LIGHTING...
Owner Manual
Page 14
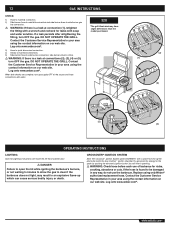
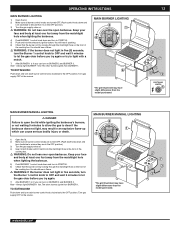
... before you try lighting with a match (see on a bright sunny day. ƽ WARNING: If the side burner does not light in five (5) seconds: a) Turn off the side burner control valve, main burners and gas supply at source. Replace using the contact information on our web site. Contact the Customer Service Representative in your area using only Weber® authorized replacement hose. 14 OPERATING INSTRUCTIONS LIGHTING OPERATING THE SIDE BURNER INSTRUCTIONS 320 ƽ...
... before you try lighting with a match (see on a bright sunny day. ƽ WARNING: If the side burner does not light in five (5) seconds: a) Turn off the side burner control valve, main burners and gas supply at source. Replace using the contact information on our web site. Contact the Customer Service Representative in your area using only Weber® authorized replacement hose. 14 OPERATING INSTRUCTIONS LIGHTING OPERATING THE SIDE BURNER INSTRUCTIONS 320 ƽ...
Owner Manual
Page 15
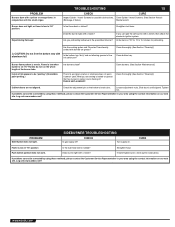
... coated with a match? Inside of gas. SIDEBURNER TROUBLESHOOTING Is gas supply off . It cannot "peel". Check the adjustment pin on . Does burner light with burned-on grease that has turned to 15 minutes for possible obstructions. (Blockage of the burner tube. If problems cannot be "peeling." (Resembles paint peeling.) Are burners clean? Burner flame pattern is porcelain enamel or stainless steel, not paint. PROBLEM Burners burn with...
... coated with a match? Inside of gas. SIDEBURNER TROUBLESHOOTING Is gas supply off . It cannot "peel". Check the adjustment pin on . Does burner light with burned-on grease that has turned to 15 minutes for possible obstructions. (Blockage of the burner tube. If problems cannot be "peeling." (Resembles paint peeling.) Are burners clean? Burner flame pattern is porcelain enamel or stainless steel, not paint. PROBLEM Burners burn with...
Owner Manual
Page 16
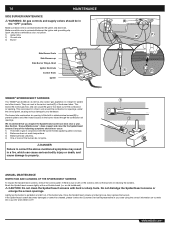
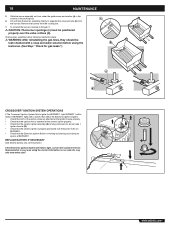
... a stainless steel screen (2) to prevent spiders and other insects. Make sure black wire is connected between the igniter and grounding clip. 16 MAINTENANCE SIDE BURNER MAINTENANCE ƽ WARNING: All gas controls and supply valves should be a white/blue color, not yellow. 1) Igniter Wire 2) Ground wire 3) Burner Side Burner Grate Side Burner cap Side Burner Ring & Head Igniter Electrode Control Knob Igniter WEBER® SPIDER/INSECT SCREENS Your Weber® gas barbecue...
... a stainless steel screen (2) to prevent spiders and other insects. Make sure black wire is connected between the igniter and grounding clip. 16 MAINTENANCE SIDE BURNER MAINTENANCE ƽ WARNING: All gas controls and supply valves should be a white/blue color, not yellow. 1) Igniter Wire 2) Ground wire 3) Burner Side Burner Grate Side Burner cap Side Burner Ring & Head Igniter Electrode Control Knob Igniter WEBER® SPIDER/INSECT SCREENS Your Weber® gas barbecue...
Owner Manual
Page 17
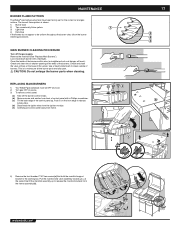
.... 3) To remove control panel: (a) Take off the gas supply. This is shown. 1) Burner tube 2) Tips occasionally flicker yellow 3) Light blue 4) Dark blue If the flames do not appear to release locking tabs. (d) Disconnect the igniter wires from the ignition module. (e) Carefully pull control panel away from back of the valves. REPLACING MAIN BURNERS 1) Your Weber® gas barbecue must be uniform throughout the burner tube, follow the burner cleaning procedures...
.... 3) To remove control panel: (a) Take off the gas supply. This is shown. 1) Burner tube 2) Tips occasionally flicker yellow 3) Light blue 4) Dark blue If the flames do not appear to release locking tabs. (d) Disconnect the igniter wires from the ignition module. (e) Carefully pull control panel away from back of the valves. REPLACING MAIN BURNERS 1) Your Weber® gas barbecue must be uniform throughout the burner tube, follow the burner cleaning procedures...
Owner Manual
Page 18
... the cooking box. 6) Lift and twist the burner assembly slightly, to ignite the BURNER 1, light BURNER 1 with a match. Check proper assembly before using the contact information on BURNER 1. • Check that the ceramic igniter is working by listening and looking for gas leaks.") CROSSOVER® IGNITION SYSTEM OPERATIONS If The Crossover® Ignition System fails to separate the crossover tube (b) from the cooking box. 7) To reinstall the burners, reverse 3) through...
... the cooking box. 6) Lift and twist the burner assembly slightly, to ignite the BURNER 1, light BURNER 1 with a match. Check proper assembly before using the contact information on BURNER 1. • Check that the ceramic igniter is working by listening and looking for gas leaks.") CROSSOVER® IGNITION SYSTEM OPERATIONS If The Crossover® Ignition System fails to separate the crossover tube (b) from the cooking box. 7) To reinstall the burners, reverse 3) through...

Owner Manual
Page 45
45 WWW.WEBER.COM®
45 WWW.WEBER.COM®


