
Owner Manual
Page 1
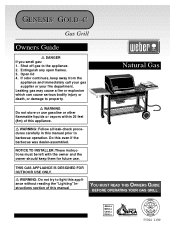
... 1199 NOTICE TO INSTALLER: These instructions must be left with the owner and the owner should keep away from the appliance and immediately call your gas supplier or your fire department. GENESIS® GOLD-C Gas Grill Owners Guide ƽ DANGER If you smell gas: 1. Extinguish any open flames. 3. Natural Gas ® ® WEBER WEBER WEBER WEBER ƽ WARNING Do not store or use . THIS GAS APPLIANCE IS DESIGNED FOR OUTDOOR USE ONLY. ƽ...
... 1199 NOTICE TO INSTALLER: These instructions must be left with the owner and the owner should keep away from the appliance and immediately call your gas supplier or your fire department. GENESIS® GOLD-C Gas Grill Owners Guide ƽ DANGER If you smell gas: 1. Extinguish any open flames. 3. Natural Gas ® ® WEBER WEBER WEBER WEBER ƽ WARNING Do not store or use . THIS GAS APPLIANCE IS DESIGNED FOR OUTDOOR USE ONLY. ƽ...

Owner Manual
Page 2
...; Use the regulator that is supplied with a damaged valve. ƽ Although your Weber gas barbecue. Call your Weber gas barbecue. ƽ Never lean over open grill or place hands or fingers on a regular basis. ƽ Liquid propane gas is out. ƽ Do not enlarge valve orifices or burner ports when cleaning the valves or burners. ƽ The Weber Gas Barbecue should never be used by your Weber gas barbecue. ƽ Do not put a barbecue cover or...
...; Use the regulator that is supplied with a damaged valve. ƽ Although your Weber gas barbecue. Call your Weber gas barbecue. ƽ Never lean over open grill or place hands or fingers on a regular basis. ƽ Liquid propane gas is out. ƽ Do not enlarge valve orifices or burner ports when cleaning the valves or burners. ƽ The Weber Gas Barbecue should never be used by your Weber gas barbecue. ƽ Do not put a barbecue cover or...
Owner Manual
Page 3
... warrants except as set out in connection with the sale, installation, use, removal, return, or replacement of parts that it . Weber may not apply to you. If Weber confirms the defect and approves the claim, Weber will return parts to assume for any parts, contact the Customer service representative in your region using the contact information sheet provided with the printed instructions accompanying it will...
... warrants except as set out in connection with the sale, installation, use, removal, return, or replacement of parts that it . Weber may not apply to you. If Weber confirms the defect and approves the claim, Weber will return parts to assume for any parts, contact the Customer service representative in your region using the contact information sheet provided with the printed instructions accompanying it will...

Owner Manual
Page 4
Contents Danger & Warnings A-2 Warranty A-3 General Instructions A-5 Exploded View A-6 Parts List A-10 Assembly Instructions B-1 Installing Work Surfaces and Gas Connection Guidelines C-1 Operating D-1 Lighting D-1 Manual Lighting D-2 Lighting the side burner D-3 Cooking D-4 Storage and/or Nouse D-4 Cleaning D-4 Annual Maintenance D-5 General Maintenance D-6 Replacing Main Burners D-7 Crossover Ignition System Operations D-8 Troubleshooting D-9 Side Burner Troubleshooting D-10 A-4
Contents Danger & Warnings A-2 Warranty A-3 General Instructions A-5 Exploded View A-6 Parts List A-10 Assembly Instructions B-1 Installing Work Surfaces and Gas Connection Guidelines C-1 Operating D-1 Lighting D-1 Manual Lighting D-2 Lighting the side burner D-3 Cooking D-4 Storage and/or Nouse D-4 Cleaning D-4 Annual Maintenance D-5 General Maintenance D-6 Replacing Main Burners D-7 Crossover Ignition System Operations D-8 Troubleshooting D-9 Side Burner Troubleshooting D-10 A-4
Owner Manual
Page 5
... local codes that apply to portable gas grills, you will give you the minimum requirements for assembling your Weber Gas Barbecue. In Canada the installation of this barbecue outdoors in the food. General Instructions Your Weber Gas Barbecue is portable so you can easily change its individual shutoff valve must be installed in or on your Weber Gas Barbecue when the gas supply is being tested at low pressures. The natural gas...
... local codes that apply to portable gas grills, you will give you the minimum requirements for assembling your Weber Gas Barbecue. In Canada the installation of this barbecue outdoors in the food. General Instructions Your Weber Gas Barbecue is portable so you can easily change its individual shutoff valve must be installed in or on your Weber Gas Barbecue when the gas supply is being tested at low pressures. The natural gas...
Owner Manual
Page 6
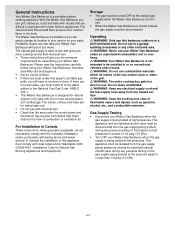
1 Genesis Gold-C NG 2 3 34 4 5 6 35 7 8 36 9 37 38 39 10 40 11 41 12 16 13 19 14 15 42 16 18 17 43 18 44 19 45 46 20 47 21 48 22 23 49 24 50 25 39 51 26 52 27 53 54 28 29 55 26 56 30 57 31 58 32 59 33 A-6
1 Genesis Gold-C NG 2 3 34 4 5 6 35 7 8 36 9 37 38 39 10 40 11 41 12 16 13 19 14 15 42 16 18 17 43 18 44 19 45 46 20 47 21 48 22 23 49 24 50 25 39 51 26 52 27 53 54 28 29 55 26 56 30 57 31 58 32 59 33 A-6

Owner Manual
Page 7
.... Front and Back Burners 46. Igniter 50. Manifold, Hose and regulator (assembled) 52. Rear Frame 56. Cooking Grates 11. Right Endcap 36. Igniter Button 39. Side Frame (Left front/Right rear) 20. Frame Connector 27. Spider Stopper Guards 53. 1. Work Surface Trim 17. Shroud 5. 1/4-20 x 1 1/4 inch bolt 6. Control Panel 38. Drip Pans 25. 1/4 - 20 x 2 inch Bolt 26. Crossover Tube 45. Manifold Support Bracket 49. Rear...
.... Front and Back Burners 46. Igniter 50. Manifold, Hose and regulator (assembled) 52. Rear Frame 56. Cooking Grates 11. Right Endcap 36. Igniter Button 39. Side Frame (Left front/Right rear) 20. Frame Connector 27. Spider Stopper Guards 53. 1. Work Surface Trim 17. Shroud 5. 1/4-20 x 1 1/4 inch bolt 6. Control Panel 38. Drip Pans 25. 1/4 - 20 x 2 inch Bolt 26. Crossover Tube 45. Manifold Support Bracket 49. Rear...

Owner Manual
Page 13
...(2). Note: Remove protective covers from tabs of the frame(1). Tighten bolts with wrench. (1) (2) C049.a C-1 Tighten (1) (2) Check that they are turned OFF. If they do turn , they are off . Install Side Burner Assembly You will need side burner assembly (assembly includes mounting frame), two 1/2 inch bolts, two nylon washers and a 7/16 inch or adjustable wrench. Slip washers on each valve. Slip washers...
...(2). Note: Remove protective covers from tabs of the frame(1). Tighten bolts with wrench. (1) (2) C049.a C-1 Tighten (1) (2) Check that they are turned OFF. If they do turn , they are off . Install Side Burner Assembly You will need side burner assembly (assembly includes mounting frame), two 1/2 inch bolts, two nylon washers and a 7/16 inch or adjustable wrench. Slip washers on each valve. Slip washers...

Owner Manual
Page 14
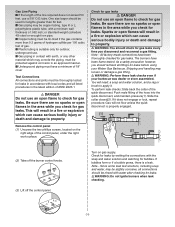
... side burner control knob down and turn it stops, then the burner valve is resistant to the action of natural gas when connections are general requirements taken from the source when the barbecue is disconnected I This barbecue is OFF. I The outdoor connector must be firmly attached to rigid, permanent construction. ƽ WARNING: Do not route the 12 foot hose under a deck. I A manual...
... side burner control knob down and turn it stops, then the burner valve is resistant to the action of natural gas when connections are general requirements taken from the source when the barbecue is disconnected I This barbecue is OFF. I The outdoor connector must be firmly attached to rigid, permanent construction. ƽ WARNING: Do not route the 12 foot hose under a deck. I A manual...
Owner Manual
Page 15
... for gas leaks ƽ DANGER Do not use an open flames will not flow unless the quick disconnect is a leak. Note - If bubbles form or if a bubble grows, there is properly engaged. (1) (2) (2) Take off the burner control knobs. (3) Lift off the control panel. or standard weight (schedule 40) steel or wrought iron pipe. Check for leaks before using your barbecue was...
... for gas leaks ƽ DANGER Do not use an open flames will not flow unless the quick disconnect is a leak. Note - If bubbles form or if a bubble grows, there is properly engaged. (1) (2) (2) Take off the burner control knobs. (3) Lift off the control panel. or standard weight (schedule 40) steel or wrought iron pipe. Check for leaks before using your barbecue was...
Owner Manual
Page 16
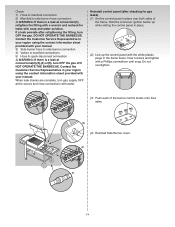
... of the burner control knobs onto their valve. (3) (4) Reinstall Side Burner cover. (4) (5) C-4 Contact the Customer Service Representative in your manual. 3) Side burner hose to side burner connection 4) Valves to manifold connections 5) Hose to side burner hose connection ƽ WARNING: If there is a leak at connections(2),(3),(4) or(5), turn OFF the gas. Reinstall control panel (after retightening the fitting, turn OFF the gas. DO NOT OPERATE THE BARBECUE. Check: 1) Hose to manifold connection 2) Manifold to quick...
... of the burner control knobs onto their valve. (3) (4) Reinstall Side Burner cover. (4) (5) C-4 Contact the Customer Service Representative in your manual. 3) Side burner hose to side burner connection 4) Valves to manifold connections 5) Hose to side burner hose connection ƽ WARNING: If there is a leak at connections(2),(3),(4) or(5), turn OFF the gas. Reinstall control panel (after retightening the fitting, turn OFF the gas. DO NOT OPERATE THE BARBECUE. Check: 1) Hose to manifold connection 2) Manifold to quick...
Owner Manual
Page 17
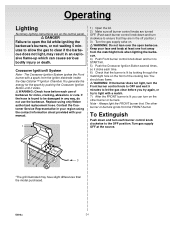
... barbecue's burners, or not waiting 5 minutes to allow the gas to be damaged in your manual. 1 1) Open the lid. 2) Make sure all burner control knobs are turned OFF. (Push each use the barbecue. Operating Lighting Summary lighting instructions are on the control panel. ƽ DANGER Failure to open barbecue. Replace using the contact information sheet provided with a spark from the FRONT burner. Crossover Ignition® System Note - Contact the Customer Service...
... barbecue's burners, or not waiting 5 minutes to allow the gas to be damaged in your manual. 1 1) Open the lid. 2) Make sure all burner control knobs are turned OFF. (Push each use the barbecue. Operating Lighting Summary lighting instructions are on the control panel. ƽ DANGER Failure to open barbecue. Replace using the contact information sheet provided with a spark from the FRONT burner. Crossover Ignition® System Note - Contact the Customer Service...

Owner Manual
Page 18
... the other burner or burners ignite from the matchlight hole when lighting the barbecue. 5) Push Front burner control knob down and turn clockwise to ensure they are in the off position.) 3) Turn the gas supply valve on. 4) Strike a match and put the flame into the matchlight hole in the front of the cooking box. Manual Lighting ƽ DANGER Failure to open lid while igniting the barbecue's burners, or...
... the other burner or burners ignite from the matchlight hole when lighting the barbecue. 5) Push Front burner control knob down and turn clockwise to ensure they are in the off position.) 3) Turn the gas supply valve on. 4) Strike a match and put the flame into the matchlight hole in the front of the cooking box. Manual Lighting ƽ DANGER Failure to open lid while igniting the barbecue's burners, or...
Owner Manual
Page 20
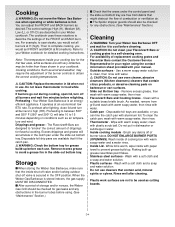
... ENLARGE BURNER PORTS (OPENINGS). Inside Lid - Stainless steel surfaces - Then to cool before using the contact information sheet provided with warm soapy water and a water rinse. Excess drippings and grease will take 10 to "smoke" the correct amount of replacement cooking grates and Flavorizer Bars contact the Customer Service Representative in your Weber Gas Barbecue OFF and wait for detailed cooking instructions. For...
... ENLARGE BURNER PORTS (OPENINGS). Inside Lid - Stainless steel surfaces - Then to cool before using the contact information sheet provided with warm soapy water and a water rinse. Excess drippings and grease will take 10 to "smoke" the correct amount of replacement cooking grates and Flavorizer Bars contact the Customer Service Representative in your Weber Gas Barbecue OFF and wait for detailed cooking instructions. For...
Owner Manual
Page 21
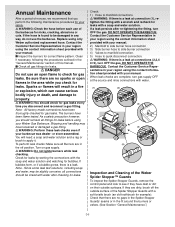
... the burners or valves. (See Section "General Maintenance.") D-5 Replace using the contact information sheet provided with your manual. Clean if necessary, following maintenance procedures for gas leaks. s Check all connections should recheck all Burners are complete, turn gas supply OFF at connections (2,3,4 0r 5), turn OFF the gas. Be sure there are no sparks or open flame to check for your Weber Gas Barbecue. All...
... the burners or valves. (See Section "General Maintenance.") D-5 Replace using the contact information sheet provided with your manual. Clean if necessary, following maintenance procedures for gas leaks. s Check all connections should recheck all Burners are complete, turn gas supply OFF at connections (2,3,4 0r 5), turn OFF the gas. Be sure there are no sparks or open flame to check for your Weber Gas Barbecue. All...

Owner Manual
Page 22
...the control panel, causing serious damage to your barbecue. (1) Main Burner Flame Pattern The Weber Gas Barbecue burners have been factory set for spiders and other insects access to the burner tubes through the air shutter openings. (1) If the flames do not ignite. &#...Barbecue heats unevenly. 4) One or more of the valves. This could result in a fire in and around the air shutter section of the burners with a wire (a straightened-out coat hanger will work). Look inside of the burner tube and the valve, thereby preventing spiders and other insects. Check and clean the valve orifices...
...the control panel, causing serious damage to your barbecue. (1) Main Burner Flame Pattern The Weber Gas Barbecue burners have been factory set for spiders and other insects access to the burner tubes through the air shutter openings. (1) If the flames do not ignite. &#...Barbecue heats unevenly. 4) One or more of the valves. This could result in a fire in and around the air shutter section of the burners with a wire (a straightened-out coat hanger will work). Look inside of the burner tube and the valve, thereby preventing spiders and other insects. Check and clean the valve orifices...

Owner Manual
Page 23
... the burner control knobs. Replacing Main Burners 1) Your Weber Gas Barbecue must be OFF and cool. 2) Turn gas OFF at source. 3) To remove control panel: take off the control panel. 4) Unlatch the Spider Stopper™ Guards and remove them. 7) Lift and twist the burner assembly slightly, to separate the crossover tube(1) from the cooking box. (1) 5) Remove the manifold bracket and unscrew the two wing nuts(1) that hold the manifold to...
... the burner control knobs. Replacing Main Burners 1) Your Weber Gas Barbecue must be OFF and cool. 2) Turn gas OFF at source. 3) To remove control panel: take off the control panel. 4) Unlatch the Spider Stopper™ Guards and remove them. 7) Lift and twist the burner assembly slightly, to separate the crossover tube(1) from the cooking box. (1) 5) Remove the manifold bracket and unscrew the two wing nuts(1) that hold the manifold to...
Owner Manual
Page 24
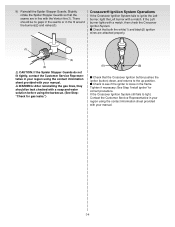
Crossover® Ignition System Operations If the Crossover Ignition System fails to light, Contact the Customer Service Representative in your region using the contact information sheet provided with your manual. ƽ WARNING: After reinstalling the gas lines, they should be leak checked with a soap and water solution before using the contact information sheet provided with the Venturi fins(1). See Step "Install igniter" for gas leaks.") (1) (2) s Check...
Crossover® Ignition System Operations If the Crossover Ignition System fails to light, Contact the Customer Service Representative in your region using the contact information sheet provided with your manual. ƽ WARNING: After reinstalling the gas lines, they should be leak checked with a soap and water solution before using the contact information sheet provided with the Venturi fins(1). See Step "Install igniter" for gas leaks.") (1) (2) s Check...
Owner Manual
Page 25
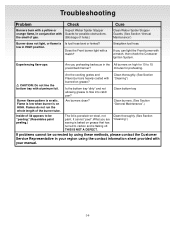
... by using the contact information sheet provided with your manual. Flame is low when burner is flaking off. Experiencing flare-ups: Are you are seeing is baked on grease that has turned to carbon and is on HIGH. minutes for preheating. ƽ CAUTION: Do not line the bottom tray with burned-on grease? It cannot "peel". Are burners clean? Troubleshooting Problem Check Burners...
... by using the contact information sheet provided with your manual. Flame is low when burner is flaking off. Experiencing flare-ups: Are you are seeing is baked on grease that has turned to carbon and is on HIGH. minutes for preheating. ƽ CAUTION: Do not line the bottom tray with burned-on grease? It cannot "peel". Are burners clean? Troubleshooting Problem Check Burners...
Owner Manual
Page 26
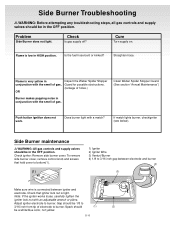
... off? To remove side burner cover, remove control knob and screws that igniter lock nut is connected between electrode and burner (4) (3) Make sure wire is tight. Does burner light with an adjustable wrench or pliers. Side Burner Troubleshooting ƽ WARNING: Before attempting any troubleshooting steps, all gas controls and supply valves should be in the OFF position. Straighten hose. Check that hold cover to bottom(1). (1) 1) Igniter 2) Igniter Wire 3) Venturi/Burner 4) 1/8 to burner.
... off? To remove side burner cover, remove control knob and screws that igniter lock nut is connected between electrode and burner (4) (3) Make sure wire is tight. Does burner light with an adjustable wrench or pliers. Side Burner Troubleshooting ƽ WARNING: Before attempting any troubleshooting steps, all gas controls and supply valves should be in the OFF position. Straighten hose. Check that hold cover to bottom(1). (1) 1) Igniter 2) Igniter Wire 3) Venturi/Burner 4) 1/8 to burner.


