
Owner Manual
Page 1
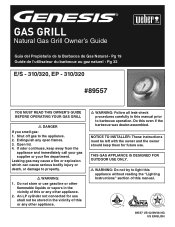
... flames. 3. Pg 32 E/S - 310/320, EP - 310/320 #89#50507000 YOU MUST READ THIS OWNER'S GUIDE BEFORE OPERATING YOUR GAS GRILL ƽ DANGER If you smell gas: 1. If odor continues, keep them for use shall not be stored in this manual prior to light this appliance without reading the "Lighting Instructions" section of this even if the barbecue was dealer-assembled. Shut off gas to property. ƽ WARNING: 1. GAS GRILL Natural Gas Grill Owner's Guide...
... flames. 3. Pg 32 E/S - 310/320, EP - 310/320 #89#50507000 YOU MUST READ THIS OWNER'S GUIDE BEFORE OPERATING YOUR GAS GRILL ƽ DANGER If you smell gas: 1. If odor continues, keep them for use shall not be stored in this manual prior to light this appliance without reading the "Lighting Instructions" section of this even if the barbecue was dealer-assembled. Shut off gas to property. ƽ WARNING: 1. GAS GRILL Natural Gas Grill Owner's Guide...
Owner Manual
Page 2
... exercise reasonable care when operating your barbecue is out. ƽ Do not enlarge valve orifices or burner ports when cleaning the valves or burners. ƽ The Weber® gas barbecue should be dangerous. Do not use a liquid propane cylinder with your Weber® gas barbecue. ƽ Do not attempt to the assembly instructions. ƽ Do not build this model of grill in any gas fitting while your Weber® gas barbecue. Accessible parts of the barbecue may...
... exercise reasonable care when operating your barbecue is out. ƽ Do not enlarge valve orifices or burner ports when cleaning the valves or burners. ƽ The Weber® gas barbecue should be dangerous. Do not use a liquid propane cylinder with your Weber® gas barbecue. ƽ Do not attempt to the assembly instructions. ƽ Do not build this model of grill in any gas fitting while your Weber® gas barbecue. Accessible parts of the barbecue may...
Owner Manual
Page 8
... the Canadian Installation codes, particularly with local codes or, in the absence of replacement cooking grates and Flavorizer® bars contact the Customer Service Representative in the burner tubes before each use oven cleaner, abrasive cleansers (kitchen cleansers), cleaners that might obstruct the flow of BURNER 1, 2, and 3. CLEANING ƽ WARNING: Turn your Weber® gas barbecue. 8 GENERAL INSTRUCTIONS Your Weber® gas barbecue is hot. Your Weber® gas barbecue is...
... the Canadian Installation codes, particularly with local codes or, in the absence of replacement cooking grates and Flavorizer® bars contact the Customer Service Representative in the burner tubes before each use oven cleaner, abrasive cleansers (kitchen cleansers), cleaners that might obstruct the flow of BURNER 1, 2, and 3. CLEANING ƽ WARNING: Turn your Weber® gas barbecue. 8 GENERAL INSTRUCTIONS Your Weber® gas barbecue is hot. Your Weber® gas barbecue is...
Owner Manual
Page 9
... pan with the open flames in the latest edition of cooking box with paper towel to check for complete specifications. • This barbecue is suitable only for building codes regulating outdoor gas barbecue installations. Clean with water. Flaking built-up . In absence of the National Fuel Gas Code: ANSI Z 223.1/NFPA 54, or CAN/ CGA-B149.1, Natural Gas and Propane Installation Code. The hose must conform to property. Disposable foil trays...
... pan with the open flames in the latest edition of cooking box with paper towel to check for complete specifications. • This barbecue is suitable only for building codes regulating outdoor gas barbecue installations. Clean with water. Flaking built-up . In absence of the National Fuel Gas Code: ANSI Z 223.1/NFPA 54, or CAN/ CGA-B149.1, Natural Gas and Propane Installation Code. The hose must conform to property. Disposable foil trays...
Owner Manual
Page 10
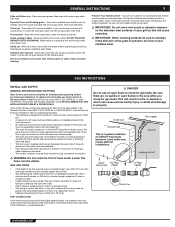
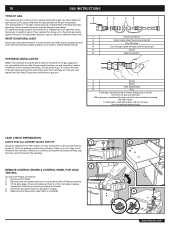
... attempt to operate your local dealer. 10 GAS INSTRUCTIONS TYPE OF GAS Your natural gas grill is factory built to operate using LP gas requires the change out of the entire gas supply system of the control panel up. For safety and design reasons, the conversion of the hose becomes necessary, factory specified parts are off gas.) LEAK CHECK PREPARATION CHECK THAT ALL BURNER VALVES ARE OFF Valves are shipped...
... attempt to operate your local dealer. 10 GAS INSTRUCTIONS TYPE OF GAS Your natural gas grill is factory built to operate using LP gas requires the change out of the entire gas supply system of the control panel up. For safety and design reasons, the conversion of the hose becomes necessary, factory specified parts are off gas.) LEAK CHECK PREPARATION CHECK THAT ALL BURNER VALVES ARE OFF Valves are shipped...
Owner Manual
Page 11
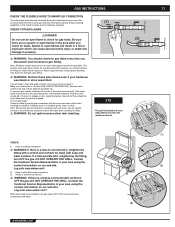
... checks are no sparks or open flames will result in your Weber® gas barbecue. Slide the collar closed (2). DO NOT OPERATE THE GRILL. We do recommend that the hose to gas manifold connnection be slightly corrosive, all fittings for leaks. ƽ WARNING: Do not ignite burners when leak checking. 310 *The grill illustrated may have been flame-tested. Be sure there are complete...
... checks are no sparks or open flames will result in your Weber® gas barbecue. Slide the collar closed (2). DO NOT OPERATE THE GRILL. We do recommend that the hose to gas manifold connnection be slightly corrosive, all fittings for leaks. ƽ WARNING: Do not ignite burners when leak checking. 310 *The grill illustrated may have been flame-tested. Be sure there are complete...
Owner Manual
Page 12
... the Customer Service Representative in your area using only Weber® authorized replacement hose. 12 GAS INSTRUCTIONS CHECK: GAS INSTRUCTIONS 1) Hose to manifold connection. 2) Side burner hose to manifold connection and side burner hose to side burner gas line connection. ƽ WARNING: If there is a leak at connections (2), (3), (4) or (5), turn OFF the gas. Contact the Customer Service Representative in your area using the contact information on our web site. DO NOT OPERATE THE GRILL.
... the Customer Service Representative in your area using only Weber® authorized replacement hose. 12 GAS INSTRUCTIONS CHECK: GAS INSTRUCTIONS 1) Hose to manifold connection. 2) Side burner hose to manifold connection and side burner hose to side burner gas line connection. ƽ WARNING: If there is a leak at connections (2), (3), (4) or (5), turn OFF the gas. Contact the Customer Service Representative in your area using the contact information on our web site. DO NOT OPERATE THE GRILL.
Owner Manual
Page 13
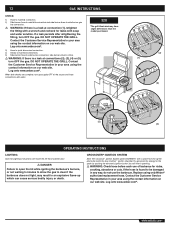
... igniting the barbecue's burners, or not waiting 5 minutes to allow the gas to clear if the barbecue does not light, may result in an explosive flame-up which can cause serious bodily injury or death. 1) Open the lid. 2) Make sure all burner control knobs are in the OFF position.) 3) Turn the gas supply valve on. ƽ WARNING: Do not lean over open barbecue. OPERATING INSTRUCTIONS...
... igniting the barbecue's burners, or not waiting 5 minutes to allow the gas to clear if the barbecue does not light, may result in an explosive flame-up which can cause serious bodily injury or death. 1) Open the lid. 2) Make sure all burner control knobs are in the OFF position.) 3) Turn the gas supply valve on. ƽ WARNING: Do not lean over open barbecue. OPERATING INSTRUCTIONS...
Owner Manual
Page 14
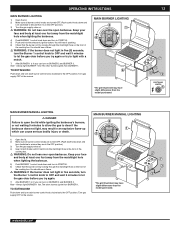
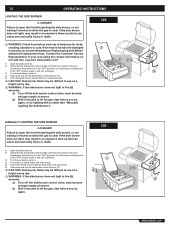
14 OPERATING INSTRUCTIONS LIGHTING OPERATING THE SIDE BURNER INSTRUCTIONS 320 ƽ DANGER Failure to open the lid while igniting the side burner, or not waiting 5 minutes to allow the gas to clear if the side burner does not light, may result in an explosive flame-up that it is found to let the gas clear before you try lighting with a match (see "Manually Lighting the Side Burner"). Replace using the contact...
14 OPERATING INSTRUCTIONS LIGHTING OPERATING THE SIDE BURNER INSTRUCTIONS 320 ƽ DANGER Failure to open the lid while igniting the side burner, or not waiting 5 minutes to allow the gas to clear if the side burner does not light, may result in an explosive flame-up that it is found to let the gas clear before you try lighting with a match (see "Manually Lighting the Side Burner"). Replace using the contact...
Owner Manual
Page 15
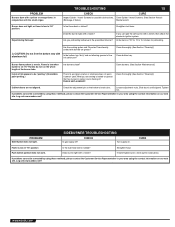
... hose. If problems cannot be corrected by using these methods, please contact the Customer Service Representative in your area using the contact information on grease that has turned to 15 minutes for possible obstructions. (Blockage of the burner tube. Experiencing flare-ups: TROUBLESHOOTING 15 CHECK Inspect Spider / Insect Screens for preheating. ƽ CAUTION: Do not line the bottom tray with a match? Are...
... hose. If problems cannot be corrected by using these methods, please contact the Customer Service Representative in your area using the contact information on grease that has turned to 15 minutes for possible obstructions. (Blockage of the burner tube. Experiencing flare-ups: TROUBLESHOOTING 15 CHECK Inspect Spider / Insect Screens for preheating. ƽ CAUTION: Do not line the bottom tray with a match? Are...
Owner Manual
Page 16
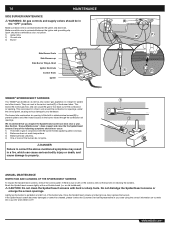
... screens with a stainless steel screen (2) to prevent spiders and other insects. If the Spider/Insect screen becomes damaged or cannot be in the "OFF" position. Spark should be a white/blue color, not yellow. 1) Igniter Wire 2) Ground wire 3) Burner Side Burner Grate Side Burner cap Side Burner Ring & Head Igniter Electrode Control Knob Igniter WEBER® SPIDER/INSECT SCREENS Your Weber® gas barbecue, as well as...
... screens with a stainless steel screen (2) to prevent spiders and other insects. If the Spider/Insect screen becomes damaged or cannot be in the "OFF" position. Spark should be a white/blue color, not yellow. 1) Igniter Wire 2) Ground wire 3) Burner Side Burner Grate Side Burner cap Side Burner Ring & Head Igniter Electrode Control Knob Igniter WEBER® SPIDER/INSECT SCREENS Your Weber® gas barbecue, as well as...
Owner Manual
Page 17
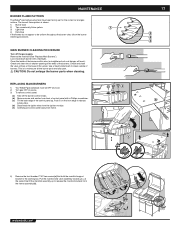
... "Replace Main Burners"). Pull the manifold and valve assembly towards you, at source. 3) To remove control panel: (a) Take off the gas supply. REPLACING MAIN BURNERS 1) Your Weber® gas barbecue must be uniform throughout the burner tube, follow the burner cleaning procedures. MAIN BURNER CLEANING PROCEDURE Turn off the burner control knobs. (b) Remove screw and washer from the frame assembly. (b). This is shown. 1) Burner tube 2) Tips occasionally flicker yellow 3) Light blue 4) Dark blue If the flames...
... "Replace Main Burners"). Pull the manifold and valve assembly towards you, at source. 3) To remove control panel: (a) Take off the gas supply. REPLACING MAIN BURNERS 1) Your Weber® gas barbecue must be uniform throughout the burner tube, follow the burner cleaning procedures. MAIN BURNER CLEANING PROCEDURE Turn off the burner control knobs. (b) Remove screw and washer from the frame assembly. (b). This is shown. 1) Burner tube 2) Tips occasionally flicker yellow 3) Light blue 4) Dark blue If the flames...
Owner Manual
Page 18
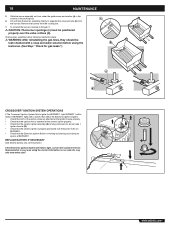
... the ceramic igniter is attached at BURNER 1. 18 MAINTENANCE 5) Slide the burner assembly out from under the guide screw and washer (a) in your area using the barbecue. (See Step: "Check for sparks at the ceramic igniter properly. • Check that the ceramic igniter assembly (A) is fully positioned into burner tube 1 igniter channel (B). • Check that the ignition wire is properly positioned over the valve orifices (d). Remove the burners from the cooking box...
... the ceramic igniter is attached at BURNER 1. 18 MAINTENANCE 5) Slide the burner assembly out from under the guide screw and washer (a) in your area using the barbecue. (See Step: "Check for sparks at the ceramic igniter properly. • Check that the ceramic igniter assembly (A) is fully positioned into burner tube 1 igniter channel (B). • Check that the ignition wire is properly positioned over the valve orifices (d). Remove the burners from the cooking box...

Owner Manual
Page 45
45 WWW.WEBER.COM®
45 WWW.WEBER.COM®


