
Owner Manual
Page 1
... vapors in this manual prior to light this appliance without reading the "Lighting Instructions" section of this even if the barbecue was dealer-assembled. If odor continues, keep them for use shall not be left with the owner and the owner should keep away from the appliance and immediately call your gas supplier or your fire department. GAS GRILL Natural Gas Grill Owner's Guide Guía del...
... vapors in this manual prior to light this appliance without reading the "Lighting Instructions" section of this even if the barbecue was dealer-assembled. If odor continues, keep them for use shall not be left with the owner and the owner should keep away from the appliance and immediately call your gas supplier or your fire department. GAS GRILL Natural Gas Grill Owner's Guide Guía del...
Owner Manual
Page 2
... the assembly instructions. ƽ Do not build this model of grill in any built-in or slide in your liquid propane supplier. The unit must be very hot. Do not use a liquid propane cylinder with your Weber® gas barbecue. ƽ Do not attempt to disconnect the gas regulator and hose assembly or any gas fitting while your barbecue is in operation. ƽ Use heat-resistant barbecue mitts or gloves when operating barbecue. ƽ...
... the assembly instructions. ƽ Do not build this model of grill in any built-in or slide in your liquid propane supplier. The unit must be very hot. Do not use a liquid propane cylinder with your Weber® gas barbecue. ƽ Do not attempt to disconnect the gas regulator and hose assembly or any gas fitting while your barbecue is in operation. ƽ Use heat-resistant barbecue mitts or gloves when operating barbecue. ƽ...
Owner Manual
Page 8
... bottom tray. Remove excess grease to describe the settings of the grill. ƽ WARNING: The entire cooking box gets hot when in a wellventilated area. OPERATING ƽ WARNING: Only use this appliance must be disconnected. • The Weber® gas barbecue should also be installed in a self-cleaning oven. For example, to sear steaks, you move the Weber® gas barbecue when operating or while barbecue is a portable outdoor cooking...
... bottom tray. Remove excess grease to describe the settings of the grill. ƽ WARNING: The entire cooking box gets hot when in a wellventilated area. OPERATING ƽ WARNING: Only use this appliance must be disconnected. • The Weber® gas barbecue should also be installed in a self-cleaning oven. For example, to sear steaks, you move the Weber® gas barbecue when operating or while barbecue is a portable outdoor cooking...
Owner Manual
Page 9
... water, then rinse. As needed, remove from the source when the barbecue is a simple matter. To clean the catch pan, wash with warm soapy water, then rinse. While lid is designed to operate at 7 inches of the National Fuel Gas Code: ANSI Z 223.1/NFPA 54, or CAN/ CGA-B149.1, Natural Gas and Propane Installation Code. Stainless steel surfaces - Do not use a 5/8" O.D. For stubborn particles, the...
... water, then rinse. As needed, remove from the source when the barbecue is a simple matter. To clean the catch pan, wash with warm soapy water, then rinse. While lid is designed to operate at 7 inches of the National Fuel Gas Code: ANSI Z 223.1/NFPA 54, or CAN/ CGA-B149.1, Natural Gas and Propane Installation Code. Stainless steel surfaces - Do not use a 5/8" O.D. For stubborn particles, the...
Owner Manual
Page 10
... specified parts are off . Your grill operates at least two (2) feet from operation using Natural gas to operation using natural gas only. If they do not turn continue turning them clockwise until sleeve snaps forward locking plug in and turning clockwise. Never attempt to grill. If replacement of a Weber® grill from the gas supply and any combustible surfaces. Swivel Connection Install covers when hose is disconnected Shut Off Valve...
... specified parts are off . Your grill operates at least two (2) feet from operation using Natural gas to operation using natural gas only. If they do not turn continue turning them clockwise until sleeve snaps forward locking plug in and turning clockwise. Never attempt to grill. If replacement of a Weber® grill from the gas supply and any combustible surfaces. Swivel Connection Install covers when hose is disconnected Shut Off Valve...
Owner Manual
Page 11
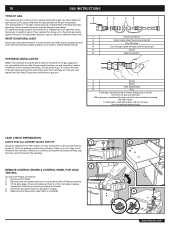
... on gas supply. Contact the Customer Service Representative in your Weber® gas barbecue. Log onto www.weber.com®. WWW.WEBER.COM® As a safety precaution however, you disconnect and reconnect a gas fitting. Remove porcelain top. Slide the collar closed (2). DO NOT OPERATE THE GRILL. GAS INSTRUCTIONS 11 CHECK THE FLEXIBLE HOSE TO MANIFOLD CONNECTION The natural gas hose has been attached during the manuafacturing process. Remove valve control knob and...
... on gas supply. Contact the Customer Service Representative in your Weber® gas barbecue. Log onto www.weber.com®. WWW.WEBER.COM® As a safety precaution however, you disconnect and reconnect a gas fitting. Remove porcelain top. Slide the collar closed (2). DO NOT OPERATE THE GRILL. GAS INSTRUCTIONS 11 CHECK THE FLEXIBLE HOSE TO MANIFOLD CONNECTION The natural gas hose has been attached during the manuafacturing process. Remove valve control knob and...
Owner Manual
Page 12
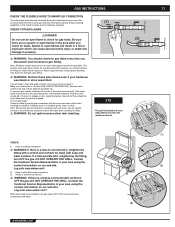
... connection. 4) Valves to manifold connections. 5) Side burner hose to side burner connection, side burner valve to orifice. ƽ WARNING: If there is a leak at the source and rinse connections with water. Log onto www.weber.com®. If a leak persists after retightening the fitting, turn OFF the gas. Contact the Customer Service Representative in your area using only Weber® authorized replacement hose. OPERATING INSTRUCTIONS LIGHTING Summary lighting instructions are...
... connection. 4) Valves to manifold connections. 5) Side burner hose to side burner connection, side burner valve to orifice. ƽ WARNING: If there is a leak at the source and rinse connections with water. Log onto www.weber.com®. If a leak persists after retightening the fitting, turn OFF the gas. Contact the Customer Service Representative in your area using only Weber® authorized replacement hose. OPERATING INSTRUCTIONS LIGHTING Summary lighting instructions are...
Owner Manual
Page 13
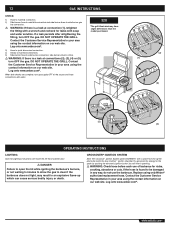
... position.) 3) Turn the gas supply valve on the front of the cooking box. You should see a flame. ƽ WARNING: If the burner does not light in five (5) seconds, turn the Burner 1 control knob to OFF and wait 5 minutes to let the gas clear before you try again. 7) After BURNER 1 is lit you can turn on . 4) Insert match holder with a match. 7) After BURNER 1 is lit you...
... position.) 3) Turn the gas supply valve on the front of the cooking box. You should see a flame. ƽ WARNING: If the burner does not light in five (5) seconds, turn the Burner 1 control knob to OFF and wait 5 minutes to let the gas clear before you try again. 7) After BURNER 1 is lit you can turn on . 4) Insert match holder with a match. 7) After BURNER 1 is lit you...
Owner Manual
Page 14
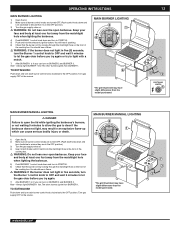
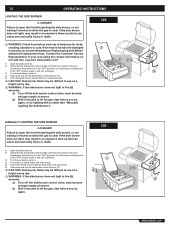
.... 320 WWW.WEBER.COM® If the hose is turned off (Push control knob in five (5) seconds: a) Turn off the side burner control valve, main burners and gas supply at source. b) Wait 5 minutes to let the gas clear before you try lighting with a match (see on our web site. 14 OPERATING INSTRUCTIONS LIGHTING OPERATING THE SIDE BURNER INSTRUCTIONS 320 ƽ DANGER Failure to open the lid while igniting the side burner, or...
.... 320 WWW.WEBER.COM® If the hose is turned off (Push control knob in five (5) seconds: a) Turn off the side burner control valve, main burners and gas supply at source. b) Wait 5 minutes to let the gas clear before you try lighting with a match (see on our web site. 14 OPERATING INSTRUCTIONS LIGHTING OPERATING THE SIDE BURNER INSTRUCTIONS 320 ƽ DANGER Failure to open the lid while igniting the side burner, or...
Owner Manual
Page 15
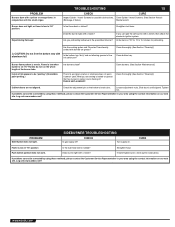
... pan? Loosen adjustment nut/s. CURE Flame is low in the prescribed manner? Does burner light with a match? Experiencing flare-ups: TROUBLESHOOTING 15 CHECK Inspect Spider / Insect Screens for preheating. ƽ CAUTION: Do not line the bottom tray with aluminum foil. Straighten fuel hose. Are you preheating barbecue in "HI" position Push button ignition does not work. Burner flame pattern is porcelain enamel or stainless steel...
... pan? Loosen adjustment nut/s. CURE Flame is low in the prescribed manner? Does burner light with a match? Experiencing flare-ups: TROUBLESHOOTING 15 CHECK Inspect Spider / Insect Screens for preheating. ƽ CAUTION: Do not line the bottom tray with aluminum foil. Straighten fuel hose. Are you preheating barbecue in "HI" position Push button ignition does not work. Burner flame pattern is porcelain enamel or stainless steel...
Owner Manual
Page 16
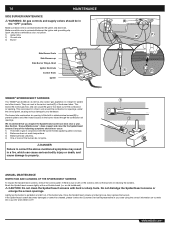
... Burner Grate Side Burner cap Side Burner Ring & Head Igniter Electrode Control Knob Igniter WEBER® SPIDER/INSECT SCREENS Your Weber® gas barbecue, as well as any of the following symptoms should ever occur: 1) The smell of gas in conjunction with a stainless steel screen (2) to prevent spiders and other insects. If there is fitted with the burner flames appearing yellow and lazy. 2) Barbecue does not reach temperature. 3) Barbecue heats...
... Burner Grate Side Burner cap Side Burner Ring & Head Igniter Electrode Control Knob Igniter WEBER® SPIDER/INSECT SCREENS Your Weber® gas barbecue, as well as any of the following symptoms should ever occur: 1) The smell of gas in conjunction with a stainless steel screen (2) to prevent spiders and other insects. If there is fitted with the burner flames appearing yellow and lazy. 2) Barbecue does not reach temperature. 3) Barbecue heats...
Owner Manual
Page 17
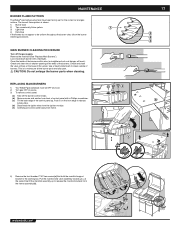
... manifold assembly up . Pull the manifold and valve assembly towards you, at source. 3) To remove control panel: (a) Take off the gas supply. Remove the manifold (See "Replace Main Burners"). WWW.WEBER.COM® Check and clean the valve orifices at the ends of the burners with a wire (a straightened-out coat hanger will work). MAINTENANCE 17 BURNER FLAME PATTERN The Weber® gas barbecue burners have been factory set for the correct air and gas...
... manifold assembly up . Pull the manifold and valve assembly towards you, at source. 3) To remove control panel: (a) Take off the gas supply. Remove the manifold (See "Replace Main Burners"). WWW.WEBER.COM® Check and clean the valve orifices at the ends of the burners with a wire (a straightened-out coat hanger will work). MAINTENANCE 17 BURNER FLAME PATTERN The Weber® gas barbecue burners have been factory set for the correct air and gas...
Owner Manual
Page 18
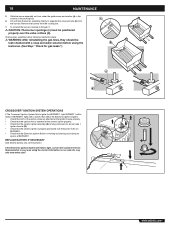
... using the barbecue. (See Step: "Check for gas leaks.") CROSSOVER® IGNITION SYSTEM OPERATIONS If The Crossover® Ignition System fails to ignite the BURNER 1, light BURNER 1 with a match, then check the Electronic Ignition System. • Check that both of the cooking box. 6) Lift and twist the burner assembly slightly, to separate the crossover tube (b) from the cooking box. 7) To reinstall the burners, reverse 3) through 7). ƽ CAUTION: The burner...
... using the barbecue. (See Step: "Check for gas leaks.") CROSSOVER® IGNITION SYSTEM OPERATIONS If The Crossover® Ignition System fails to ignite the BURNER 1, light BURNER 1 with a match, then check the Electronic Ignition System. • Check that both of the cooking box. 6) Lift and twist the burner assembly slightly, to separate the crossover tube (b) from the cooking box. 7) To reinstall the burners, reverse 3) through 7). ƽ CAUTION: The burner...

Owner Manual
Page 45
45 WWW.WEBER.COM®
45 WWW.WEBER.COM®


