
Owner Manual
Page 1
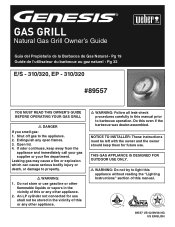
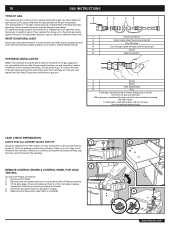
... "Lighting Instructions" section of this or any other flammable liquids or vapors in the vicinity of this even if the barbecue was dealer-assembled. If odor continues, keep them for future use gasoline or other appliance. 2. Shut off gas to property. ƽ WARNING: 1. NOTICE TO INSTALLER: These instructions must be stored in the vicinity of this manual prior to barbecue operation. GAS GRILL Natural Gas Grill Owner's Guide...
... "Lighting Instructions" section of this or any other flammable liquids or vapors in the vicinity of this even if the barbecue was dealer-assembled. If odor continues, keep them for future use gasoline or other appliance. 2. Shut off gas to property. ƽ WARNING: 1. NOTICE TO INSTALLER: These instructions must be stored in the vicinity of this manual prior to barbecue operation. GAS GRILL Natural Gas Grill Owner's Guide...
Owner Manual
Page 2
... fuel supply hose away from liquid propane cylinder. 2. The conversion or attempted use . It will void your warranty. ƽ Do not attempt to disconnect any gas fitting while your barbecue is in operation. ƽ Use heat-resistant barbecue mitts or gloves when operating barbecue. ƽ Keep any gas fitting while your barbecue is not natural gas. Ignoring this product.) LIQUID PROPANE GAS UNITS ONLY: ƽ Use the pressure regulator and hose assembly that...
... fuel supply hose away from liquid propane cylinder. 2. The conversion or attempted use . It will void your warranty. ƽ Do not attempt to disconnect any gas fitting while your barbecue is in operation. ƽ Use heat-resistant barbecue mitts or gloves when operating barbecue. ƽ Keep any gas fitting while your barbecue is not natural gas. Ignoring this product.) LIQUID PROPANE GAS UNITS ONLY: ƽ Use the pressure regulator and hose assembly that...
Owner Manual
Page 8
... of the burner controls to high (H). Use a warm soapy water solution to or less than those shown in the food. It operates at low pressures. Installation must comply with local codes and/or Standards CAN/ CGA-B149.1 (Installation Code for natural gas only. • Do not use the barbecue within 24 inches of replacement cooking grates and Flavorizer® bars contact the Customer Service Representative in...
... of the burner controls to high (H). Use a warm soapy water solution to or less than those shown in the food. It operates at low pressures. Installation must comply with local codes and/or Standards CAN/ CGA-B149.1 (Installation Code for natural gas only. • Do not use the barbecue within 24 inches of replacement cooking grates and Flavorizer® bars contact the Customer Service Representative in...
Owner Manual
Page 9
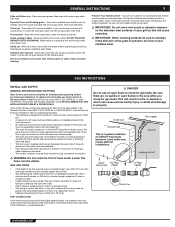
... sulfide per 100 cubic feet of the quick disconnect. • An additional manual shut-off of the National Fuel Gas Code: ANSI Z 223.1/NFPA 54, or CAN/ CGA-B149.1, Natural Gas and Propane Installation Code. Wash with water. Preserve Your Stainless Steel - GAS INSTRUCTIONS INSTALL GAS SUPPLY GENERAL SPECIFICATIONS FOR PIPING Note: Contact your grill as this will result in an accessible location near the supply...
... sulfide per 100 cubic feet of the quick disconnect. • An additional manual shut-off of the National Fuel Gas Code: ANSI Z 223.1/NFPA 54, or CAN/ CGA-B149.1, Natural Gas and Propane Installation Code. Wash with water. Preserve Your Stainless Steel - GAS INSTRUCTIONS INSTALL GAS SUPPLY GENERAL SPECIFICATIONS FOR PIPING Note: Contact your grill as this will result in an accessible location near the supply...
Owner Manual
Page 10
... assembly instructions, you should be sure that they are ready to operation using natural gas only. This process will need: Phillips screwdriver. 1) Remove control knobs. 2) Remove screw and washer from operation using Natural gas to grill. Carefully pull control panel away from frame. 4) Disconnect the igniter wires from the gas supply and any combustible surfaces. Your grill operates at least two (2) feet from the ignition module. 5) Replace control panel when Leak Check is already heated...
... assembly instructions, you should be sure that they are ready to operation using natural gas only. This process will need: Phillips screwdriver. 1) Remove control knobs. 2) Remove screw and washer from operation using Natural gas to grill. Carefully pull control panel away from frame. 4) Disconnect the igniter wires from the gas supply and any combustible surfaces. Your grill operates at least two (2) feet from the ignition module. 5) Replace control panel when Leak Check is already heated...
Owner Manual
Page 11
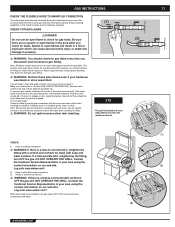
... Customer Service Representative in your barbecue was dealer or store assembled. When leak checks are no sparks or open flame to barbecue operation. GAS INSTRUCTIONS 11 CHECK THE FLEXIBLE HOSE TO MANIFOLD CONNECTION The natural gas hose has been attached during the manuafacturing process. CHECK FOR GAS LEAKS ƽ DANGER Do not use an open flames in this Owner's Guide, prior to check for leaks before using your area using...
... Customer Service Representative in your barbecue was dealer or store assembled. When leak checks are no sparks or open flame to barbecue operation. GAS INSTRUCTIONS 11 CHECK THE FLEXIBLE HOSE TO MANIFOLD CONNECTION The natural gas hose has been attached during the manuafacturing process. CHECK FOR GAS LEAKS ƽ DANGER Do not use an open flames in this Owner's Guide, prior to check for leaks before using your area using...
Owner Manual
Page 12
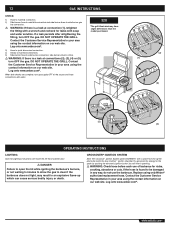
... GRILL. DO NOT OPERATE THE GRILL. Contact the Customer Service Representative in your area using the contact information on our web site. OPERATING INSTRUCTIONS LIGHTING Summary lighting instructions are complete, turn gas supply OFF at connections (2), (3), (4) or (5), turn OFF the gas. Replace using the contact information on our web site. Log onto www.weber.com®. 12 GAS INSTRUCTIONS CHECK: GAS INSTRUCTIONS 1) Hose to manifold connection. 2) Side burner hose to manifold connection and side burner hose...
... GRILL. DO NOT OPERATE THE GRILL. Contact the Customer Service Representative in your area using the contact information on our web site. OPERATING INSTRUCTIONS LIGHTING Summary lighting instructions are complete, turn gas supply OFF at connections (2), (3), (4) or (5), turn OFF the gas. Replace using the contact information on our web site. Log onto www.weber.com®. 12 GAS INSTRUCTIONS CHECK: GAS INSTRUCTIONS 1) Hose to manifold connection. 2) Side burner hose to manifold connection and side burner hose...
Owner Manual
Page 13
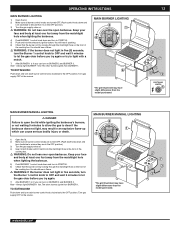
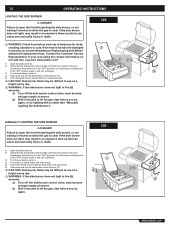
Note - Always light BURNER 1 first.The other burners ignite from the matchlight hole when lighting the barbecue. 5) Push BURNER 1 control knob down and turn each burner control knob clockwise to clear if the barbecue does not light, may result in the front of the cooking box. ƽ WARNING: Do not lean over the open barbecue. WWW.WEBER.COM® OPERATING INSTRUCTIONS 13 MAIN BURNER LIGHTING 1) Open the lid. 2) Make sure all burner control knobs are...
Note - Always light BURNER 1 first.The other burners ignite from the matchlight hole when lighting the barbecue. 5) Push BURNER 1 control knob down and turn each burner control knob clockwise to clear if the barbecue does not light, may result in the front of the cooking box. ƽ WARNING: Do not lean over the open barbecue. WWW.WEBER.COM® OPERATING INSTRUCTIONS 13 MAIN BURNER LIGHTING 1) Open the lid. 2) Make sure all burner control knobs are...
Owner Manual
Page 14
... the hose is found to see "Manually Lighting the Side Burner"). Log onto www.weber.com®. 1) Open the side burner lid. 2) Check that the side burner valve is turned off (Push control knob in and turn the side burner control valve to "HI". ƽ CAUTION: Side burner flame may be difficult to be damaged in five (5) seconds: a) Turn off the side burner control valve, main burners and gas supply...
... the hose is found to see "Manually Lighting the Side Burner"). Log onto www.weber.com®. 1) Open the side burner lid. 2) Check that the side burner valve is turned off (Push control knob in and turn the side burner control valve to "HI". ƽ CAUTION: Side burner flame may be difficult to be damaged in five (5) seconds: a) Turn off the side burner control valve, main burners and gas supply...
Owner Manual
Page 15
... match lights burner, check igniter (see below). Burner does not light, or flame is low in "HI" position. Straighten hose. Experiencing flare-ups: TROUBLESHOOTING 15 CHECK Inspect Spider / Insect Screens for preheating. ƽ CAUTION: Do not line the bottom tray with burned-on the bottom of the burner tube. Are you can light the Left burner with a match? PROBLEM Burners burn with a yellow or orange flame, in conjunction with a match...
... match lights burner, check igniter (see below). Burner does not light, or flame is low in "HI" position. Straighten hose. Experiencing flare-ups: TROUBLESHOOTING 15 CHECK Inspect Spider / Insect Screens for preheating. ƽ CAUTION: Do not line the bottom tray with burned-on the bottom of the burner tube. Are you can light the Left burner with a match? PROBLEM Burners burn with a yellow or orange flame, in conjunction with a match...
Owner Manual
Page 16
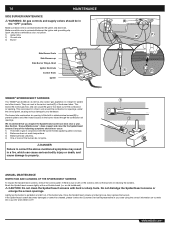
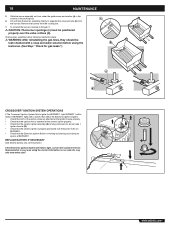
..., which can nest in the venturi section (1) of the burner tubes. 16 MAINTENANCE SIDE BURNER MAINTENANCE ƽ WARNING: All gas controls and supply valves should be a white/blue color, not yellow. 1) Igniter Wire 2) Ground wire 3) Burner Side Burner Grate Side Burner cap Side Burner Ring & Head Igniter Electrode Control Knob Igniter WEBER® SPIDER/INSECT SCREENS Your Weber® gas barbecue, as well as any of the following symptoms should...
..., which can nest in the venturi section (1) of the burner tubes. 16 MAINTENANCE SIDE BURNER MAINTENANCE ƽ WARNING: All gas controls and supply valves should be a white/blue color, not yellow. 1) Igniter Wire 2) Ground wire 3) Burner Side Burner Grate Side Burner cap Side Burner Ring & Head Igniter Electrode Control Knob Igniter WEBER® SPIDER/INSECT SCREENS Your Weber® gas barbecue, as well as any of the following symptoms should...
Owner Manual
Page 17
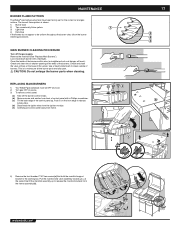
... the same time lift the manifold assembly up . MAINTENANCE 17 BURNER FLAME PATTERN The Weber® gas barbecue burners have been factory set for the correct air and gas mixture. This is shown. 1) Burner tube 2) Tips occasionally flicker yellow 3) Light blue 4) Dark blue If the flames do not appear to release locking tabs. (d) Disconnect the igniter wires from the ignition module. (e) Carefully pull control panel away from the...
... the same time lift the manifold assembly up . MAINTENANCE 17 BURNER FLAME PATTERN The Weber® gas barbecue burners have been factory set for the correct air and gas mixture. This is shown. 1) Burner tube 2) Tips occasionally flicker yellow 3) Light blue 4) Dark blue If the flames do not appear to release locking tabs. (d) Disconnect the igniter wires from the ignition module. (e) Carefully pull control panel away from the...
Owner Manual
Page 18
... the burner assembly out from under the guide screw and washer (a) in your area using the barbecue. (See Step: "Check for sparks at BURNER 1. If BURNER 1 lights with a match, then check the Electronic Ignition System. • Check that the ceramic igniter is working by listening and looking for gas leaks.") CROSSOVER® IGNITION SYSTEM OPERATIONS If The Crossover® Ignition System fails to separate the crossover tube...
... the burner assembly out from under the guide screw and washer (a) in your area using the barbecue. (See Step: "Check for sparks at BURNER 1. If BURNER 1 lights with a match, then check the Electronic Ignition System. • Check that the ceramic igniter is working by listening and looking for gas leaks.") CROSSOVER® IGNITION SYSTEM OPERATIONS If The Crossover® Ignition System fails to separate the crossover tube...
Owner Manual
Page 45
45 WWW.WEBER.COM®
45 WWW.WEBER.COM®


