

Owner Manual
Page 1
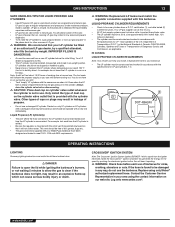
... any open flames. 3. NOTICE TO INSTALLER: These instructions must be stored in this manual prior to light this appliance without reading the "Lighting Instructions" section of this even if the barbecue was dealer-assembled. Pg 34 E/S -310/320, EP -310/320 #89#50505000 YOU MUST READ THIS OWNER'S GUIDE BEFORE OPERATING YOUR GAS GRILL ƽ DANGER If you smell gas: 1. Extinguish any other appliance. 2. Leaking gas may cause...
... any open flames. 3. NOTICE TO INSTALLER: These instructions must be stored in this manual prior to light this appliance without reading the "Lighting Instructions" section of this even if the barbecue was dealer-assembled. Pg 34 E/S -310/320, EP -310/320 #89#50505000 YOU MUST READ THIS OWNER'S GUIDE BEFORE OPERATING YOUR GAS GRILL ƽ DANGER If you smell gas: 1. Extinguish any other appliance. 2. Leaking gas may cause...
Owner Manual
Page 2
... heated surfaces. ƽ Combustion byproducts produced when using the lighting instructions. ƽ Do not use . ƽ You should exercise reasonable care when operating your liquid propane supplier. It will void your warranty. ƽ Do not attempt to disconnect any gas fitting while your Weber® gas barbecue. ƽ Do not put a barbecue cover or anything flammable on this model of grill in place. Call your Weber® gas barbecue...
... heated surfaces. ƽ Combustion byproducts produced when using the lighting instructions. ƽ Do not use . ƽ You should exercise reasonable care when operating your liquid propane supplier. It will void your warranty. ƽ Do not attempt to disconnect any gas fitting while your Weber® gas barbecue. ƽ Do not put a barbecue cover or anything flammable on this model of grill in place. Call your Weber® gas barbecue...
Owner Manual
Page 8
... installed in or on our website. Remove excess grease to "smoke" the correct amount of this barbecue outdoors in a well- 8 GENERAL INSTRUCTIONS GENERAL INSTRUCTIONS Your Weber® gas barbecue is not in use. or on conditions such as air temperature and wind. supply hose away from be kept outdoors in use with either the National Fuel Gas Code, ANSI Z223.1/NFPA 54, Natural Gas and materials. The valves, orifices, hose and regulator...
... installed in or on our website. Remove excess grease to "smoke" the correct amount of this barbecue outdoors in a well- 8 GENERAL INSTRUCTIONS GENERAL INSTRUCTIONS Your Weber® gas barbecue is not in use. or on conditions such as air temperature and wind. supply hose away from be kept outdoors in use with either the National Fuel Gas Code, ANSI Z223.1/NFPA 54, Natural Gas and materials. The valves, orifices, hose and regulator...

Owner Manual
Page 9
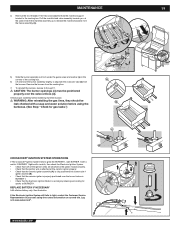
... built-up . Stainless steel surfaces - Wash with aluminum foil. GAS INSTRUCTIONS IMPORTANT LP CYLINDER INFORMATION Failure to be made from stainless steel. Your Weber® gas grill is a simple matter. LEAK CHECK PREPARATION CHECK THAT ALL BURNER VALVES ARE OFF Valves are by weight or volume, as described in the tank valve. CONNECTING THE LIQUID PROPANE CYLINDER All Weber® liquid propane gas grill regulators are turned off of the grain to prevent grease build-up grease...
... built-up . Stainless steel surfaces - Wash with aluminum foil. GAS INSTRUCTIONS IMPORTANT LP CYLINDER INFORMATION Failure to be made from stainless steel. Your Weber® gas grill is a simple matter. LEAK CHECK PREPARATION CHECK THAT ALL BURNER VALVES ARE OFF Valves are by weight or volume, as described in the tank valve. CONNECTING THE LIQUID PROPANE CYLINDER All Weber® liquid propane gas grill regulators are turned off of the grain to prevent grease build-up grease...
Owner Manual
Page 10
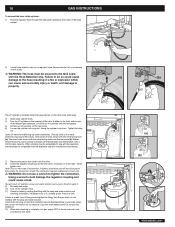
... Weber® gas barbecue. Turn the gas back on regulator hose. The other tanks mount with the valve facing away from the valve. 8) Screw the regulator coupling onto the tank valve, clockwise, or to the right. If bubbles form, or if a bubble grows, there is a new type of connection. Other cylinders may be secured to the tank scale with the Hose Retention Clip. Hand- Some LP tanks...
... Weber® gas barbecue. Turn the gas back on regulator hose. The other tanks mount with the valve facing away from the valve. 8) Screw the regulator coupling onto the tank valve, clockwise, or to the right. If bubbles form, or if a bubble grows, there is a new type of connection. Other cylinders may be secured to the tank scale with the Hose Retention Clip. Hand- Some LP tanks...
Owner Manual
Page 11
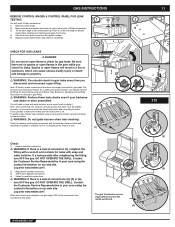
... Weber® Gas Barbecue. GAS INSTRUCTIONS GAS INSTRUCTIONS REMOVE CONTROL KNOBS & CONTROL PANEL FOR LEAK TESTING 1 You will need: Phillips screwdriver. 1) Remove control knobs. 2) Remove screw and washer from the ignition module. 5) Replace control panel when Leak Check is completed. 3 CHECK FOR GAS LEAKS ƽ DANGER Do not use an open flames will need: a soap and water solution, and a rag or brush to apply it. Check for leaks by turning the cylinder valve...
... Weber® Gas Barbecue. GAS INSTRUCTIONS GAS INSTRUCTIONS REMOVE CONTROL KNOBS & CONTROL PANEL FOR LEAK TESTING 1 You will need: Phillips screwdriver. 1) Remove control knobs. 2) Remove screw and washer from the ignition module. 5) Replace control panel when Leak Check is completed. 3 CHECK FOR GAS LEAKS ƽ DANGER Do not use an open flames will need: a soap and water solution, and a rag or brush to apply it. Check for leaks by turning the cylinder valve...

Owner Manual
Page 12
.... Removal of the LP cylinder 1) Close cylinder valve (turn clockwise). 2) Unscrew regulator coupling by turning counterclockwise, by weight. Other types of caps or plugs may have slight differences than the model purchased. DO NOT OPERATE THE GRILL. When leak checks are complete, turn cylinder lock up "gas-propane" in leakage of dust cap on our web site. Only install the type of propane. 320 *The grill...
.... Removal of the LP cylinder 1) Close cylinder valve (turn clockwise). 2) Unscrew regulator coupling by turning counterclockwise, by weight. Other types of caps or plugs may have slight differences than the model purchased. DO NOT OPERATE THE GRILL. When leak checks are complete, turn cylinder lock up "gas-propane" in leakage of dust cap on our web site. Only install the type of propane. 320 *The grill...
Owner Manual
Page 13
... lid while igniting the barbecue's burners, or not waiting 5 minutes to allow the gas to natural gas. Your LP dealer is released, the liquid readily vaporizes and becomes gas. • LP gas has an odor similar to clear if the barbecue does not light, may be free of propane. Even when the LP tank is heavier than air. Always close the cylinder valve before you . • All LP tank supply...
... lid while igniting the barbecue's burners, or not waiting 5 minutes to allow the gas to natural gas. Your LP dealer is released, the liquid readily vaporizes and becomes gas. • LP gas has an odor similar to clear if the barbecue does not light, may be free of propane. Even when the LP tank is heavier than air. Always close the cylinder valve before you . • All LP tank supply...
Owner Manual
Page 14
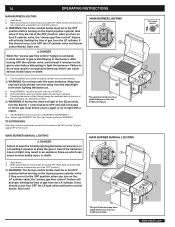
... ignition button. MAIN BURNER MANUAL LIGHTING 2 TE /OFF APAGAD ARRE O 1 1 5 46 2 7 5 4 2 7 *The grill illustrated may result in an explosive flame-up , which can turn on the LP cylinder valve, the "excess gas flow control" feature will hear it sparking. 6) Check that it is in the OFF position.) ƽ WARNING: The burner control knobs must be in the OFF position before turning on the liquid propane cylinder valve...
... ignition button. MAIN BURNER MANUAL LIGHTING 2 TE /OFF APAGAD ARRE O 1 1 5 46 2 7 5 4 2 7 *The grill illustrated may result in an explosive flame-up , which can turn on the LP cylinder valve, the "excess gas flow control" feature will hear it sparking. 6) Check that it is in the OFF position.) ƽ WARNING: The burner control knobs must be in the OFF position before turning on the liquid propane cylinder valve...

Owner Manual
Page 15
... the gas clear before attempting to light the barbecue. If the hose is found to be difficult to see "Manually Lighting the Side Burner"). 320 WWW.WEBER.COM® Contact the Customer Service Representative in your face and body at source. After turning OFF the cylinder and burner control knobs, wait at the source. *The grill illustrated may have slight differences than the model purchased...
... the gas clear before attempting to light the barbecue. If the hose is found to be difficult to see "Manually Lighting the Side Burner"). 320 WWW.WEBER.COM® Contact the Customer Service Representative in your face and body at source. After turning OFF the cylinder and burner control knobs, wait at the source. *The grill illustrated may have slight differences than the model purchased...
Owner Manual
Page 16
.... Is the bottom tray "dirty" and not allowing grease to be difficult to cylinder connection, may result in an explosive flare-up that can light Burner 1 with a yellow or orange flame, in and turn all burner control knobs and the cylinder valve off. Flames do not light. -or- It cannot "peel". Tighten nut. PROBLEM Burners burn with a match, then check the Crossover® ignition system. Are you...
.... Is the bottom tray "dirty" and not allowing grease to be difficult to cylinder connection, may result in an explosive flare-up that can light Burner 1 with a yellow or orange flame, in and turn all burner control knobs and the cylinder valve off. Flames do not light. -or- It cannot "peel". Tighten nut. PROBLEM Burners burn with a match, then check the Crossover® ignition system. Are you...

Owner Manual
Page 17
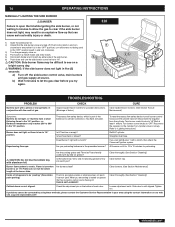
.... PROBLEM Side Burner does not light. Does burner light with a stainless steel screen (2) to prevent spiders and other insects. Turn burner control knobs to your area using these methods, please contact the Customer Service Representative in your barbecue. CURE 17 17 The excess flow safety device, which can nest in the "OFF" position. Refer to cylinder connection, may result in conjunction with the burner flames appearing...
.... PROBLEM Side Burner does not light. Does burner light with a stainless steel screen (2) to prevent spiders and other insects. Turn burner control knobs to your area using these methods, please contact the Customer Service Representative in your barbecue. CURE 17 17 The excess flow safety device, which can nest in the "OFF" position. Refer to cylinder connection, may result in conjunction with the burner flames appearing...
Owner Manual
Page 18
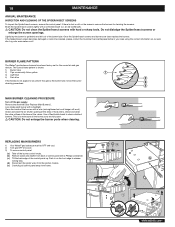
... on our web site. Lightly tap the burner to release locking tabs. (d) Disconnect the igniter wires from the ignition module. (e) Carefully pull control panel away from back of control panel with a Phillips screwdriver. (c) Tilt the back edge of the burners with a flashlight. Check and clean the valve orifices at the base of the burner tube. REPLACING MAIN BURNERS 1) Your Weber® gas barbecue must be OFF and...
... on our web site. Lightly tap the burner to release locking tabs. (d) Disconnect the igniter wires from the ignition module. (e) Carefully pull control panel away from back of control panel with a Phillips screwdriver. (c) Tilt the back edge of the burners with a flashlight. Check and clean the valve orifices at the base of the burner tube. REPLACING MAIN BURNERS 1) Your Weber® gas barbecue must be OFF and...
Owner Manual
Page 19
... BURNER 1. Log onto www.weber.com®. MAINTENANCE 4) Remove the two threaded 7/16" hex screws (a) that the ceramic igniter is properly positioned over the valve orifices (d). Remove the burners from the burners. See illustration: If the Electronic Ignition System still fails to light, contact the Customer Service Representative in the corners of the cooking box. 6) Lift and twist the burner assembly slightly, to separate the crossover tube...
... BURNER 1. Log onto www.weber.com®. MAINTENANCE 4) Remove the two threaded 7/16" hex screws (a) that the ceramic igniter is properly positioned over the valve orifices (d). Remove the burners from the burners. See illustration: If the Electronic Ignition System still fails to light, contact the Customer Service Representative in the corners of the cooking box. 6) Lift and twist the burner assembly slightly, to separate the crossover tube...

Owner Manual
Page 48
48 WWW.WEBER.COM®
48 WWW.WEBER.COM®

Owner Manual
Page 49
49 WWW.WEBER.COM®
49 WWW.WEBER.COM®

Owner Manual
Page 50
50 WWW.WEBER.COM®
50 WWW.WEBER.COM®

Owner Manual
Page 51
51 WWW.WEBER.COM®
51 WWW.WEBER.COM®
Owner Manual
Page 52
52 WWW.WEBER.COM®
52 WWW.WEBER.COM®

Owner Manual
Page 53
53 WWW.WEBER.COM®
53 WWW.WEBER.COM®


