

Owner Manual
Page 1
... try to light this appliance without reading "Lighting" instructions section of this manual prior to the appliance. 2. GENESIS®1500 Natural Gas Barbecue Owner's Manual ® WARNING: Follow all leak check procedures carefully in the vicinity of this even if barbecue was dealer assembled. FOR YOUR SAFETY Do not store or use . THIS GAS APPLIANCE IS DESIGNED FOR OUTDOOR USE ONLY. Open lid. 4. NOTICE TO INSTALLER: These instructions must be...
... try to light this appliance without reading "Lighting" instructions section of this manual prior to the appliance. 2. GENESIS®1500 Natural Gas Barbecue Owner's Manual ® WARNING: Follow all leak check procedures carefully in the vicinity of this even if barbecue was dealer assembled. FOR YOUR SAFETY Do not store or use . THIS GAS APPLIANCE IS DESIGNED FOR OUTDOOR USE ONLY. Open lid. 4. NOTICE TO INSTALLER: These instructions must be...
Owner Manual
Page 2
... to disconnect the gas regulator or any gas fitting while your barbecue is in operation. ƽ A dented or rusty LP tank may be hazardous and should be checked by children. ƽ You should exercise reasonable care when operating your Weber Gas Barbecue. ƽDANGER Failure to follow the assembly instructions in this manual. ƽ After a period of your Weber Gas Barbecue. ƽ Do not put a barbecue cover or anything...
... to disconnect the gas regulator or any gas fitting while your barbecue is in operation. ƽ A dented or rusty LP tank may be hazardous and should be checked by children. ƽ You should exercise reasonable care when operating your Weber Gas Barbecue. ƽDANGER Failure to follow the assembly instructions in this manual. ƽ After a period of your Weber Gas Barbecue. ƽ Do not put a barbecue cover or anything...
Owner Manual
Page 3
... date of purchase. Weber is not covered by insects within the burner tubes, as set forth herein and any special, indirect or consequential damages. This Warranty applies only to the purchaser, freight or postage prepaid. If you are required to return defective parts, transportation charges must be limited to the repair or replacement of parts which on Weber. Deterioration or...
... date of purchase. Weber is not covered by insects within the burner tubes, as set forth herein and any special, indirect or consequential damages. This Warranty applies only to the purchaser, freight or postage prepaid. If you are required to return defective parts, transportation charges must be limited to the repair or replacement of parts which on Weber. Deterioration or...

Owner Manual
Page 4
...covered under the following patent nos.: U.S.A. #4,677,964; 4,727,853; #4,777,927; #4,829,978; #4,860,724; #4,941,817; #4,966,125; #5,070,776; #D293,067; #D316,355; Genesis Gas Barbecues are U.S. Canada: Rd 1987 Reg. #58,034; #1,279,540; #1,283,586; #1,300,994; #1,300,995. Weber, , Genesis..., Flavorizer and Crossover are registered U.S. trademarks of Weber-Stephen Products Co., 200 East Daniels Road, Palatine, IL ...
...covered under the following patent nos.: U.S.A. #4,677,964; 4,727,853; #4,777,927; #4,829,978; #4,860,724; #4,941,817; #4,966,125; #5,070,776; #D293,067; #D316,355; Genesis Gas Barbecues are U.S. Canada: Rd 1987 Reg. #58,034; #1,279,540; #1,283,586; #1,300,994; #1,300,995. Weber, , Genesis..., Flavorizer and Crossover are registered U.S. trademarks of Weber-Stephen Products Co., 200 East Daniels Road, Palatine, IL ...

Owner Manual
Page 5
... flare-ups. d) Heavy gauge steel Flavorizer Bars distribute heat within the grill. e) Weber Warm-Up Basket for temperature control. h) Catch pan catches excess grease. Contents WARNINGS 2 Warranty & Patents 2-3 General Instructions 6 Assembly 13-25 Operating Instructions Lighting 26-27 Cooking 28 After a Period of drippings for precision cooking measures grill temperature, and can be removed and inserted into the food. f) Separate burners for additional cooking or...
... flare-ups. d) Heavy gauge steel Flavorizer Bars distribute heat within the grill. e) Weber Warm-Up Basket for temperature control. h) Catch pan catches excess grease. Contents WARNINGS 2 Warranty & Patents 2-3 General Instructions 6 Assembly 13-25 Operating Instructions Lighting 26-27 Cooking 28 After a Period of drippings for precision cooking measures grill temperature, and can be removed and inserted into the food. f) Separate burners for additional cooking or...
Owner Manual
Page 6
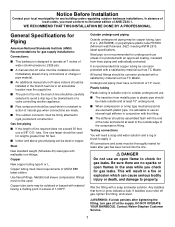
... area. This appliance and its individual manual shutoff valve during any heated surface. s This Weber Gas Barbecue is designed for assembling your Weber Gas Barbecue under the control panel and the bottom tray are free from the gas supply piping system by children. s Do not use Liquid Propane (LP) bottled gas. Gas supply testing s Disconnect your Weber Gas Barbecue when the gas supply is easy to use . The closed lid and Flavorizer Bars...
... area. This appliance and its individual manual shutoff valve during any heated surface. s This Weber Gas Barbecue is designed for assembling your Weber Gas Barbecue under the control panel and the bottom tray are free from the gas supply piping system by children. s Do not use Liquid Propane (LP) bottled gas. Gas supply testing s Disconnect your Weber Gas Barbecue when the gas supply is easy to use . The closed lid and Flavorizer Bars...
Owner Manual
Page 7
... the line. ƽ DANGER Do not use an open flames in conjunction with material having a melting point in excess of any building codes regulating outdoor barbecue installations. tube. Copper tubing must conform to operate at least 10" underground. Outside underground piping Outside underground piping may be corrosion protected with a satisfactory material such as TC Mastic. Steel pipe is not recommended for gas leaks...
... the line. ƽ DANGER Do not use an open flames in conjunction with material having a melting point in excess of any building codes regulating outdoor barbecue installations. tube. Copper tubing must conform to operate at least 10" underground. Outside underground piping Outside underground piping may be corrosion protected with a satisfactory material such as TC Mastic. Steel pipe is not recommended for gas leaks...

Owner Manual
Page 8
...;WARNING: Turn off Figure 1 Inside Gas Supply ƽCAUTION: Follow "General Specifications for Piping" in this manual. Typical natural gas supply installation to the condition of the barbecue. Prepare the post so that this manual. Inspect the gas supply line at the source before attempting any assembly. ƽCAUTION: Combustible materials should never be within 24 inches of the top, bottom, back...
...;WARNING: Turn off Figure 1 Inside Gas Supply ƽCAUTION: Follow "General Specifications for Piping" in this manual. Typical natural gas supply installation to the condition of the barbecue. Prepare the post so that this manual. Inspect the gas supply line at the source before attempting any assembly. ƽCAUTION: Combustible materials should never be within 24 inches of the top, bottom, back...
Owner Manual
Page 10
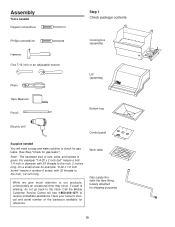
... to check for gas leaks. (See Step "Check for reference. Call the Weber Customer Service Center toll free 1-800-446-1071 to the inch, 2 inches long. Assembly Tools needed Regular screwdriver Phillips screwdriver Hammer One 7/16 inch or an adjustable wrench Pliers Step 1 Check package contents Cooking box (assembly) Lid (assembly) ® ® Tape Measure Pencil Bottom tray Electric drill Control panel Supplies...
... to check for gas leaks. (See Step "Check for reference. Call the Weber Customer Service Center toll free 1-800-446-1071 to the inch, 2 inches long. Assembly Tools needed Regular screwdriver Phillips screwdriver Hammer One 7/16 inch or an adjustable wrench Pliers Step 1 Check package contents Cooking box (assembly) Lid (assembly) ® ® Tape Measure Pencil Bottom tray Electric drill Control panel Supplies...
Owner Manual
Page 17
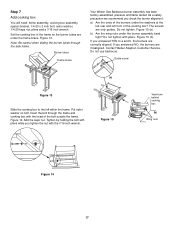
... aligned. Figure 15 (a). Contact Weber-Stephen Customer Service. Guide screw (a) Figure 13 Slide the cooking box to a and b, the burners are only guides. Figure 14. Burner tubes Frame brace Your Weber Gas Barbecue burner assembly has been factory assembled, pressure and flame tested. Do not tighten with the 7/16 inch wrench. Put nylon washer on bolt. Note: Be careful when sliding the burner tubes through the frame and cooking...
... aligned. Figure 15 (a). Contact Weber-Stephen Customer Service. Guide screw (a) Figure 13 Slide the cooking box to a and b, the burners are only guides. Figure 14. Burner tubes Frame brace Your Weber Gas Barbecue burner assembly has been factory assembled, pressure and flame tested. Do not tighten with the 7/16 inch wrench. Put nylon washer on bolt. Note: Be careful when sliding the burner tubes through the frame and cooking...

Owner Manual
Page 18
... from the barbecue gas supply line. Tighten with a 3/4 inch wrench. Proceed to the manifold fitting. Figure 17. Figure 18. Lift the bracket, manifold and cooking box slightly as a unit and hook onto the frame brace. You will need: one burner control knob. (Valves are off. Figure 16 (a). Place your gas barbecue. We recommend that the connection between the barbecue gas supply line and the natural gas supply be...
... from the barbecue gas supply line. Tighten with a 3/4 inch wrench. Proceed to the manifold fitting. Figure 17. Figure 18. Lift the bracket, manifold and cooking box slightly as a unit and hook onto the frame brace. You will need: one burner control knob. (Valves are off. Figure 16 (a). Place your gas barbecue. We recommend that the connection between the barbecue gas supply line and the natural gas supply be...
Owner Manual
Page 20
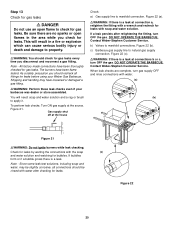
...;WARNING: Perform these leak checks even if your Weber Gas Barbecue. The burners have been thoroughly checked for leaks. All factory made connections have been flame tested. Figure 22 (b). Figure 21. b) Valves to manifold connections. DO NOT OPERATE THE BARBECUE. To perform leak checks: Turn ON gas supply at connections b or c, turn gas supply OFF and rinse connections with a wrench and...
...;WARNING: Perform these leak checks even if your Weber Gas Barbecue. The burners have been thoroughly checked for leaks. All factory made connections have been flame tested. Figure 22 (b). Figure 21. b) Valves to manifold connections. DO NOT OPERATE THE BARBECUE. To perform leak checks: Turn ON gas supply at connections b or c, turn gas supply OFF and rinse connections with a wrench and...

Owner Manual
Page 26
... in any way, do not use of the cooking box. ƽWARNING: If the burner does not light, turn on . ƽWARNING: Do not lean over open lid while igniting the barbecue, or not waiting 5 minutes to allow the gas to be damaged in an explosive flame-up which can turn the Front burner control knob to OFF and wait 5 minutes...
... in any way, do not use of the cooking box. ƽWARNING: If the burner does not light, turn on . ƽWARNING: Do not lean over open lid while igniting the barbecue, or not waiting 5 minutes to allow the gas to be damaged in an explosive flame-up which can turn the Front burner control knob to OFF and wait 5 minutes...
Owner Manual
Page 28
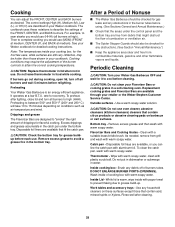
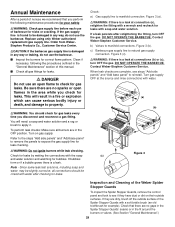
... to avoid a grease fire in the bottom tray. DO NOT ENLARGE BURNER PORTS (OPENINGS). Cooking You can line the catch pan with paper towel to prevent flaking due to describe the settings of Nonuse s The Weber Gas Barbecue should also be checked for any debris off of cooking box with plastic scrub ball. Work tables and accessory trays - Remove excess grease to 15...
... to avoid a grease fire in the bottom tray. DO NOT ENLARGE BURNER PORTS (OPENINGS). Cooking You can line the catch pan with paper towel to prevent flaking due to describe the settings of Nonuse s The Weber Gas Barbecue should also be checked for any debris off of cooking box with plastic scrub ball. Work tables and accessory trays - Remove excess grease to 15...
Owner Manual
Page 29
...burners are complete, see if they are dirty, brush off the outside surfaces. Contact Weber-Stephen Customer Service. Note - Contact Weber-Stephen Customer Service. Order from WeberStephen Products Co., Customer Service Center. ƽCAUTION: If the barbecue gas supply line ...and watching for leaks. b) Valves to natural gas supply connection. Replace using only Weber authorized replacement gas supply line. DO NOT OPERATE THE BARBECUE. Figure 3 (b). DO NOT OPERATE THE BARBECUE. Check: a) Gas supply line to expose the gas supply line for correct flame pattern. Refer to the steps...
...burners are complete, see if they are dirty, brush off the outside surfaces. Contact Weber-Stephen Customer Service. Note - Contact Weber-Stephen Customer Service. Order from WeberStephen Products Co., Customer Service Center. ƽCAUTION: If the barbecue gas supply line ...and watching for leaks. b) Valves to natural gas supply connection. Replace using only Weber authorized replacement gas supply line. DO NOT OPERATE THE BARBECUE. Figure 3 (b). DO NOT OPERATE THE BARBECUE. Check: a) Gas supply line to expose the gas supply line for correct flame pattern. Refer to the steps...

Owner Manual
Page 30
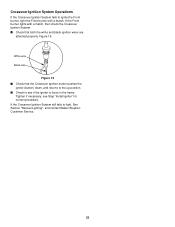
.... Figure 8. c) Remove control panel: take off the burner control knobs. Figure 4. Tips occasionally yellowish Burner inside cooking box Light blue Air shutter Venturi fin Figure 4 The Weber Spider Stopper Guard is to flow back out of gas in Figure 6. Barbecue does not reach temperature. 3. Replacing Main Burners a) Your Weber Gas Barbecue must be uniform the length of the burner tubes. Flames Figure 6 Dark blue If the flames do not ignite. ƽ...
.... Figure 8. c) Remove control panel: take off the burner control knobs. Figure 4. Tips occasionally yellowish Burner inside cooking box Light blue Air shutter Venturi fin Figure 4 The Weber Spider Stopper Guard is to flow back out of gas in Figure 6. Barbecue does not reach temperature. 3. Replacing Main Burners a) Your Weber Gas Barbecue must be uniform the length of the burner tubes. Flames Figure 6 Dark blue If the flames do not ignite. ƽ...

Owner Manual
Page 31
... Guards so that hold the manifold to separate the crossover tube from the cooking box. There should be positioned properly over the valve orifices. Figure 14. f) Remove the manifold bracket and unscrew the two wing nuts that the seams are in the corners of the burners and carefully set it down. Figure 12. See "Check for gas leaks". d) Unlatch the Spider...
... Guards so that hold the manifold to separate the crossover tube from the cooking box. There should be positioned properly over the valve orifices. Figure 14. f) Remove the manifold bracket and unscrew the two wing nuts that the seams are in the corners of the burners and carefully set it down. Figure 12. See "Check for gas leaks". d) Unlatch the Spider...
Owner Manual
Page 32
... attached properly. s Check to ignite the Front burner, light the Front burner with a match, then check the Crossover Ignition System. If the Crossover Ignition System still fails to the up position. If the Front burner lights with a match. Tighten if necessary; s Check that the Crossover Ignition button pushes the igniter (button) down, and returns to light, See Section "Manual Lighting", and contact Weber-Stephen Customer Service. 32
... attached properly. s Check to ignite the Front burner, light the Front burner with a match, then check the Crossover Ignition System. If the Crossover Ignition System still fails to the up position. If the Front burner lights with a match. Tighten if necessary; s Check that the Crossover Ignition button pushes the igniter (button) down, and returns to light, See Section "Manual Lighting", and contact Weber-Stephen Customer Service. 32

Owner Manual
Page 33
... grates and Flavorizer Bars heavily coated with a match, then check the Crossover Ignition System. Burner flame pattern is low Are burners clean? Flames do not run the whole length of gas. THIS IS NOT A DEFECT. Clean burners. (See Section "General Maintenance".) Inside of holes.) Cure Clean Weber Spider Stopper Guards. (See Section "Annual Maintenance".) Burner does not light, or flame is flaking off. TROUBLESHOOTING Problem Burners...
... grates and Flavorizer Bars heavily coated with a match, then check the Crossover Ignition System. Burner flame pattern is low Are burners clean? Flames do not run the whole length of gas. THIS IS NOT A DEFECT. Clean burners. (See Section "General Maintenance".) Inside of holes.) Cure Clean Weber Spider Stopper Guards. (See Section "Annual Maintenance".) Burner does not light, or flame is flaking off. TROUBLESHOOTING Problem Burners...

Owner Manual
Page 35
... 31 Cooking box 32 Burner control knobs (3) 33 Control panel 34 Igniter button 35 Phillips screws/washers (2) 36 Crossover tube 37 Front and back burners (2) 38 Center burner 39 1/4-20 stainless steel wing nuts (2) 40 Spider Stopper Guards (3) 41 Manifold assembly 42 Manifold bracket 43 Igniter 44 Igniter lock nut 45 Gas catcher ignition chamber 46 Igniter wire (black) 47 Igniter wire (white) 48 Right frame 49 Gas supply line 50 Flare...
... 31 Cooking box 32 Burner control knobs (3) 33 Control panel 34 Igniter button 35 Phillips screws/washers (2) 36 Crossover tube 37 Front and back burners (2) 38 Center burner 39 1/4-20 stainless steel wing nuts (2) 40 Spider Stopper Guards (3) 41 Manifold assembly 42 Manifold bracket 43 Igniter 44 Igniter lock nut 45 Gas catcher ignition chamber 46 Igniter wire (black) 47 Igniter wire (white) 48 Right frame 49 Gas supply line 50 Flare...


