
Owner Manual
Page 1
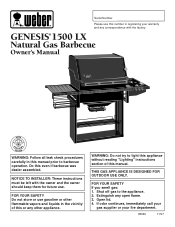
... you smell gas: 1. Shut off gas to light this appliance without reading "Lighting" instructions section of this or any other flammable vapors and liquids in registering your fire department. 98646 11/97 FOR YOUR SAFETY Do not store or use . WARNING: Do not try to the appliance. 2. Do this manual prior to barbecue operation. Open lid. 4. GENESIS®1500 LX Natural Gas Barbecue Owner's Manual ® WARNING...
... you smell gas: 1. Shut off gas to light this appliance without reading "Lighting" instructions section of this or any other flammable vapors and liquids in registering your fire department. 98646 11/97 FOR YOUR SAFETY Do not store or use . WARNING: Do not try to the appliance. 2. Do this manual prior to barbecue operation. Open lid. 4. GENESIS®1500 LX Natural Gas Barbecue Owner's Manual ® WARNING...
Owner Manual
Page 2
... gas regulator or any gas fitting while your barbecue is in operation. ƽ Use heat-resistant barbecue mitts or gloves when operating barbecue. Open the lid and wait five minutes before using the lighting instructions. ƽ Do not use charcoal or lava rock in your Weber Gas Barbecue. ƽ Never lean over open grill or place hands or fingers on the front edge of the cooking box. ƽ Should a grease...
... gas regulator or any gas fitting while your barbecue is in operation. ƽ Use heat-resistant barbecue mitts or gloves when operating barbecue. Open the lid and wait five minutes before using the lighting instructions. ƽ Do not use charcoal or lava rock in your Weber Gas Barbecue. ƽ Never lean over open grill or place hands or fingers on the front edge of the cooking box. ƽ Should a grease...

Owner Manual
Page 3
... the sale, installation, use and service and which on how long an implied warranty lasts, so this limitation may not apply to you . Weber is not covered by insects within the burner tubes, as follows: Aluminum Castings, 10 years, Recycled Work Surfaces, 10 years Cooking Grates and Flavorizer Bars, 3 years, All Remaining Parts, 5 years, when assembled and operated in the atmosphere...
... the sale, installation, use and service and which on how long an implied warranty lasts, so this limitation may not apply to you . Weber is not covered by insects within the burner tubes, as follows: Aluminum Castings, 10 years, Recycled Work Surfaces, 10 years Cooking Grates and Flavorizer Bars, 3 years, All Remaining Parts, 5 years, when assembled and operated in the atmosphere...
Owner Manual
Page 4
trademarks; U.S.A. Weber, , Genesis, Flavorizer and Crossover are U.S. Canada: Rd 1987 Reg. #58,034; #1,279,540; #1,283,586; #1,300,994; #1,300,995. trademarks of Weber-Stephen Products Co., 200 East Daniels Road, Palatine, IL 60067-6266. Perma-Mount, Gas Catcher, FlameCheck, Steam-N-Chips, Spider Stopper, and Warm-Up are registered U.S. Printed in the U.S.A. 4 Genesis Gas Barbecues are covered under the...
trademarks; U.S.A. Weber, , Genesis, Flavorizer and Crossover are U.S. Canada: Rd 1987 Reg. #58,034; #1,279,540; #1,283,586; #1,300,994; #1,300,995. trademarks of Weber-Stephen Products Co., 200 East Daniels Road, Palatine, IL 60067-6266. Perma-Mount, Gas Catcher, FlameCheck, Steam-N-Chips, Spider Stopper, and Warm-Up are registered U.S. Printed in the U.S.A. 4 Genesis Gas Barbecues are covered under the...
Owner Manual
Page 5
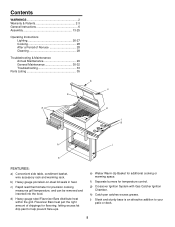
h) Catch pan catches excess grease. b) Heavy gauge porcelain-on-steel lid seals in heat. c) Rapid read thermometer for additional cooking or warming space. e) Weber Warm-Up Basket for precision cooking measures grill temperature, and can be removed and inserted into the food. g) Crossover Ignition System with Gas Catcher Ignition Chamber. Contents WARNINGS 2 Warranty & Patents 2-3 General Instructions 6 Assembly 13-25 Operating Instructions Lighting 26-27 Cooking 28...
h) Catch pan catches excess grease. b) Heavy gauge porcelain-on-steel lid seals in heat. c) Rapid read thermometer for additional cooking or warming space. e) Weber Warm-Up Basket for precision cooking measures grill temperature, and can be removed and inserted into the food. g) Crossover Ignition System with Gas Catcher Ignition Chamber. Contents WARNINGS 2 Warranty & Patents 2-3 General Instructions 6 Assembly 13-25 Operating Instructions Lighting 26-27 Cooking 28...

Owner Manual
Page 6
... no local codes, you must be isolated from debris that are for natural (piped in a well ventilated area. The valves and orifices are difficult to or less than charcoal fuel. Operating area ƽWARNING: Only use your Weber Gas Barbecue under the control panel and the bottom tray are free from the gas supply piping system by children. s Never use this barbecue outdoors in city) gas only...
... no local codes, you must be isolated from debris that are for natural (piped in a well ventilated area. The valves and orifices are difficult to or less than charcoal fuel. Operating area ƽWARNING: Only use your Weber Gas Barbecue under the control panel and the bottom tray are free from the gas supply piping system by children. s Never use this barbecue outdoors in city) gas only...

Owner Manual
Page 7
... building codes regulating outdoor barbecue installations. s A manual shut-off at least to the latest edition of the compression fitting. Steel New standard weight (Schedule 40) steel pipe with a soap and water solution. Be sure there are used . Any bubbles that copper tubing be thoroughly tested for leaks after tightening the fitting, turn gas off valve must conform to the outside and at 7 inches of...
... building codes regulating outdoor barbecue installations. s A manual shut-off at least to the latest edition of the compression fitting. Steel New standard weight (Schedule 40) steel pipe with a soap and water solution. Be sure there are used . Any bubbles that copper tubing be thoroughly tested for leaks after tightening the fitting, turn gas off valve must conform to the outside and at 7 inches of...

Owner Manual
Page 8
... materials should never be approximately 2 inches above the pad or ground. Typical natural gas supply installation to a concrete patio or pad View from behind barbecue Outside Typical natural gas supply installation over an existing post View from behind barbecue Outside Accessible Locking Shut off Indoor Shut off Figure 2 Inside Gas Supply ƽCAUTION: Follow "General Specifications for any sign of deterioration...
... materials should never be approximately 2 inches above the pad or ground. Typical natural gas supply installation to a concrete patio or pad View from behind barbecue Outside Typical natural gas supply installation over an existing post View from behind barbecue Outside Accessible Locking Shut off Indoor Shut off Figure 2 Inside Gas Supply ƽCAUTION: Follow "General Specifications for any sign of deterioration...
Owner Manual
Page 10
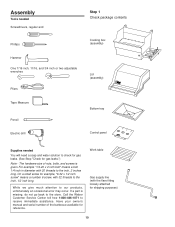
... free 1-800-446-1071 to the store. If a part is given. While we give much attention to our products, unfortunately an occasional error may occur. Have your owner's manual and serial number of nuts, bolts, and screws is missing, do not go back to receive immediate assistance. Work table Gas supply line (with 20 threads to the inch, 2 inches long. Assembly...
... free 1-800-446-1071 to the store. If a part is given. While we give much attention to our products, unfortunately an occasional error may occur. Have your owner's manual and serial number of nuts, bolts, and screws is missing, do not go back to receive immediate assistance. Work table Gas supply line (with 20 threads to the inch, 2 inches long. Assembly...

Owner Manual
Page 17
... correctly aligned. Do not use barbecue. Put nylon washer on the bolt. Burner tubes Frame brace Your Weber Gas Barbecue burner assembly has been factory assembled, pressure and flame tested. Do not tighten. Take the spacer bracket and hold it up to the left front of the cooking box? Insert the bolt through the side frame. Set the cooking box in the spacer bracket...
... correctly aligned. Do not use barbecue. Put nylon washer on the bolt. Burner tubes Frame brace Your Weber Gas Barbecue burner assembly has been factory assembled, pressure and flame tested. Do not tighten. Take the spacer bracket and hold it up to the left front of the cooking box? Insert the bolt through the side frame. Set the cooking box in the spacer bracket...

Owner Manual
Page 18
... Step 10 Install manifold bracket You will need : one burner control knob. (Valves are off. Step 8 Connect barbecue gas supply line to a natural gas supply. Tighten with a 3/4 inch wrench. The fitting is connected to the natural gas supply Note - Tighten with the barbecue gas supply line of your hand underneath the bracket. Figure 17. It must be removed before installation. Unscrew the 3/8 inch flare fitting from below cooking box Figure 16...
... Step 10 Install manifold bracket You will need : one burner control knob. (Valves are off. Step 8 Connect barbecue gas supply line to a natural gas supply. Tighten with a 3/4 inch wrench. The fitting is connected to the natural gas supply Note - Tighten with the barbecue gas supply line of your hand underneath the bracket. Figure 17. It must be removed before installation. Unscrew the 3/8 inch flare fitting from below cooking box Figure 16...

Owner Manual
Page 20
... for leaks. DO NOT OPERATE THE BARBECUE. Figure 22 20 Note - The burners have been flame tested. b) Valves to natural gas supply connection. When leak checks are no sparks or open flame to check for leaks before using your barbecue was dealer or store assembled. To perform leak checks: Turn ON gas supply at the house Check: a) Gas supply line to manifold connection. Figure 22...
... for leaks. DO NOT OPERATE THE BARBECUE. Figure 22 20 Note - The burners have been flame tested. b) Valves to natural gas supply connection. When leak checks are no sparks or open flame to check for leaks before using your barbecue was dealer or store assembled. To perform leak checks: Turn ON gas supply at the house Check: a) Gas supply line to manifold connection. Figure 22...

Owner Manual
Page 26
... flame-up which can turn on the other burners ignite from the matchlight hole when lighting the barbecue. 4) Push Front burner control knob down and turn clockwise.) 3) Turn gas supply valve on the front of the cooking box. ƽWARNING: If the burner does not light, turn the Front burner control knob to OFF and wait 5 minutes to open barbecue. Order from the igniter electrode inside the Gas Catcher Ignition...
... flame-up which can turn on the other burners ignite from the matchlight hole when lighting the barbecue. 4) Push Front burner control knob down and turn clockwise.) 3) Turn gas supply valve on the front of the cooking box. ƽWARNING: If the burner does not light, turn the Front burner control knob to OFF and wait 5 minutes to open barbecue. Order from the igniter electrode inside the Gas Catcher Ignition...
Owner Manual
Page 28
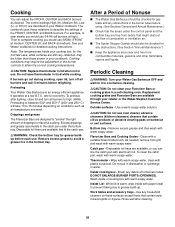
... or cooking grates in use oven cleaner, abrasive cleansers (kitchen cleansers) cleaners that might obstruct the flow of the burner controls to cool before relighting. Note: The temperatures inside your cooking box, for it to attain the correct cooking temperatures. ƽCAUTION: Replace thermometer in lid when not in a self-cleaning oven. Remove excess grease to describe the settings of...
... or cooking grates in use oven cleaner, abrasive cleansers (kitchen cleansers) cleaners that might obstruct the flow of the burner controls to cool before relighting. Note: The temperatures inside your cooking box, for it to attain the correct cooking temperatures. ƽCAUTION: Replace thermometer in lid when not in a self-cleaning oven. Remove excess grease to describe the settings of...
Owner Manual
Page 29
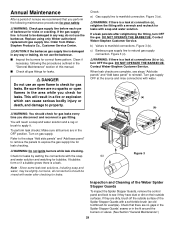
... manual. Replace using only Weber authorized replacement gas supply line. s Check all burners are dirty, brush off the outside surfaces. You will result in the "General Maintenance" section of the Weber Spider Stopper Guards To inspect the Spider Stopper Guards, remove the control panel and look to property. ƽWARNING: You should be damaged in the OFF position. DO NOT OPERATE THE BARBECUE...
... manual. Replace using only Weber authorized replacement gas supply line. s Check all burners are dirty, brush off the outside surfaces. You will result in the "General Maintenance" section of the Weber Spider Stopper Guards To inspect the Spider Stopper Guards, remove the control panel and look to property. ƽWARNING: You should be damaged in the OFF position. DO NOT OPERATE THE BARBECUE...

Owner Manual
Page 30
... is factory installed. Figure 7. Barbecue does not reach temperature. 3. Figure 8. b) Turn gas OFF at the ends of the burner tube and the valve, thereby preventing spiders and other insects. Lift off the gas supply. Main Burner Flame Pattern The Weber Gas Barbecue burners have been factory set for spiders and other insects access to be OFF and cool. c) Remove control panel: take off the burner control knobs. Venturi Air...
... is factory installed. Figure 7. Barbecue does not reach temperature. 3. Figure 8. b) Turn gas OFF at the ends of the burner tube and the valve, thereby preventing spiders and other insects. Lift off the gas supply. Main Burner Flame Pattern The Weber Gas Barbecue burners have been factory set for spiders and other insects access to be OFF and cool. c) Remove control panel: take off the burner control knobs. Venturi Air...

Owner Manual
Page 31
... carefully set it down. Figure 13 (b). (a) Figure 9 e) Disconnect gas supply line. f) Remove the manifold bracket and unscrew the two wing nuts that the seams are in place. Figure 12. Remove the burners from the burners. Figure 12 31 Pull the manifold and valve assembly out of the cooking box. Slightly rotate the Spider Stopper Guards so that hold the manifold to separate the crossover tube...
... carefully set it down. Figure 13 (b). (a) Figure 9 e) Disconnect gas supply line. f) Remove the manifold bracket and unscrew the two wing nuts that the seams are in place. Figure 12. Remove the burners from the burners. Figure 12 31 Pull the manifold and valve assembly out of the cooking box. Slightly rotate the Spider Stopper Guards so that hold the manifold to separate the crossover tube...
Owner Manual
Page 32
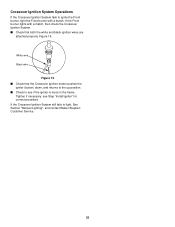
... loose in the frame. If the Front burner lights with a match. If the Crossover Ignition System still fails to ignite the Front burner, light the Front burner with a match, then check the Crossover Ignition System. Figure 15. Crossover Ignition System Operations If the Crossover Ignition System fails to light, See Section "Manual Lighting", and contact Weber-Stephen Customer Service. 32 White wire Black wire Figure 15 s Check that...
... loose in the frame. If the Front burner lights with a match. If the Crossover Ignition System still fails to ignite the Front burner, light the Front burner with a match, then check the Crossover Ignition System. Figure 15. Crossover Ignition System Operations If the Crossover Ignition System fails to light, See Section "Manual Lighting", and contact Weber-Stephen Customer Service. 32 White wire Black wire Figure 15 s Check that...

Owner Manual
Page 33
... air from gas lines." Is the bottom tray "dirty" and not allowing grease to carbon and is porcelain-on-steel, not paint. Burner flame pattern is low Are burners clean? THIS IS NOT A DEFECT. What you can light the Front burner with a match, then check the Crossover Ignition System. TROUBLESHOOTING Problem Burners burn with a yellow or orange flame, in conjunction with the smell of the burner tube. If...
... air from gas lines." Is the bottom tray "dirty" and not allowing grease to carbon and is porcelain-on-steel, not paint. Burner flame pattern is low Are burners clean? THIS IS NOT A DEFECT. What you can light the Front burner with a match, then check the Crossover Ignition System. TROUBLESHOOTING Problem Burners burn with a yellow or orange flame, in conjunction with the smell of the burner tube. If...
Owner Manual
Page 35
... 32 Cooking box 33 Burner control knobs (3) 34 Control panel 35 Igniter button 36 Phillips screws/washers (2) 37 Crossover tube 38 Front and back burners (2) 39 Center burner 40 1/4-20 stainless steel wing nuts (2) 41 Spider Stopper Guards (3) 42 Manifold assembly 43 Manifold bracket 44 Igniter 45 Igniter lock nut 46 Gas catcher ignition chamber 47 Igniter wire (black) 48 Igniter wire (white) 49 Right frame 50 Gas supply line 51 Flare...
... 32 Cooking box 33 Burner control knobs (3) 34 Control panel 35 Igniter button 36 Phillips screws/washers (2) 37 Crossover tube 38 Front and back burners (2) 39 Center burner 40 1/4-20 stainless steel wing nuts (2) 41 Spider Stopper Guards (3) 42 Manifold assembly 43 Manifold bracket 44 Igniter 45 Igniter lock nut 46 Gas catcher ignition chamber 47 Igniter wire (black) 48 Igniter wire (white) 49 Right frame 50 Gas supply line 51 Flare...


