
Owner Manual
Page 1
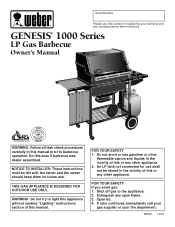
... smell gas: 1. THIS GAS APPLIANCE IS DESIGNED FOR OUTDOOR USE ONLY. If odor continues, immediately call your gas supplier or your warranty and any open flame. 3. Serial Number Please use this number in registering your fire department. 98599 10/97 GENESIS® 1000 Series LP Gas Barbecue Owner's Manual WEBER WEBER ® NationalPROPANEGAS Association WARNING: Follow all leak check procedures carefully in the vicinity of this even if barbecue was dealer assembled...
... smell gas: 1. THIS GAS APPLIANCE IS DESIGNED FOR OUTDOOR USE ONLY. If odor continues, immediately call your gas supplier or your warranty and any open flame. 3. Serial Number Please use this number in registering your fire department. 98599 10/97 GENESIS® 1000 Series LP Gas Barbecue Owner's Manual WEBER WEBER ® NationalPROPANEGAS Association WARNING: Follow all leak check procedures carefully in the vicinity of this even if barbecue was dealer assembled...
Owner Manual
Page 2
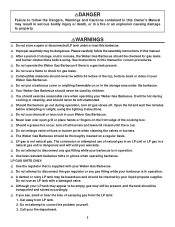
... the LP tank: 1. The conversion or attempted use a flame to check for gas leaks and burner obstructions before attempting to relight, using . Do not attempt to property. ƽWARNINGS ƽ Do not store a spare or disconnected LP tank under the barbecue. ƽ Your Weber Gas Barbecue should exercise reasonable care when operating your Weber Gas Barbecue. ƽDANGER Failure to follow the assembly instructions in operation. ƽ A dented or rusty LP tank may be used...
... the LP tank: 1. The conversion or attempted use a flame to check for gas leaks and burner obstructions before attempting to relight, using . Do not attempt to property. ƽWARNINGS ƽ Do not store a spare or disconnected LP tank under the barbecue. ƽ Your Weber Gas Barbecue should exercise reasonable care when operating your Weber Gas Barbecue. ƽDANGER Failure to follow the assembly instructions in operation. ƽ A dented or rusty LP tank may be used...
Owner Manual
Page 3
... PURCHASER of this Weber Gas Barbecue that it will be free of defects in material and workmanship from the date of purchase. Weber may not apply to replace such parts without charge. This Limited Warranty does not cover any failures or operating difficulties due to accident, abuse, misuse, alteration, misapplication, vandalism, improper installation or improper maintenance or service, or failure to...
... PURCHASER of this Weber Gas Barbecue that it will be free of defects in material and workmanship from the date of purchase. Weber may not apply to replace such parts without charge. This Limited Warranty does not cover any failures or operating difficulties due to accident, abuse, misuse, alteration, misapplication, vandalism, improper installation or improper maintenance or service, or failure to...
Owner Manual
Page 4
..., and Warm-Up are covered under the following patent nos.: U.S.A. #4,677,964; 4,727,853; #4,777,927; #4,829,978; #4,860,724; #4,941,817; #4,966,125; #5,070,776; #D293,067; #D316,355; Genesis Gas Barbecues are U.S. U.S.A. Canada: Rd 1987 Reg. #58,034; #1,279,540; #1,283,586; #1,300,994; #1,300,995. trademarks of Weber-Stephen Products Co., 200...
..., and Warm-Up are covered under the following patent nos.: U.S.A. #4,677,964; 4,727,853; #4,777,927; #4,829,978; #4,860,724; #4,941,817; #4,966,125; #5,070,776; #D293,067; #D316,355; Genesis Gas Barbecues are U.S. U.S.A. Canada: Rd 1987 Reg. #58,034; #1,279,540; #1,283,586; #1,300,994; #1,300,995. trademarks of Weber-Stephen Products Co., 200...

Owner Manual
Page 5
... gauge porcelain-on-steel lid seals in heat. Contents WARNINGS 2 Warranty & Patents 3-4 General Instructions 6 Assembly 7-22 Operating Instructions Lighting 23-24 Cooking 25 Storage and/or Nonuse 25 Cleaning 25 e a i Troubleshooting & Maintenance LP Tank Information 26-28 Annual Maintenance 29 General Maintenance 30-32 Troubleshooting 33 Parts Listing 35 b c d f g j a FEATURES: h a) Convenient tables and racks. g) Crossover Ignition System with an excess flow control that has additional...
... gauge porcelain-on-steel lid seals in heat. Contents WARNINGS 2 Warranty & Patents 3-4 General Instructions 6 Assembly 7-22 Operating Instructions Lighting 23-24 Cooking 25 Storage and/or Nonuse 25 Cleaning 25 e a i Troubleshooting & Maintenance LP Tank Information 26-28 Annual Maintenance 29 General Maintenance 30-32 Troubleshooting 33 Parts Listing 35 b c d f g j a FEATURES: h a) Convenient tables and racks. g) Crossover Ignition System with an excess flow control that has additional...
Owner Manual
Page 6
... Installation in the food. s Never use with indoor kitchen appliances. This regulator is set for LP gas only. Disconnected LP tanks must comply with you if you more cooking control than charcoal fuel. Do not use and gives you move. Please read the instructions carefully before using your Weber Gas Barbecue under or near the Weber Gas Barbecue. 6 s Not for use this appliance must not be stored in use by children. The valves, orifices, hose...
... Installation in the food. s Never use with indoor kitchen appliances. This regulator is set for LP gas only. Disconnected LP tanks must comply with you if you more cooking control than charcoal fuel. Do not use and gives you move. Please read the instructions carefully before using your Weber Gas Barbecue under or near the Weber Gas Barbecue. 6 s Not for use this appliance must not be stored in use by children. The valves, orifices, hose...
Owner Manual
Page 7
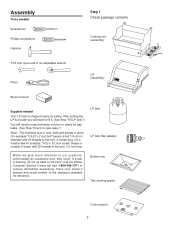
.... After setting the LP fuel scale you will need to fill it. (See Step "Fill LP tank.") You will need a soap and water solution to check for gas leaks. (See Step "Check for example, "6-32 x 1/2 inch screw" means a number 6 screw, with 20 threads to the inch, 2 inches long. Bottom tray Two cooking grates Control panel 7 Have your owner's manual and serial number of the barbecue available...
.... After setting the LP fuel scale you will need to fill it. (See Step "Fill LP tank.") You will need a soap and water solution to check for gas leaks. (See Step "Check for example, "6-32 x 1/2 inch screw" means a number 6 screw, with 20 threads to the inch, 2 inches long. Bottom tray Two cooking grates Control panel 7 Have your owner's manual and serial number of the barbecue available...
Owner Manual
Page 13
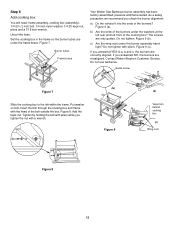
... not tighten. Guide screw Figure 7 Slide the cooking box to a, b and c, the burners are misaligned. b) Are the ends of the burners? If you check the burner alignment: a) Do the valves fit into the ends of the burners under the burner assembly hand tight? Contact Weber-Stephen Customer Service. Uncoil the hose. Set the cooking box in the frame so the burner tubes are only guides. Insert the...
... not tighten. Guide screw Figure 7 Slide the cooking box to a, b and c, the burners are misaligned. b) Are the ends of the burners? If you check the burner alignment: a) Do the valves fit into the ends of the burners under the burner assembly hand tight? Contact Weber-Stephen Customer Service. Uncoil the hose. Set the cooking box in the frame so the burner tubes are only guides. Insert the...
Owner Manual
Page 16
... series of LP tanks, see Section "Operating Instructions". After adjusting tank scale, push tank down a couple of LP gas. ƽWARNING: We recommend that the tank scale is a new LP tank. If the tank manufacturer has not resolved the issue to check that your satisfaction, then call the tank manufacturer's customer service center. Other LP tanks are illustrated in the phone book for example: do this is set...
... series of LP tanks, see Section "Operating Instructions". After adjusting tank scale, push tank down a couple of LP gas. ƽWARNING: We recommend that the tank scale is a new LP tank. If the tank manufacturer has not resolved the issue to check that your satisfaction, then call the tank manufacturer's customer service center. Other LP tanks are illustrated in the phone book for example: do this is set...

Owner Manual
Page 18
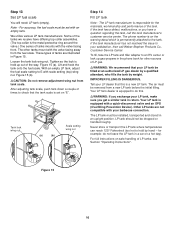
.... b) Regulator to manifold connections. DO NOT OPERATE THE BARBECUE. If bubbles form or if a bubble grows there is a leak at connection (a) , retighten the fitting with water. (a) (b) Figure 19 Check for leaks by turning the tank valve handwheel counterclockwise. The burners have loosened or damaged a gas fitting. ƽWARNING: Perform these leak checks even if your Weber Gas Barbecue. Contact Weber-Stephen Customer Service...
.... b) Regulator to manifold connections. DO NOT OPERATE THE BARBECUE. If bubbles form or if a bubble grows there is a leak at connection (a) , retighten the fitting with water. (a) (b) Figure 19 Check for leaks by turning the tank valve handwheel counterclockwise. The burners have loosened or damaged a gas fitting. ƽWARNING: Perform these leak checks even if your Weber Gas Barbecue. Contact Weber-Stephen Customer Service...

Owner Manual
Page 21
... the bracket, you can slide the rod all the way inside the frame tube. Figure 29 (b). Step 22 Install swing table You will need: swing table assembly, support rod, support rod holder and swing table end bracket. Push the support rod into the hole in the frame. Push the bracket into the hole ...in the swing table end bracket. Figure 29 (a). Check to tap it lightly with a hammer. ƽWARNING: If swing table end bracket is 30 pounds. Allow the slide bar to order a new part.
... the bracket, you can slide the rod all the way inside the frame tube. Figure 29 (b). Step 22 Install swing table You will need: swing table assembly, support rod, support rod holder and swing table end bracket. Push the support rod into the hole in the frame. Push the bracket into the hole ...in the swing table end bracket. Figure 29 (a). Check to tap it lightly with a hammer. ƽWARNING: If swing table end bracket is 30 pounds. Allow the slide bar to order a new part.
Owner Manual
Page 23
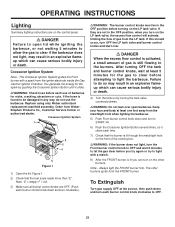
... burner control knobs are OFF. (Push each time. 7) Check that the fuel scale reads more than "E". Failure to do not use of barbecue for the gas to clear before turning on the LP tank valve. The other burners. Crossover Ignition System Note - The Crossover Ignition System ignites the Front burner with a match. 8) After the FRONT burner is still flowing to the burners. Note - OPERATING INSTRUCTIONS Lighting Summary lighting instructions are on the control...
... burner control knobs are OFF. (Push each time. 7) Check that the fuel scale reads more than "E". Failure to do not use of barbecue for the gas to clear before turning on the LP tank valve. The other burners. Crossover Ignition System Note - The Crossover Ignition System ignites the Front burner with a match. 8) After the FRONT burner is still flowing to the burners. Note - OPERATING INSTRUCTIONS Lighting Summary lighting instructions are on the control...

Owner Manual
Page 24
... to light the barbecue. Figure 2. 2) Check that the burner is lit by turning the tank valve counterclockwise. 5) Strike a match and put the flame into the matchlight hole in the OFF position, when you turn OFF the LP tank valve and burner control knobs and start over open lid while igniting the barbecue, or not waiting 5 minutes to allow the gas to OFF. Always light the FRONT burner first. Manual Lighting...
... to light the barbecue. Figure 2. 2) Check that the burner is lit by turning the tank valve counterclockwise. 5) Strike a match and put the flame into the matchlight hole in the OFF position, when you turn OFF the LP tank valve and burner control knobs and start over open lid while igniting the barbecue, or not waiting 5 minutes to allow the gas to OFF. Always light the FRONT burner first. Manual Lighting...

Owner Manual
Page 25
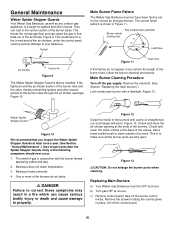
... the bottom tray. ventilated area out of reach of the FRONT, CENTER, and BACK burners. Disconnected LP tanks must be turned off all burners to describe the settings of children. s The Spider Stopper Guards should be stored outdoors in water. Flavorizer Bars and Cooking Grates- Catch pan - Cooking ƽWARNING: Do not move the Weber Gas Barbecue when operating or hot. The control settings High...
... the bottom tray. ventilated area out of reach of the FRONT, CENTER, and BACK burners. Disconnected LP tanks must be turned off all burners to describe the settings of children. s The Spider Stopper Guards should be stored outdoors in water. Flavorizer Bars and Cooking Grates- Catch pan - Cooking ƽWARNING: Do not move the Weber Gas Barbecue when operating or hot. The control settings High...

Owner Manual
Page 28
... (18 1/4 inches high, 12 1/4 inches in accordance with your Weber Gas Barbecue have questions about 20 hours of LP gas. ƽWARNING: We recommend that prevent dispersion. s Replacement LP tanks supplied by weight. certification, and has been tested within five years. s Treat "empty" LP tanks with the same care as are not compatible with the specifications for example: do this odor. Liquid Propane (LP) Tank(s) s The LP tank and connections...
... (18 1/4 inches high, 12 1/4 inches in accordance with your Weber Gas Barbecue have questions about 20 hours of LP gas. ƽWARNING: We recommend that prevent dispersion. s Replacement LP tanks supplied by weight. certification, and has been tested within five years. s Treat "empty" LP tanks with the same care as are not compatible with the specifications for example: do this odor. Liquid Propane (LP) Tank(s) s The LP tank and connections...

Owner Manual
Page 29
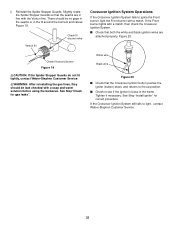
... dealer. Contact Weber-Stephen Customer Service. (d) Figure 8 Inspection and Cleaning of the Weber Spider Stopper Guards To inspect the Spider Stopper Guards, remove the control panel and look to property. ƽWARNING: You should be damaged in any way, do not use the barbecue. c) Valves to manifold connection. d) The hose to tank connection. Check that you disconnect and reconnect a gas fitting. Annual...
... dealer. Contact Weber-Stephen Customer Service. (d) Figure 8 Inspection and Cleaning of the Weber Spider Stopper Guards To inspect the Spider Stopper Guards, remove the control panel and look to property. ƽWARNING: You should be damaged in any way, do not use the barbecue. c) Valves to manifold connection. d) The hose to tank connection. Check that you disconnect and reconnect a gas fitting. Annual...
Owner Manual
Page 30
... not ignite. ƽ DANGER Failure to correct these symptoms may result in conjunction with a flashlight. Main Burner Cleaning Procedure Turn off the burner control knobs. Remove the manifold. (See Section "Replacing the main burners".) Look inside of the air shutter. Barbecue heats unevenly. 4. Figure 12 Clean the inside each burner with the burner flames appearing yellow and lazy. 2. Check and clean the valve orifices at source. Use...
... not ignite. ƽ DANGER Failure to correct these symptoms may result in conjunction with a flashlight. Main Burner Cleaning Procedure Turn off the burner control knobs. Remove the manifold. (See Section "Replacing the main burners".) Look inside of the air shutter. Barbecue heats unevenly. 4. Figure 12 Clean the inside each burner with the burner flames appearing yellow and lazy. 2. Check and clean the valve orifices at source. Use...
Owner Manual
Page 32
... valve Crossover Ignition System Operations If the Crossover Ignition System fails to light, contact Weber-Stephen Customer Service. 32 Check fit around the burners and valves. White wire Black wire Figure 20 s Check that the seams are attached properly. See Step "Install igniter" for gas leaks". If the Crossover Ignition System still fails to ignite the Front burner, light the Front burner with a match, then check the Crossover Ignition...
... valve Crossover Ignition System Operations If the Crossover Ignition System fails to light, contact Weber-Stephen Customer Service. 32 Check fit around the burners and valves. White wire Black wire Figure 20 s Check that the seams are attached properly. See Step "Install igniter" for gas leaks". If the Crossover Ignition System still fails to ignite the Front burner, light the Front burner with a match, then check the Crossover Ignition...

Owner Manual
Page 33
... high for preheating. Burner flame pattern is on -steel, not paint. tank, but tank is low Are burners clean? Disconnect the regulator from the tank. Turn burner control knobs OFF. Flames do not light. -orBurners have activated. THIS IS NOT A DEFECT. If problems cannot be adjusted with an empty tank. Is LP fuel low or empty? Is the bottom tray "dirty" and not allowing grease to "Lighting Instructions". Clean thoroughly...
... high for preheating. Burner flame pattern is on -steel, not paint. tank, but tank is low Are burners clean? Disconnect the regulator from the tank. Turn burner control knobs OFF. Flames do not light. -orBurners have activated. THIS IS NOT A DEFECT. If problems cannot be adjusted with an empty tank. Is LP fuel low or empty? Is the bottom tray "dirty" and not allowing grease to "Lighting Instructions". Clean thoroughly...
Owner Manual
Page 35
... Tank panel 37 1/4-20 x 1 1/4 inch bolt 38 1/4-20 hex nut 39 Hair pin cotters (2) 40 Hinge pins (2) 41 Thermometer 42 1/4-20 keps nut 43 Cooking box 44 Burner control knobs (3) 45 Control panel 46 Igniter button 47 Phillips screws/washers (2) 48 Crossover tube 49 Front and back burners (2) 50 Center burner 51 1/4-20 stainless steel wing nuts (2) 52 Spider Stopper Guards (3) 53 Manifold assembly 54 Manifold...
... Tank panel 37 1/4-20 x 1 1/4 inch bolt 38 1/4-20 hex nut 39 Hair pin cotters (2) 40 Hinge pins (2) 41 Thermometer 42 1/4-20 keps nut 43 Cooking box 44 Burner control knobs (3) 45 Control panel 46 Igniter button 47 Phillips screws/washers (2) 48 Crossover tube 49 Front and back burners (2) 50 Center burner 51 1/4-20 stainless steel wing nuts (2) 52 Spider Stopper Guards (3) 53 Manifold assembly 54 Manifold...


