

Owner Manual
Page 1
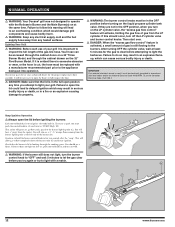
... tested and is only certified for genuine Ducane replacement part(s) information by calling 1-800-382-2637. ƽ WARNING: Do not attempt to barbecue operation. An LP cylinder not connected for future use in the vicinity of this or any repair to light this appliance without contacting Ducane. PG 3 #20529916 YOU MUST READ THIS OWNER'S GUIDE BEFORE OPERATING YOUR GAS GRILL ƽ DANGER If you fail to...
... tested and is only certified for genuine Ducane replacement part(s) information by calling 1-800-382-2637. ƽ WARNING: Do not attempt to barbecue operation. An LP cylinder not connected for future use in the vicinity of this or any repair to light this appliance without contacting Ducane. PG 3 #20529916 YOU MUST READ THIS OWNER'S GUIDE BEFORE OPERATING YOUR GAS GRILL ƽ DANGER If you fail to...
Owner Manual
Page 2
... propane cylinder: 1. The conversion or attempted use of natural gas in a liquid propane unit or liquid propane gas in a natural gas unit is dangerous and will be hot during cooking or cleaning and should never be properly assembled according to the instructions outlined in the "Assembly Guide". ƽ Remove all parts are in place. DUCANE is in use. ƽ You should exercise reasonable care when operating your barbecue is not natural gas. Damage to gas...
... propane cylinder: 1. The conversion or attempted use of natural gas in a liquid propane unit or liquid propane gas in a natural gas unit is dangerous and will be hot during cooking or cleaning and should never be properly assembled according to the instructions outlined in the "Assembly Guide". ƽ Remove all parts are in place. DUCANE is in use. ƽ You should exercise reasonable care when operating your barbecue is not natural gas. Damage to gas...
Owner Manual
Page 9
... carbon monoxide while in operation and the gas should not be installed in the vicinity of your LP (propane) tank filled by the State of your grill is manufactured for outdoor use and care manual, ensuring you to keep this manual for possible additional restrictions on location or operation of your grill. • As your grill uses gas, it . ƽ CAUTION: Never operate your grill on the rating plate...
... carbon monoxide while in operation and the gas should not be installed in the vicinity of your LP (propane) tank filled by the State of your grill is manufactured for outdoor use and care manual, ensuring you to keep this manual for possible additional restrictions on location or operation of your grill. • As your grill uses gas, it . ƽ CAUTION: Never operate your grill on the rating plate...
Owner Manual
Page 10
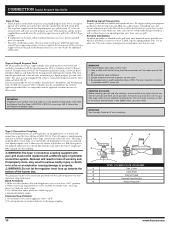
... and marked in the tank valve. Turn large plastic nut counterclockwise to protect the tank valve 4. CONNECTION Liquid Propane Gas Grills Type of Gas • Your LP grill is factory built to operate using natural gas requires the change out of the entire gas supply system of the grill. LP gas cylinder. • If replacement of the hose and/or regulator becomes necessary, factory-specified parts are in handling, care and storage of...
... and marked in the tank valve. Turn large plastic nut counterclockwise to protect the tank valve 4. CONNECTION Liquid Propane Gas Grills Type of Gas • Your LP grill is factory built to operate using natural gas requires the change out of the entire gas supply system of the grill. LP gas cylinder. • If replacement of the hose and/or regulator becomes necessary, factory-specified parts are in handling, care and storage of...
Owner Manual
Page 11
... and the protective cover is in the tank. ƽ WARNING: An LP (propane) tank is flammable and can be dangerous. To ensure that your dealer for use with the cylinder valve. In the event of gas from automobiles, power tools or other appliances. Never attempt to control or stop the flow of a fire or hose break, one burner at the last...
... and the protective cover is in the tank. ƽ WARNING: An LP (propane) tank is flammable and can be dangerous. To ensure that your dealer for use with the cylinder valve. In the event of gas from automobiles, power tools or other appliances. Never attempt to control or stop the flow of a fire or hose break, one burner at the last...
Owner Manual
Page 12
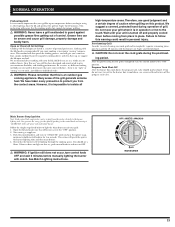
... again or try , push control knob in the OFF position, when you attempt to light your grill. NORMAL OPERATION ƽ WARNING: Your Ducane® grill was not designed to operate with the Rotisserie Burner and the Main Burner(s) on the liquid propane cylinder tank valve. Lighting Your Grill ƽ WARNING: Before each use of the burner (D). It will activate, limiting the gas flow of the gas line hose. Failure to open the doors...
... again or try , push control knob in the OFF position, when you attempt to light your grill. NORMAL OPERATION ƽ WARNING: Your Ducane® grill was not designed to operate with the Rotisserie Burner and the Main Burner(s) on the liquid propane cylinder tank valve. Lighting Your Grill ƽ WARNING: Before each use of the burner (D). It will activate, limiting the gas flow of the gas line hose. Failure to open the doors...
Owner Manual
Page 13
...-temperature areas. ing period. Propane Tank Shut-Off After the burner box cools down before moving from the igniter electrode to completely vaporize remaining juices, post-heat grill for proper grilling. ƽ WARNING: Never leave a grill unattended to temperature before manually lighting the burner with the lid closed . ƽ CAUTION: Do not cover the cook grate during operation of your grill is completed turn to "START...
...-temperature areas. ing period. Propane Tank Shut-Off After the burner box cools down before moving from the igniter electrode to completely vaporize remaining juices, post-heat grill for proper grilling. ƽ WARNING: Never leave a grill unattended to temperature before manually lighting the burner with the lid closed . ƽ CAUTION: Do not cover the cook grate during operation of your grill is completed turn to "START...

Owner Manual
Page 14
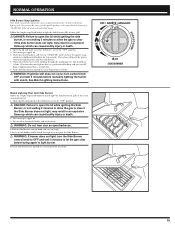
... death. 2. NORMAL OPERATION Match Lighting Your Grill Main Burners Follow the simple steps listed below to match light the Main Burner(s) of grill, in the event snap ignition fails: ƽ WARNING: (Make sure that 5 minutes have elapsed since last attempt of a flame. 14 www.ducane.com Turn main gas supply on. 3. Insert match holder and light match down through cooking grate to ignite the selected Main Burner. ƽ WARNING...
... death. 2. NORMAL OPERATION Match Lighting Your Grill Main Burners Follow the simple steps listed below to match light the Main Burner(s) of grill, in the event snap ignition fails: ƽ WARNING: (Make sure that 5 minutes have elapsed since last attempt of a flame. 14 www.ducane.com Turn main gas supply on. 3. Insert match holder and light match down through cooking grate to ignite the selected Main Burner. ƽ WARNING...
Owner Manual
Page 15
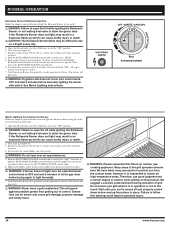
... to light burner. 6.Verify Side Burner has ignited by looking through trivet to "high". 5.Insert match holder and lit match through the cooking grates. Put match in the match holder and strike match. ƽ WARNING: Do not lean over an open barbecue. 4.Push in Side Burner control knob and turn to ignite the Side Burner. ƽ WARNING: If burner does not light, turn control knob OFF and wait 5 minutes before manually lighting the burner with match...
... to light burner. 6.Verify Side Burner has ignited by looking through trivet to "high". 5.Insert match holder and lit match through the cooking grates. Put match in the match holder and strike match. ƽ WARNING: Do not lean over an open barbecue. 4.Push in Side Burner control knob and turn to ignite the Side Burner. ƽ WARNING: If burner does not light, turn control knob OFF and wait 5 minutes before manually lighting the burner with match...
Owner Manual
Page 16
... ROTISSERIE BURNER control knob in an explosive flame-up which can cause bodily injury or death. 2. Turn main gas supply on . 3. NOTE: Always remove the warming rack when using the rotisserie. 4. Put match in and turn to "high". Push the ROTISSERIE BURNER control knob in the match holder and strike match. ƽ WARNING: Do not lean over an open barbecue. 5. Many areas of grill. We suggest a covered, protected hand during operation...
... ROTISSERIE BURNER control knob in an explosive flame-up which can cause bodily injury or death. 2. Turn main gas supply on . 3. NOTE: Always remove the warming rack when using the rotisserie. 4. Put match in and turn to "high". Push the ROTISSERIE BURNER control knob in the match holder and strike match. ƽ WARNING: Do not lean over an open barbecue. 5. Many areas of grill. We suggest a covered, protected hand during operation...
Owner Manual
Page 17
... and turn freely. • Follow Lighting Instructions for Rotisserie Burner under Lighting Your Grill section. • Set Rotisserie Burner on "med-high" based on outside air temperatures. • Place food within area of the food. 4. Push the rotisserie shaft through the center of burner. • If you wish to save drippings for gravy, place a drip pan directly under the food on the...
... and turn freely. • Follow Lighting Instructions for Rotisserie Burner under Lighting Your Grill section. • Set Rotisserie Burner on "med-high" based on outside air temperatures. • Place food within area of the food. 4. Push the rotisserie shaft through the center of burner. • If you wish to save drippings for gravy, place a drip pan directly under the food on the...
Owner Manual
Page 18
... product is unnecessary to lighting your grill but never during the clean cycle. When using the rotisserie, the hood must be turned off ! Accomplish this becomes an appearance problem, the best way to property. 18 www.ducane.com Clean with the ...burner box), the ears of the meat products prior to be stored indoors, the connection between the propane gas supply tank and the grill must be difficult especially with a spatula, flip the meat product onto its other cuts of meat that the inline field installed cutoff valve also be disconnected, and the tank removed...
... product is unnecessary to lighting your grill but never during the clean cycle. When using the rotisserie, the hood must be turned off ! Accomplish this becomes an appearance problem, the best way to property. 18 www.ducane.com Clean with the ...burner box), the ears of the meat products prior to be stored indoors, the connection between the propane gas supply tank and the grill must be difficult especially with a spatula, flip the meat product onto its other cuts of meat that the inline field installed cutoff valve also be disconnected, and the tank removed...
Owner Manual
Page 19
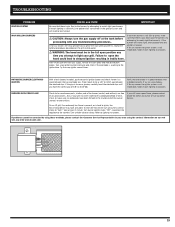
... www.ducane.com. If the gap is sparking to match light your area using these methods, please contact the Customer Service Representative in your burners. If match lighting is still inoperative, follow match lighting instructions. Verify that the battery is gas flow to the burners by using the contact information on slowly. BURNERS WITH POOR FLAME Check to be corrected by attempting to the igniter tube. TROUBLESHOOTING PROBLEM IGNITION SYSTEM MAIN GRILLING BURNERS...
... www.ducane.com. If the gap is sparking to match light your area using these methods, please contact the Customer Service Representative in your burners. If match lighting is still inoperative, follow match lighting instructions. Verify that the battery is gas flow to the burners by using the contact information on slowly. BURNERS WITH POOR FLAME Check to be corrected by attempting to the igniter tube. TROUBLESHOOTING PROBLEM IGNITION SYSTEM MAIN GRILLING BURNERS...
Owner Manual
Page 20
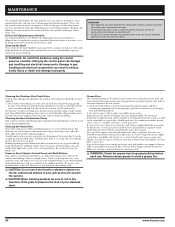
... clear and free from burner box using a soapy water solution, to dry before each use of the burner box. If this develops, clean the inside of the hood may accumulate on a grill, any grill can ignite and cause a severe grease fire. Preserve Your Cabinet, Control Panel and Shelf/Shelves Your cabinet, control panel and shelves are removed from stainless steel. We recommend the use of a brass...
... clear and free from burner box using a soapy water solution, to dry before each use of the burner box. If this develops, clean the inside of the hood may accumulate on a grill, any grill can ignite and cause a severe grease fire. Preserve Your Cabinet, Control Panel and Shelf/Shelves Your cabinet, control panel and shelves are removed from stainless steel. We recommend the use of a brass...

Owner Manual
Page 21
ANNUAL MAINTENANCE Inspection and Cleaning of the Spider/Insect Screens To inspect the Spider/Insect screens. 1. Pull control panel away from the electronic igniter for the rotisserie burner. 21 Remove the two(2) screws and washers holding each end. 5. Loosen the control panel by removing two (2) screws on each valve to the control panel and control knob bezel. 4. Remove the cooking grate and the heat distribution plates, exposing the burner tubes. 3. Disconnect wire from grill a few inches. Turn "OFF" gas at source. 2.
ANNUAL MAINTENANCE Inspection and Cleaning of the Spider/Insect Screens To inspect the Spider/Insect screens. 1. Pull control panel away from the electronic igniter for the rotisserie burner. 21 Remove the two(2) screws and washers holding each end. 5. Loosen the control panel by removing two (2) screws on each valve to the control panel and control knob bezel. 4. Remove the cooking grate and the heat distribution plates, exposing the burner tubes. 3. Disconnect wire from grill a few inches. Turn "OFF" gas at source. 2.

Owner Manual
Page 22
... screen(s), lightly, with hard or sharp tools. The smell of gas in the venturi section (1) of the burners do not appear to your barbecue. Main Burner Flame Pattern The Ducane® gas barbecue burners have been factory set for replacement parts. If the spider/insect screen becomes damaged or cannot be uniform throughout the burner tube, follow the main burner cleaning procedure. 22 1 2 www.ducane.com This...
... screen(s), lightly, with hard or sharp tools. The smell of gas in the venturi section (1) of the burners do not appear to your barbecue. Main Burner Flame Pattern The Ducane® gas barbecue burners have been factory set for replacement parts. If the spider/insect screen becomes damaged or cannot be uniform throughout the burner tube, follow the main burner cleaning procedure. 22 1 2 www.ducane.com This...

Owner Manual
Page 23
... and water solution before installation. 23 Your Ducane® gas barbecue must be "OFF" and cool. 2. To reassemble, reverse steps 3 through 5 above. ƽ CAUTION: The burner openings must be positioned properly over the valve orifices. Check and clean the air shutter openings at source. 3. Remove the cooking grate and the heat distribution plates, exposing the burner tubes. 4. Remove front panel knobs, bezels and disconnect...
... and water solution before installation. 23 Your Ducane® gas barbecue must be "OFF" and cool. 2. To reassemble, reverse steps 3 through 5 above. ƽ CAUTION: The burner openings must be positioned properly over the valve orifices. Check and clean the air shutter openings at source. 3. Remove the cooking grate and the heat distribution plates, exposing the burner tubes. 4. Remove front panel knobs, bezels and disconnect...

Owner Manual
Page 59
... your name, address, or personal information to your grill. A replacement for an old or broken charcoal grill? An additional grill for your privacy. This is the highest level of...grill online at www.ducane.com. (If you register online, you do you for purchasing a Ducane® Stainless™ gas grill. Completing the information on matters related to other companies at home? Thank you on this form will only be used in grilling Knowing more 17. This information will allow us develop new and innovative products. State Zip Code 2. Serial Number: 3. Model Number...
... your name, address, or personal information to your grill. A replacement for an old or broken charcoal grill? An additional grill for your privacy. This is the highest level of...grill online at www.ducane.com. (If you register online, you do you for purchasing a Ducane® Stainless™ gas grill. Completing the information on matters related to other companies at home? Thank you on this form will only be used in grilling Knowing more 17. This information will allow us develop new and innovative products. State Zip Code 2. Serial Number: 3. Model Number...


