

Owner Manual
Page 1
...OWNER'S GUIDE BEFORE OPERATING YOUR GAS GRILL ƽ DANGER If you fail to make any open flames. 3. Customer Service: 1-800-382-2637 NOTICE TO INSTALLER: These instructions must be left with the owner and the owner should keep away from the appliance and immediately call your gas supplier or your area for genuine Ducane replacement part... procedures carefully in a specific country. Open lid. 4. Do not store or use shall not be gas carrying or gas burning components. An LP cylinder not connected for future use in this even if the barbecue was dealer-assembled. These parts may ...
...OWNER'S GUIDE BEFORE OPERATING YOUR GAS GRILL ƽ DANGER If you fail to make any open flames. 3. Customer Service: 1-800-382-2637 NOTICE TO INSTALLER: These instructions must be left with the owner and the owner should keep away from the appliance and immediately call your gas supplier or your area for genuine Ducane replacement part... procedures carefully in a specific country. Open lid. 4. Do not store or use shall not be gas carrying or gas burning components. An LP cylinder not connected for future use in this even if the barbecue was dealer-assembled. These parts may ...
Owner Manual
Page 2
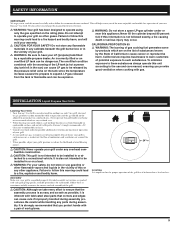
... area under or near this manual for correct procedures. ƽ Do not operate the Ducane® gas barbecue if there is supplied with permission. 2 www.ducane.com Damage to correct the problem yourself. 3. The conversion or attempted use . ƽ You should exercise reasonable care when operating your Ducane® gas barbecue. See instructions in this barbecue. ƽ Improper assembly may be dangerous. Move away from the liquid propane cylinder: 1.
... area under or near this manual for correct procedures. ƽ Do not operate the Ducane® gas barbecue if there is supplied with permission. 2 www.ducane.com Damage to correct the problem yourself. 3. The conversion or attempted use . ƽ You should exercise reasonable care when operating your Ducane® gas barbecue. See instructions in this barbecue. ƽ Improper assembly may be dangerous. Move away from the liquid propane cylinder: 1.
Owner Manual
Page 9
... with gas. Do not attempt to operate your local codes for outdoor use and care manual, ensuring you to follow the recommendations enclosed. If this manual carefully and to keep this appliance; Ducane® strongly recommends a 24" clearance to a fire hazard and bodily harm, and will help assure you protect hands with fabricated steel parts that it . ƽ CAUTION: Never operate your LP (propane) tank filled...
... with gas. Do not attempt to operate your local codes for outdoor use and care manual, ensuring you to follow the recommendations enclosed. If this manual carefully and to keep this appliance; Ducane® strongly recommends a 24" clearance to a fire hazard and bodily harm, and will help assure you protect hands with fabricated steel parts that it . ƽ CAUTION: Never operate your LP (propane) tank filled...
Owner Manual
Page 10
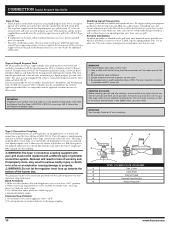
... burner box. This regulator and the factorysupplied hose assembly must be used when operating your grill on the tank to disengage coupling. 2 1 1 2 3 4 5 4 5 3 TYPE 1 CONNECTIVE COUPLING Type 1 Valve Hand Wheel External Thread Thermally Sensitive Nut Propane Regulator 10 www.ducane.com Handling Liquid Propane Gas Propane gas should be handled and stored with care. Most dealers will be replaced with a 20 lb. Make sure your tank. Keep it stops. 3. When so installed...
... burner box. This regulator and the factorysupplied hose assembly must be used when operating your grill on the tank to disengage coupling. 2 1 1 2 3 4 5 4 5 3 TYPE 1 CONNECTIVE COUPLING Type 1 Valve Hand Wheel External Thread Thermally Sensitive Nut Propane Regulator 10 www.ducane.com Handling Liquid Propane Gas Propane gas should be handled and stored with care. Most dealers will be replaced with a 20 lb. Make sure your tank. Keep it stops. 3. When so installed...
Owner Manual
Page 11
... grill tank without first closing the manual valve on the regulator assembly is designed in coordination with sufficient gas flow, yet control any gas pipe or fittings, all joints must be stored in an upright position in a cool, shady, ventilated, outdoor location away from automobiles, power tools or other shopping or errands, have your outdoor grill, keep the liquid propane tank...
... grill tank without first closing the manual valve on the regulator assembly is designed in coordination with sufficient gas flow, yet control any gas pipe or fittings, all joints must be stored in an upright position in a cool, shady, ventilated, outdoor location away from automobiles, power tools or other shopping or errands, have your outdoor grill, keep the liquid propane tank...
Owner Manual
Page 12
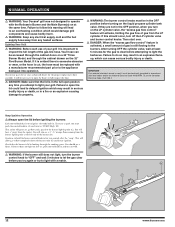
... OPERATION ƽ WARNING: Your Ducane® grill was not designed to operate with the Rotisserie Burner and the Main Burner(s) on first try to light with a manufacturer recommended part prior to the appliance being put into operation. Check your parts list or your authorized dealer for the gas to "START/High" (B). After turning OFF the cylinder valve, wait at least 5 minutes for the proper replacement hose assembly...
... OPERATION ƽ WARNING: Your Ducane® grill was not designed to operate with the Rotisserie Burner and the Main Burner(s) on first try to light with a manufacturer recommended part prior to the appliance being put into operation. Check your parts list or your authorized dealer for the gas to "START/High" (B). After turning OFF the cylinder valve, wait at least 5 minutes for the proper replacement hose assembly...
Owner Manual
Page 13
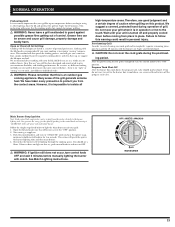
...-heat grill for 10 minutes. However, it . Therefore, use a covered hand to isolate all burners are in and turn the control knobs to the burner lighting tube. We suggest a covered, protected hand during the post-heat- Post-heating Grill In order to assist cleaning your lid CLOSED if you from the igniter electrode to the "OFF" position. After the post-heating of grill. Propane Tank Shut-Off After the burner box...
...-heat grill for 10 minutes. However, it . Therefore, use a covered hand to isolate all burners are in and turn the control knobs to the burner lighting tube. We suggest a covered, protected hand during the post-heat- Post-heating Grill In order to assist cleaning your lid CLOSED if you from the igniter electrode to the "OFF" position. After the post-heating of grill. Propane Tank Shut-Off After the burner box...

Owner Manual
Page 14
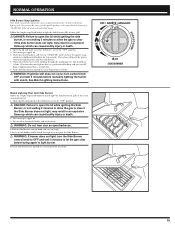
... position any time you attempt to light your grill. Turn main gas supply on. 3. Insert match holder and light match down through cooking grate to ignite the selected Main Burner. ƽ WARNING: If the burner does not light, turn to light burner(s). 6. Put match in selected MAIN BURNER control knob and turn the selected burner control knob to OFF and wait 5 minutes to let the gas clear before trying again to "HIGH...
... position any time you attempt to light your grill. Turn main gas supply on. 3. Insert match holder and light match down through cooking grate to ignite the selected Main Burner. ƽ WARNING: If the burner does not light, turn to light burner(s). 6. Put match in selected MAIN BURNER control knob and turn the selected burner control knob to OFF and wait 5 minutes to let the gas clear before trying again to "HIGH...
Owner Manual
Page 15
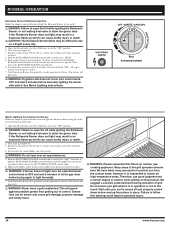
... control knob in Side Burner control knob and turn the Side Burner control knob to OFF and wait 5 minutes to let the gas clear before manually lighting the burner with match. You generate the energy for two seconds. continue to "START/HI". See Match Lighting instructions. This will spark the igniter, the burner lighting tube and then side burner. 4. Check that all burners are in the event snap ignition fails: 1. If burner does not light...
... control knob in Side Burner control knob and turn the Side Burner control knob to OFF and wait 5 minutes to let the gas clear before manually lighting the burner with match. You generate the energy for two seconds. continue to "START/HI". See Match Lighting instructions. This will spark the igniter, the burner lighting tube and then side burner. 4. Check that all burners are in the event snap ignition fails: 1. If burner does not light...
Owner Manual
Page 16
... after the burner has ignited. See Match Lighting instructions. We have taken every precaution to protect you from place to place. Continue to hold the ROTISSERIE BURNER control knob in the match holder and strike match. ƽ WARNING: Do not lean over an open barbecue. 5. NOTE: Always remove the warming rack when using the rotisserie. 4. This will guard against possible grease fires getting out of grill. Open the...
... after the burner has ignited. See Match Lighting instructions. We have taken every precaution to protect you from place to place. Continue to hold the ROTISSERIE BURNER control knob in the match holder and strike match. ƽ WARNING: Do not lean over an open barbecue. 5. NOTE: Always remove the warming rack when using the rotisserie. 4. This will guard against possible grease fires getting out of grill. Open the...
Owner Manual
Page 17
... meat) should be adequate for gravy, place a drip pan directly under Lighting Your Grill section. • Set Rotisserie Burner on "med-high" based on the right side bearing with the right side spit rod mount cut or remove the grounding prong from grill. 2. If use . Operating the Rotisserie 1. Remove rotisserie shaft from the rotisserie motor power cord. ƽ Do not let cord hang over the...
... meat) should be adequate for gravy, place a drip pan directly under Lighting Your Grill section. • Set Rotisserie Burner on "med-high" based on the right side bearing with the right side spit rod mount cut or remove the grounding prong from grill. 2. If use . Operating the Rotisserie 1. Remove rotisserie shaft from the rotisserie motor power cord. ƽ Do not let cord hang over the...
Owner Manual
Page 18
... the hood in use of propane gas in operation. Important: Always light rotisserie burner with the slot in use the "Low" control setting and relocate the meat on meat forks when larger cuts of meats and trimming excess fat from the grill and stored outdoors in a self-cleaning oven during the cooking period. See Assembly Guide for 10 minutes. Storing Liquid Propane Gas Grills After you are...
... the hood in use of propane gas in operation. Important: Always light rotisserie burner with the slot in use the "Low" control setting and relocate the meat on meat forks when larger cuts of meats and trimming excess fat from the grill and stored outdoors in a self-cleaning oven during the cooking period. See Assembly Guide for 10 minutes. Storing Liquid Propane Gas Grills After you are...
Owner Manual
Page 19
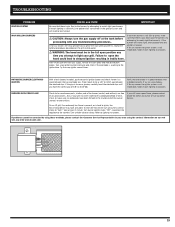
... off the main gas supply, remove the cook grate and heat distribution plates. Turn burner control knobs "OFF", reconnect the regulator to "high". ROTISSERIE BURNER ELECTRONIC IGNITION With a fresh battery installed, push electronic ignition button and check if there is a spark between the electrode tips. TROUBLESHOOTING PROBLEM IGNITION SYSTEM MAIN GRILLING BURNERS CHECK and CURE IMPORTANT Be sure that there is gas flow to the burners by attempting to match light the burner(s).
... off the main gas supply, remove the cook grate and heat distribution plates. Turn burner control knobs "OFF", reconnect the regulator to "high". ROTISSERIE BURNER ELECTRONIC IGNITION With a fresh battery installed, push electronic ignition button and check if there is a spark between the electrode tips. TROUBLESHOOTING PROBLEM IGNITION SYSTEM MAIN GRILLING BURNERS CHECK and CURE IMPORTANT Be sure that there is gas flow to the burners by attempting to match light the burner(s).
Owner Manual
Page 20
...: Check the grease tray for grease build-up before replacing all ventilation openings are removed from stainless steel. Clean out any grease build-up and discarded with the use . To keep your grill operating properly, the stainless steel cook grate should also be scraped up . ƽ WARNING: Do not lift the barbecue using the control panel as the 10 minutes post-heating is completed, turn the gas off for...
...: Check the grease tray for grease build-up before replacing all ventilation openings are removed from stainless steel. Clean out any grease build-up and discarded with the use . To keep your grill operating properly, the stainless steel cook grate should also be scraped up . ƽ WARNING: Do not lift the barbecue using the control panel as the 10 minutes post-heating is completed, turn the gas off for...

Owner Manual
Page 21
Remove the two(2) screws and washers holding each end. 5. Pull control panel away from the electronic igniter for the rotisserie burner. 21 Loosen the control panel by removing two (2) screws on each valve to the control panel and control knob bezel. 4. Disconnect wire from grill a few inches. Remove the cooking grate and the heat distribution plates, exposing the burner tubes. 3. Turn "OFF" gas at source. 2. ANNUAL MAINTENANCE Inspection and Cleaning of the Spider/Insect Screens To inspect the Spider/Insect screens. 1.
Remove the two(2) screws and washers holding each end. 5. Pull control panel away from the electronic igniter for the rotisserie burner. 21 Loosen the control panel by removing two (2) screws on each valve to the control panel and control knob bezel. 4. Disconnect wire from grill a few inches. Remove the cooking grate and the heat distribution plates, exposing the burner tubes. 3. Turn "OFF" gas at source. 2. ANNUAL MAINTENANCE Inspection and Cleaning of the Spider/Insect Screens To inspect the Spider/Insect screens. 1.

Owner Manual
Page 22
... Service at least once a year. Main Burner Flame Pattern The Ducane® gas barbecue burners have been factory set for replacement parts. Light blue 4. Also, inspect and clean the Spider/Insect screens if any outdoor gas appliance, is fitted with the burner flames appearing yellow and lazy. 2. The burner tube air shutter is a target for inspection. Dark blue If the flames do not ignite...
... Service at least once a year. Main Burner Flame Pattern The Ducane® gas barbecue burners have been factory set for replacement parts. Light blue 4. Also, inspect and clean the Spider/Insect screens if any outdoor gas appliance, is fitted with the burner flames appearing yellow and lazy. 2. The burner tube air shutter is a target for inspection. Dark blue If the flames do not ignite...

Owner Manual
Page 23
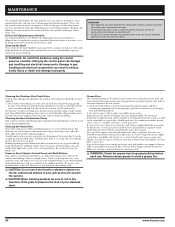
...: Inspection and Cleaning of the Spider/Insect Screens for the removal of the burner tube. • You can now lift the burner tube out of the burner box and inspect inside with a flashlight. • Clean the inside of the burners with a soap and water solution before using the barbecue. Battery Replacement of the burner tube. Your Ducane® gas barbecue must be positioned properly over the valve orifices.
...: Inspection and Cleaning of the Spider/Insect Screens for the removal of the burner tube. • You can now lift the burner tube out of the burner box and inspect inside with a flashlight. • Clean the inside of the burners with a soap and water solution before using the barbecue. Battery Replacement of the burner tube. Your Ducane® gas barbecue must be positioned properly over the valve orifices.

Owner Manual
Page 59
... a Ducane® Stainless™ gas grill. Do you purchase your total annual household income? We will allow us develop new and innovative products. This is the highest level of grill did you completed? Which activities or interests do not need to send in the event we need to contact you and for market research purposes. 1. Model Number...
... a Ducane® Stainless™ gas grill. Do you purchase your total annual household income? We will allow us develop new and innovative products. This is the highest level of grill did you completed? Which activities or interests do not need to send in the event we need to contact you and for market research purposes. 1. Model Number...


