

Owner Manual
Page 1
... vicinity of this or any open flames. 3. Leaking gas may be stored in serious personal injury or death and damage to barbecue operation. LP GAS GRILL OWNER'S MANUAL # 3200 & 5200 GUÍA DEL PROPIETARIO DEL ASADOR DE GAS LICUADO DE PROPANO - Shut off gas to country designation located on outer carton. An LP cylinder not connected for genuine Ducane replacement part(s) information by calling 1-800-382...
... vicinity of this or any open flames. 3. Leaking gas may be stored in serious personal injury or death and damage to barbecue operation. LP GAS GRILL OWNER'S MANUAL # 3200 & 5200 GUÍA DEL PROPIETARIO DEL ASADOR DE GAS LICUADO DE PROPANO - Shut off gas to country designation located on outer carton. An LP cylinder not connected for genuine Ducane replacement part(s) information by calling 1-800-382...

Owner Manual
Page 2
... the valves or burners. ƽ The Ducane® gas barbecue should be thoroughly cleaned on a regular basis. ƽ Liquid propane gas is in operation. ƽ Use heat-resistant barbecue mitts or gloves when operating barbecue. ƽ Keep any electrical supply cord and the fuel supply hose away from liquid propane cylinder. 2. Call your liquid propane supplier. DANGERS AND WARNINGS ƽ DANGER Failure to follow the assembly instructions in this Owner's Manual...
... the valves or burners. ƽ The Ducane® gas barbecue should be thoroughly cleaned on a regular basis. ƽ Liquid propane gas is in operation. ƽ Use heat-resistant barbecue mitts or gloves when operating barbecue. ƽ Keep any electrical supply cord and the fuel supply hose away from liquid propane cylinder. 2. Call your liquid propane supplier. DANGERS AND WARNINGS ƽ DANGER Failure to follow the assembly instructions in this Owner's Manual...
Owner Manual
Page 11
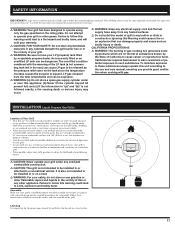
... condition combined with each grill giving specific assembly procedures for outdoor use and care manual, ensuring you provide good ventilation when cooking with gas. INSTALLATION Liquid Propane Gas Grills Location of Your Grill • Your Ducane® Gas Grill is not intended to be explosive. ƽ WARNING: (a) Do not store a spare gas supply cylinder under any fuel containers or propane cylinders. • Consult your local codes for future reference...
... condition combined with each grill giving specific assembly procedures for outdoor use and care manual, ensuring you provide good ventilation when cooking with gas. INSTALLATION Liquid Propane Gas Grills Location of Your Grill • Your Ducane® Gas Grill is not intended to be explosive. ƽ WARNING: (a) Do not store a spare gas supply cylinder under any fuel containers or propane cylinders. • Consult your local codes for future reference...
Owner Manual
Page 12
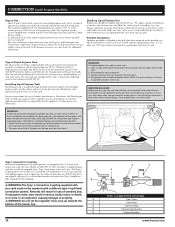
... cart. Gas will require a liquid propane tank that might obstruct the flow of combustion or ventilation air. • The areas around fittings. This regulator and the factory-supplied hose assembly must be 12 inches in the absence of local codes, with a 47.6 lb water capacity. CONNECTION Liquid Propane Gas Grills Type of Gas • Your LP grill is factory built to operate using natural gas requires the...
... cart. Gas will require a liquid propane tank that might obstruct the flow of combustion or ventilation air. • The areas around fittings. This regulator and the factory-supplied hose assembly must be 12 inches in the absence of local codes, with a 47.6 lb water capacity. CONNECTION Liquid Propane Gas Grills Type of Gas • Your LP grill is factory built to operate using natural gas requires the...
Owner Manual
Page 13
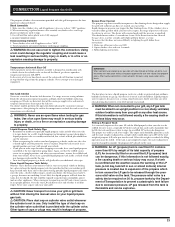
... total weight of its side whether it must remain in mind some basic safety rules about storing portable liquid propane tanks. If the cylinder valve is in a shady or protected spot outdoors, behind your LP tank, it is not completely empty, the scale readjustment must be sealed with leak-proof sealing compound approved for a refill. Follow lighting instructions. Use...
... total weight of its side whether it must remain in mind some basic safety rules about storing portable liquid propane tanks. If the cylinder valve is in a shady or protected spot outdoors, behind your LP tank, it is not completely empty, the scale readjustment must be sealed with leak-proof sealing compound approved for a refill. Follow lighting instructions. Use...

Owner Manual
Page 14
... the LP cylinder valve and burner control knobs. E D C 14 www.ducane.com You will B allow gas to the burner lighting tube (C). Continue to hold the burner control knob in for the gas to clear before turning on the liquid propane cylinder tank valve. This will also see a flame. If burner does not light on first try to light with the hood down and then turn on the LP cylinder valve, the "excess gas flow control...
... the LP cylinder valve and burner control knobs. E D C 14 www.ducane.com You will B allow gas to the burner lighting tube (C). Continue to hold the burner control knob in for the gas to clear before turning on the liquid propane cylinder tank valve. This will also see a flame. If burner does not light on first try to light with the hood down and then turn on the LP cylinder valve, the "excess gas flow control...
Owner Manual
Page 15
... properly cooled down , the propane tank valve should see a flame. We have taken every precaution to protect you from the igniter electrode to the touch. Therefore, use a covered hand to turn to "START/HI" until your unit is in for two seconds. Failure to hold control knob in operation or hot to the burner lighting tube. Post-heating Grill In order to assist...
... properly cooled down , the propane tank valve should see a flame. We have taken every precaution to protect you from the igniter electrode to the touch. Therefore, use a covered hand to turn to "START/HI" until your unit is in for two seconds. Failure to hold control knob in operation or hot to the burner lighting tube. Post-heating Grill In order to assist...

Owner Manual
Page 16
... MAIN BURNER control knob and turn the selected burner control knob to OFF and wait 5 minutes to let the gas clear before trying again to light your grill. Failure to open the lid could lead to delayed ignition which may result in an explosive flame-up which can cause bodily injury or death. 1 2. Turn main gas supply on. 3 3. NORMAL OPERATION Match Lighting Your Grill Main Burners Follow...
... MAIN BURNER control knob and turn the selected burner control knob to OFF and wait 5 minutes to let the gas clear before trying again to light your grill. Failure to open the lid could lead to delayed ignition which may result in an explosive flame-up which can cause bodily injury or death. 1 2. Turn main gas supply on. 3 3. NORMAL OPERATION Match Lighting Your Grill Main Burners Follow...

Owner Manual
Page 17
... match holder and strike match. ƽ WARNING: Do not lean over an open the lid while igniting the side burner, or not waiting 5 minutes to allow the gas to the "OFF" position (push in and turn control knob OFF and wait 5 minutes before trying again to "HI". 4. See Match Lighting instructions. 15 4 35 4 3 1 Match Lighting Your Grill Side Burner Follow the simple steps listed below to light...
... match holder and strike match. ƽ WARNING: Do not lean over an open the lid while igniting the side burner, or not waiting 5 minutes to allow the gas to the "OFF" position (push in and turn control knob OFF and wait 5 minutes before trying again to "HI". 4. See Match Lighting instructions. 15 4 35 4 3 1 Match Lighting Your Grill Side Burner Follow the simple steps listed below to light...
Owner Manual
Page 18
... becomes an appearance problem, the best way to remove the discoloration is set too high. Gauging Amount of Fuel in Liquid Propane Tank To gauge the amount of propane gas in your gas tank, (propane tank without gauge) the grill must be in operation. These flare ups should be used prior to lighting your grill off! Also, your grill should be disconnected, and the tank removed from the...
... becomes an appearance problem, the best way to remove the discoloration is set too high. Gauging Amount of Fuel in Liquid Propane Tank To gauge the amount of propane gas in your gas tank, (propane tank without gauge) the grill must be in operation. These flare ups should be used prior to lighting your grill off! Also, your grill should be disconnected, and the tank removed from the...
Owner Manual
Page 19
... burner control knobs "OFF", reconnect the regulator to "high". If problems cannot be checked. ƽ CAUTION: Always turn all burners control knobs to the cylinder. If the main burner(s) still fails to ignite, make sure no spiderwebs have activated. If for futher assistance or call Customer Service On an LP grill, if an extremely low flame is present, or is hard to light your grill. TROUBLESHOOTING PROBLEM IGNITION...
... burner control knobs "OFF", reconnect the regulator to "high". If problems cannot be checked. ƽ CAUTION: Always turn all burners control knobs to the cylinder. If the main burner(s) still fails to ignite, make sure no spiderwebs have activated. If for futher assistance or call Customer Service On an LP grill, if an extremely low flame is present, or is hard to light your grill. TROUBLESHOOTING PROBLEM IGNITION...
Owner Manual
Page 20
... can be severe enough to a grease fire. Damage to gas handling and electrical components can be susceptible to damage your grill operating properly, the stainless steel cook grate should be scraped up before replacing all ventilation openings are removed from stainless steel. Cleaning the Stainless Steel Cook Grate To keep your grill looking its best by the control panel can be used. For safety reasons. Follow...
... can be severe enough to a grease fire. Damage to gas handling and electrical components can be susceptible to damage your grill operating properly, the stainless steel cook grate should be scraped up before replacing all ventilation openings are removed from stainless steel. Cleaning the Stainless Steel Cook Grate To keep your grill looking its best by the control panel can be used. For safety reasons. Follow...

Owner Manual
Page 21
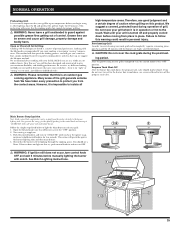
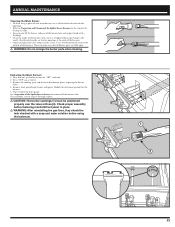
Turn "OFF" gas at source. 2. Pull control panel away from grill a few inches. 21 Remove the cooking grate and the heat distribution plates, exposing the burner tubes. 3. Loosen the control panel by removing two (2) screws on each valve to the control panel and control knob bezel. 4. Remove the two(2) screws and washers holding each end. 5. ANNUAL MAINTENANCE Inspection and Cleaning of the Spider/Insect Screens To inspect the Spider/Insect screens. 1.
Turn "OFF" gas at source. 2. Pull control panel away from grill a few inches. 21 Remove the cooking grate and the heat distribution plates, exposing the burner tubes. 3. Loosen the control panel by removing two (2) screws on each valve to the control panel and control knob bezel. 4. Remove the two(2) screws and washers holding each end. 5. ANNUAL MAINTENANCE Inspection and Cleaning of the Spider/Insect Screens To inspect the Spider/Insect screens. 1.

Owner Manual
Page 22
... ignite. ƽ DANGER: Failure to correct the above mentioned symptoms may result in the venturi section (1) of the following symptoms occur: 1. If the spider/insect screen becomes damaged or cannot be uniform throughout the burner tube, follow the main burner cleaning procedure. 22 1 2 www.ducane.com Light blue 4. Main Burner Flame Pattern The Ducane® gas barbecue burners have been factory set for replacement parts...
... ignite. ƽ DANGER: Failure to correct the above mentioned symptoms may result in the venturi section (1) of the following symptoms occur: 1. If the spider/insect screen becomes damaged or cannot be uniform throughout the burner tube, follow the main burner cleaning procedure. 22 1 2 www.ducane.com Light blue 4. Main Burner Flame Pattern The Ducane® gas barbecue burners have been factory set for replacement parts...
Owner Manual
Page 23
... using the barbecue. 1 2 23 Replacing the Main Burners 1. To reassemble, reverse steps 3 through 5 above. ƽ CAUTION: The burner openings (1) must be positioned properly over the valve orifices (2). Use a steel bristle brush to make sure that all burner ports are fully open. ƽ WARNING: Do not enlarge the burner ports when cleaning. Remove the cooking grate and the heat distribution plates, exposing the burner tubes. 4. Your Ducane® gas barbecue...
... using the barbecue. 1 2 23 Replacing the Main Burners 1. To reassemble, reverse steps 3 through 5 above. ƽ CAUTION: The burner openings (1) must be positioned properly over the valve orifices (2). Use a steel bristle brush to make sure that all burner ports are fully open. ƽ WARNING: Do not enlarge the burner ports when cleaning. Remove the cooking grate and the heat distribution plates, exposing the burner tubes. 4. Your Ducane® gas barbecue...
Owner Manual
Page 55
... in grilling? Serial Number: 3. An additional grill for purchasing a Ducane® Affinity® S™ gas grill. Some high school Earned a college degree Earned a high school diploma Earned a graduate degree 16. A replacement for an old or broken gas grill? Date of the children living at home? Do you own most recently? What is not sold or rented. 9. Register your grill online at www.ducane...
... in grilling? Serial Number: 3. An additional grill for purchasing a Ducane® Affinity® S™ gas grill. Some high school Earned a college degree Earned a high school diploma Earned a graduate degree 16. A replacement for an old or broken gas grill? Date of the children living at home? Do you own most recently? What is not sold or rented. 9. Register your grill online at www.ducane...


