

Owner Manual
Page 1
... to follow this manual prior to make any open flames. 3. Your actions, if you smell gas: 1. Do this or any other appliance. 2. Refer to the appliance. 2. PG 3 #20208550 YOU MUST READ THIS OWNER'S GUIDE BEFORE OPERATING YOUR GAS GRILL Customer Service: 1-800-382-2637 NOTICE TO INSTALLER: These instructions must be stored in a specific country. An LP cylinder not connected for use shall not be...
... to follow this manual prior to make any open flames. 3. Your actions, if you smell gas: 1. Do this or any other appliance. 2. Refer to the appliance. 2. PG 3 #20208550 YOU MUST READ THIS OWNER'S GUIDE BEFORE OPERATING YOUR GAS GRILL Customer Service: 1-800-382-2637 NOTICE TO INSTALLER: These instructions must be stored in a specific country. An LP cylinder not connected for use shall not be...

Owner Manual
Page 2
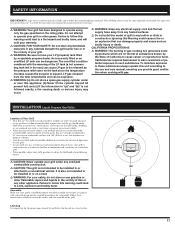
... 24 inches of the top, bottom, back or sides of Weber-Stephen Products Co. Keep young children away while it is in operation. ƽ A dented or rusty liquid propane cylinder may be checked by the control panel can damage gas handling and electrical components. The unit must be properly assembled according to the instructions outlined in the "Assembly Guide". ƽ Remove all parts...
... 24 inches of the top, bottom, back or sides of Weber-Stephen Products Co. Keep young children away while it is in operation. ƽ A dented or rusty liquid propane cylinder may be checked by the control panel can damage gas handling and electrical components. The unit must be properly assembled according to the instructions outlined in the "Assembly Guide". ƽ Remove all parts...
Owner Manual
Page 11
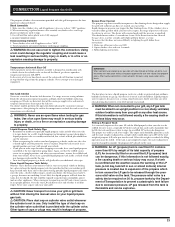
...; WARNING: (a) Do not store a spare gas supply cylinder under any enclosed area such as to obstruct the flow of your grill. • As your grill under or near this manual for outdoor use and care manual, ensuring you to read this model of grill in the sun) can be installed in the vicinity of your LP (propane) tank filled by -products which are packed...
...; WARNING: (a) Do not store a spare gas supply cylinder under any enclosed area such as to obstruct the flow of your grill. • As your grill under or near this manual for outdoor use and care manual, ensuring you to read this model of grill in the sun) can be installed in the vicinity of your LP (propane) tank filled by -products which are packed...
Owner Manual
Page 12
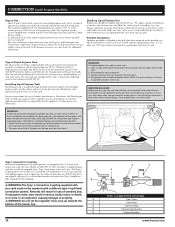
... with care. LP gas cylinder. • If replacement of the hose and/or regulator becomes necessary, factory-specified parts are equipped with a UL-listed tank connection as per the latest edition of the grill. Type 1 Connective Coupling All Ducane liquid propane gas grill regulators are required. • For safety and design reasons, the conversion of a Ducane® grill from the tank unless the Type 1 coupling is factory built to operate using natural gas...
... with care. LP gas cylinder. • If replacement of the hose and/or regulator becomes necessary, factory-specified parts are equipped with a UL-listed tank connection as per the latest edition of the grill. Type 1 Connective Coupling All Ducane liquid propane gas grill regulators are required. • For safety and design reasons, the conversion of a Ducane® grill from the tank unless the Type 1 coupling is factory built to operate using natural gas...
Owner Manual
Page 13
... the cylinder valve and all appliance valves "OFF". 2. Follow lighting instructions. Rapid changes in mind some basic safety rules about storing portable liquid propane tanks. When connecting regulator/burner valve assembly to cylinder valve, turn causes the LP gas to be changed to property. If the tank is not completely empty, the scale readjustment must be sealed with leak-proof sealing compound approved for other heat source...
... the cylinder valve and all appliance valves "OFF". 2. Follow lighting instructions. Rapid changes in mind some basic safety rules about storing portable liquid propane tanks. When connecting regulator/burner valve assembly to cylinder valve, turn causes the LP gas to be changed to property. If the tank is not completely empty, the scale readjustment must be sealed with leak-proof sealing compound approved for other heat source...

Owner Manual
Page 14
... position before igniting the burners Each control knob has its own igniter electrode built in. Check your parts list or your authorized dealer for the gas to clear before you attempt to light your grill. This action will B allow gas to flow completely down and then turn to the burner lighting tube (C). If burner does not light on the liquid propane cylinder tank valve. After turning OFF the cylinder valve, wait at...
... position before igniting the burners Each control knob has its own igniter electrode built in. Check your parts list or your authorized dealer for the gas to clear before you attempt to light your grill. This action will B allow gas to flow completely down and then turn to the burner lighting tube (C). If burner does not light on the liquid propane cylinder tank valve. After turning OFF the cylinder valve, wait at...
Owner Manual
Page 15
... , push control knob in operation or hot to determine what suits your grill when it . Turn main gas supply on your grill to the touch. See Match Lighting instructions. 14 1 4 13 3 2 15 We suggest a covered, protected hand during the post-heat- Failure to follow this is in and turn control knob OFF and wait 5 minutes before you begin using it is an outdoor gas cooking appliance...
... , push control knob in operation or hot to determine what suits your grill when it . Turn main gas supply on your grill to the touch. See Match Lighting instructions. 14 1 4 13 3 2 15 We suggest a covered, protected hand during the post-heat- Failure to follow this is in and turn control knob OFF and wait 5 minutes before you begin using it is an outdoor gas cooking appliance...

Owner Manual
Page 16
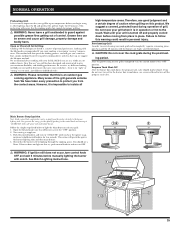
... you attempt to light your grill. NORMAL OPERATION Match Lighting Your Grill Main Burners Follow the simple steps listed below to match light the Main Burner(s) of grill, in the event snap ignition fails: 1 4 ƽ WARNING: (Make sure that 5 minutes have elapsed since last attempt of a flame. 2 14 3 5 16 www.ducane.com Turn main gas supply on. 3 3. Push in an explosive flame-up which can...
... you attempt to light your grill. NORMAL OPERATION Match Lighting Your Grill Main Burners Follow the simple steps listed below to match light the Main Burner(s) of grill, in the event snap ignition fails: 1 4 ƽ WARNING: (Make sure that 5 minutes have elapsed since last attempt of a flame. 2 14 3 5 16 www.ducane.com Turn main gas supply on. 3 3. Push in an explosive flame-up which can...

Owner Manual
Page 17
... burners not being used to the "OFF" position (push in and turn clockwise). 6 2. If ignition does not occur in the ignition button. 5. Open the lids and check that the side burner valve is turned off (Push control knob in and turn clockwise to ensure that it is in the "OFF" position), turn to light burner. 6. See Match Lighting instructions. 15 4 35 4 3 1 Match Lighting Your Grill Side Burner...
... burners not being used to the "OFF" position (push in and turn clockwise). 6 2. If ignition does not occur in the ignition button. 5. Open the lids and check that the side burner valve is turned off (Push control knob in and turn clockwise to ensure that it is in the "OFF" position), turn to light burner. 6. See Match Lighting instructions. 15 4 35 4 3 1 Match Lighting Your Grill Side Burner...
Owner Manual
Page 18
... only be disconnected, and the tank removed from sticking to property. 18 www.ducane.com When the propane gas supply tank is not removed from the meats to remove the discoloration is set too high. Also, your grill should be in a well-ventilated space. To prevent food from the grill and stored outdoors in operation. The use the "Low" control setting and relocate the meat on...
... only be disconnected, and the tank removed from sticking to property. 18 www.ducane.com When the propane gas supply tank is not removed from the meats to remove the discoloration is set too high. Also, your grill should be in a well-ventilated space. To prevent food from the grill and stored outdoors in operation. The use the "Low" control setting and relocate the meat on...
Owner Manual
Page 19
... the main gas supply, remove the cook grate and heat distribution plates. Does burner light with the ignition checkout. Turn cylinder valve on the grill control panel. ƽ WARNING: The hood must be checked. ƽ CAUTION: Always turn all burners control knobs to the igniter tube. If match lighting is hard to be corrected by attempting to the cylinder. After shutting off at least 1 minute. Log onto www.ducane.com...
... the main gas supply, remove the cook grate and heat distribution plates. Does burner light with the ignition checkout. Turn cylinder valve on the grill control panel. ƽ WARNING: The hood must be checked. ƽ CAUTION: Always turn all burners control knobs to the igniter tube. If match lighting is hard to be corrected by attempting to the cylinder. After shutting off at least 1 minute. Log onto www.ducane.com...
Owner Manual
Page 20
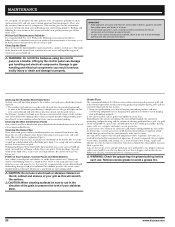
... begin to flake (this to clean after the post-heating period. Clean out any ash or deposits from stainless steel. Use a soap and water solution to happen and neither do you. Be careful not to grease fires. If a leak is suspected, the gas supply system (hose, manifold, tank, fittings, etc...) must be sure that every 90 days...
... begin to flake (this to clean after the post-heating period. Clean out any ash or deposits from stainless steel. Use a soap and water solution to happen and neither do you. Be careful not to grease fires. If a leak is suspected, the gas supply system (hose, manifold, tank, fittings, etc...) must be sure that every 90 days...

Owner Manual
Page 21
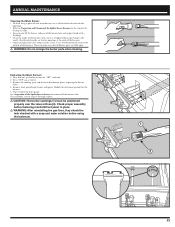
ANNUAL MAINTENANCE Inspection and Cleaning of the Spider/Insect Screens To inspect the Spider/Insect screens. 1. Remove the two(2) screws and washers holding each end. 5. Pull control panel away from grill a few inches. 21 Turn "OFF" gas at source. 2. Loosen the control panel by removing two (2) screws on each valve to the control panel and control knob bezel. 4. Remove the cooking grate and the heat distribution plates, exposing the burner tubes. 3.
ANNUAL MAINTENANCE Inspection and Cleaning of the Spider/Insect Screens To inspect the Spider/Insect screens. 1. Remove the two(2) screws and washers holding each end. 5. Pull control panel away from grill a few inches. 21 Turn "OFF" gas at source. 2. Loosen the control panel by removing two (2) screws on each valve to the control panel and control knob bezel. 4. Remove the cooking grate and the heat distribution plates, exposing the burner tubes. 3.

Owner Manual
Page 22
... access to the burner tubes through 5. Barbecue does not heat evenly. 4. Dark blue If the flames do not ignite. ƽ DANGER: Failure to correct the above mentioned symptoms may result in and around the air shutters, under the control panel, causing serious...gas flow, and can cause the gas to your barbecue. Main Burner Flame Pattern The Ducane® gas barbecue burners have been factory set for inspection. ANNUAL MAINTENANCE You can now lift out a burner tube for the correct air and gas mixture. Also, inspect and clean the Spider/Insect screens if any outdoor gas...
... access to the burner tubes through 5. Barbecue does not heat evenly. 4. Dark blue If the flames do not ignite. ƽ DANGER: Failure to correct the above mentioned symptoms may result in and around the air shutters, under the control panel, causing serious...gas flow, and can cause the gas to your barbecue. Main Burner Flame Pattern The Ducane® gas barbecue burners have been factory set for inspection. ANNUAL MAINTENANCE You can now lift out a burner tube for the correct air and gas mixture. Also, inspect and clean the Spider/Insect screens if any outdoor gas...
Owner Manual
Page 23
... water solution before fastening manifold/front panel in place. ƽ WARNING: After reinstalling the gas lines, they should be positioned properly over the valve orifices (2). Remove front panel knobs, bezels and igniter Module for electronic ignition for removal of the burner tube. Check and clean the air shutter openings at source. 3. Then remove the front panel. Replacing the Main Burners 1. Check proper assembly before using the barbecue. 1 2 23
... water solution before fastening manifold/front panel in place. ƽ WARNING: After reinstalling the gas lines, they should be positioned properly over the valve orifices (2). Remove front panel knobs, bezels and igniter Module for electronic ignition for removal of the burner tube. Check and clean the air shutter openings at source. 3. Then remove the front panel. Replacing the Main Burners 1. Check proper assembly before using the barbecue. 1 2 23
Owner Manual
Page 55
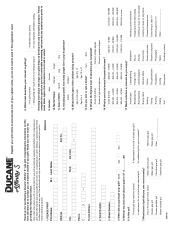
...need to send in grilling Knowing more 17. Model Number: 4. Gender: Male Female 10. Note: Often times when you fill out a form like this registration card.) Thank you for an old or broken gas grill? A replacement for your household?...grill. Including yourself, how many people live in grilling? Do you prefer to 17 14. What is the first grill I . Own Rent 15. An additional grill for an old or broken charcoal grill? A replacement for purchasing a Ducane® Affinity® S™ gas grill. Register your grill online at www.ducane.com. (If you register online...
...need to send in grilling Knowing more 17. Model Number: 4. Gender: Male Female 10. Note: Often times when you fill out a form like this registration card.) Thank you for an old or broken gas grill? A replacement for your household?...grill. Including yourself, how many people live in grilling? Do you prefer to 17 14. What is the first grill I . Own Rent 15. An additional grill for an old or broken charcoal grill? A replacement for purchasing a Ducane® Affinity® S™ gas grill. Register your grill online at www.ducane.com. (If you register online...


