

Owner Manual
Page 1
... FOR OUTDOOR USE ONLY. ƽ WARNING: Do not try to barbecue operation. Shut off gas to property. ƽ WARNING 1. FOR HOUSEHOLD USE ONLY SAVE THESE INSTRUCTIONS FOR FUTURE REFERENCE 27010357 03/03/08 NG US ENGLISH NOTICE TO INSTALLER: These instructions must be stored in the vicinity of this or any open flames. 3. NATURAL GAS GRILL OWNER'S MANUAL 3400 & 4400 GUÍA DEL PROPIETARIO DEL ASADOR DE GAS NATURAL...
... FOR OUTDOOR USE ONLY. ƽ WARNING: Do not try to barbecue operation. Shut off gas to property. ƽ WARNING 1. FOR HOUSEHOLD USE ONLY SAVE THESE INSTRUCTIONS FOR FUTURE REFERENCE 27010357 03/03/08 NG US ENGLISH NOTICE TO INSTALLER: These instructions must be stored in the vicinity of this or any open flames. 3. NATURAL GAS GRILL OWNER'S MANUAL 3400 & 4400 GUÍA DEL PROPIETARIO DEL ASADOR DE GAS NATURAL...
Owner Manual
Page 2
.... ƽ Do not use , the Ducane® gas barbecue should exercise reasonable care when operating your fire department. © 2007 Ducane Products Co., 200 East Daniels Road, Palatine, Illinois, 60067 U.S.A. Do not use a liquid propane cylinder with permission. 2 www.ducane.com See instructions in this manual for gas leaks and burner obstructions before use. ƽ Do not build this model of grill in any built-in or slide in...
.... ƽ Do not use , the Ducane® gas barbecue should exercise reasonable care when operating your fire department. © 2007 Ducane Products Co., 200 East Daniels Road, Palatine, Illinois, 60067 U.S.A. Do not use a liquid propane cylinder with permission. 2 www.ducane.com See instructions in this manual for gas leaks and burner obstructions before use. ƽ Do not build this model of grill in any built-in or slide in...

Owner Manual
Page 12
Remarque! Serrez la totalité des fixations maintenant. 20 12 www.ducane.com ASSEMBLY, ENSAMBLAJE, ASSEMBLAGE 17 18 19 Note! Apriete completamente todos los sujetadores ahora. Fully tighten all fasteners at this time. ¡Nota!
Remarque! Serrez la totalité des fixations maintenant. 20 12 www.ducane.com ASSEMBLY, ENSAMBLAJE, ASSEMBLAGE 17 18 19 Note! Apriete completamente todos los sujetadores ahora. Fully tighten all fasteners at this time. ¡Nota!

Owner Manual
Page 15
ASSEMBLY, ENSAMBLAJE, ASSEMBLAGE 25 ƽCAUTION: Always remove the warming rack when using the rotisserie. ƽOBSERVACIÓN: Siempre quite la rejilla de calentamiento cuando esté usando el sistema rotativo. ƽREMARQUE : Enlevez toujours la grille de chauffage lors de l'utilisation de la rôtisserie. 26 ƽWARNING: The rotisserie motor must be stored indoors when...
ASSEMBLY, ENSAMBLAJE, ASSEMBLAGE 25 ƽCAUTION: Always remove the warming rack when using the rotisserie. ƽOBSERVACIÓN: Siempre quite la rejilla de calentamiento cuando esté usando el sistema rotativo. ƽREMARQUE : Enlevez toujours la grille de chauffage lors de l'utilisation de la rôtisserie. 26 ƽWARNING: The rotisserie motor must be stored indoors when...
Owner Manual
Page 16
... fuel generates some by-products which are packed with gas. INSTALLATION Natural Gas Grills Location of Your Grill • Your Ducane® Gas Grill is also not intended to be located on location or operation of your grill. • As your grill is assembled properly. It is manufactured for outdoor use and care manual, ensuring you to keep this manual carefully and to follow this warning could lead to...
... fuel generates some by-products which are packed with gas. INSTALLATION Natural Gas Grills Location of Your Grill • Your Ducane® Gas Grill is also not intended to be located on location or operation of your grill. • As your grill is assembled properly. It is manufactured for outdoor use and care manual, ensuring you to keep this manual carefully and to follow this warning could lead to...
Owner Manual
Page 17
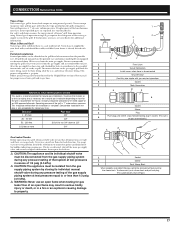
... the assembly instructions, you are no gas leaks. Comparable sized black iron pipe is also acceptable for additional information. Use soapy water or testing solution. Your grill operates at least two (2) feet from operation using Natural gas to operation using natural gas only. This process will produce a gas joint. NATURAL GAS INSTALLER'S GUIDE This guide is a recommendation for bubbles indicating escaping gas. Operating pressure of the hose becomes necessary, factory specified parts...
... the assembly instructions, you are no gas leaks. Comparable sized black iron pipe is also acceptable for additional information. Use soapy water or testing solution. Your grill operates at least two (2) feet from operation using Natural gas to operation using natural gas only. This process will produce a gas joint. NATURAL GAS INSTALLER'S GUIDE This guide is a recommendation for bubbles indicating escaping gas. Operating pressure of the hose becomes necessary, factory specified parts...
Owner Manual
Page 18
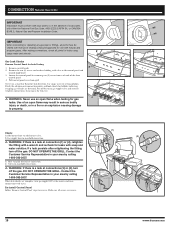
... connections with natural and propane gases. Gas Leak Checks Remove Control Panel for leaks using soapy water and a brush. Check: 1) Side burner hose to side burner valve. 2) Gas supply hose-to -manifold connections. ƽ WARNING: If there is a leak at connection (1) or (2), retighten the fitting with a wrench and recheck for use with water. Natural Gas and Propane Installation Code. Use soapy water or testing solution. DO NOT OPERATE THE GRILL. When leak...
... connections with natural and propane gases. Gas Leak Checks Remove Control Panel for leaks using soapy water and a brush. Check: 1) Side burner hose to side burner valve. 2) Gas supply hose-to -manifold connections. ƽ WARNING: If there is a leak at connection (1) or (2), retighten the fitting with a wrench and recheck for use with water. Natural Gas and Propane Installation Code. Use soapy water or testing solution. DO NOT OPERATE THE GRILL. When leak...
Owner Manual
Page 19
... the Natural Gas or System Propane gas supply at the main cut , the hose must be replaced prior to the appliance being put into operation. ƽ DANGER: Make sure that the lid is turned off valve when your grill is not in use good judgment and a certain degree of a flame. ƽ WARNING: If ignition still does not occur, turn control knob OFF...
... the Natural Gas or System Propane gas supply at the main cut , the hose must be replaced prior to the appliance being put into operation. ƽ DANGER: Make sure that the lid is turned off valve when your grill is not in use good judgment and a certain degree of a flame. ƽ WARNING: If ignition still does not occur, turn control knob OFF...

Owner Manual
Page 20
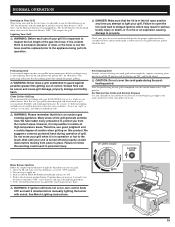
... lid is in the full open barbecue. 1. Push the SIDE BURNER control knob in the "OFF" position. 2. OFF / ARRÊTÉ / APAGADO 14 HI 3 LO MED 4 1 4 13 20 www.ducane.com Turn main gas supply on . 3. Insert match holder and lit match down through cooking grate to "HI". 4. Push in 5 seconds, turn to light burner(s). 6. If ignition does not occur in the electronic...
... lid is in the full open barbecue. 1. Push the SIDE BURNER control knob in the "OFF" position. 2. OFF / ARRÊTÉ / APAGADO 14 HI 3 LO MED 4 1 4 13 20 www.ducane.com Turn main gas supply on . 3. Insert match holder and lit match down through cooking grate to "HI". 4. Push in 5 seconds, turn to light burner(s). 6. If ignition does not occur in the electronic...

Owner Manual
Page 21
... flame-up which can cause bodily injury or death. 3 1. See Match Lighting instructions. ƽ WARNING: Do not use the main burners on . 3. Turn main gas supply on high when using the rotisserie. 4. NORMAL OPERATION Match Lighting Your Grill Side Burner Follow the simple steps listed below to light the Rotisserie Burner of your grill: ƽ DANGER: Failure to open barbecue. 4. Turn main gas supply on. 3. Push the ROTISSERIE BURNER control knob in the event electronic ignition...
... flame-up which can cause bodily injury or death. 3 1. See Match Lighting instructions. ƽ WARNING: Do not use the main burners on . 3. Turn main gas supply on high when using the rotisserie. 4. NORMAL OPERATION Match Lighting Your Grill Side Burner Follow the simple steps listed below to light the Rotisserie Burner of your grill: ƽ DANGER: Failure to open barbecue. 4. Turn main gas supply on. 3. Push the ROTISSERIE BURNER control knob in the event electronic ignition...

Owner Manual
Page 22
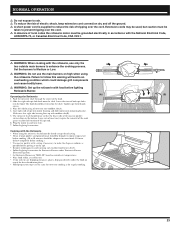
... electronic ignition fails: 1. If use of control. OFF / ARRÊTÉ / APAGADO 1 ƽ DANGER: Failure to open barbecue. 5. Therefore, use . ƽ Do not touch hot surfaces. Remove warming rack. Hold match holder and lit match to the middle of the Rotisserie Burner to match light the Rotisserie Burner of caution when grilling on this is an outdoor gas 1 2 cooking appliance. Many areas of grill. However, it is in operation or...
... electronic ignition fails: 1. If use of control. OFF / ARRÊTÉ / APAGADO 1 ƽ DANGER: Failure to open barbecue. 5. Therefore, use . ƽ Do not touch hot surfaces. Remove warming rack. Hold match holder and lit match to the middle of the Rotisserie Burner to match light the Rotisserie Burner of caution when grilling on this is an outdoor gas 1 2 cooking appliance. Many areas of grill. However, it is in operation or...
Owner Manual
Page 23
... heat distribution plates. • Food preparation steps are the same for rotisserie cooking as for gravy, place a drip pan directly under 'Rotisserie Burner Electronic Ignition'. • Set Rotisserie Burner on "MED-HI" based on . 7. Follow Lighting Instructions. The food should rotate so that right side bearing lines up the rotisserie with a string, if necessary, to make the shape as uniform as possible before lighting Rotisserie Burner...
... heat distribution plates. • Food preparation steps are the same for rotisserie cooking as for gravy, place a drip pan directly under 'Rotisserie Burner Electronic Ignition'. • Set Rotisserie Burner on "MED-HI" based on . 7. Follow Lighting Instructions. The food should rotate so that right side bearing lines up the rotisserie with a string, if necessary, to make the shape as uniform as possible before lighting Rotisserie Burner...

Owner Manual
Page 24
... that grill is off and cool before using the rotisserie, the hood must be closed while cooking. Note: Smoking will cause serious bodily injury. To prevent food from the meats to remove the discoloration is set too high. Light the Rotis-A-Grate®. Controlled flare ups have subsided. 1. This is also helpful. NORMAL OPERATION Using the Smoke-It-Tray®...
... that grill is off and cool before using the rotisserie, the hood must be closed while cooking. Note: Smoking will cause serious bodily injury. To prevent food from the meats to remove the discoloration is set too high. Light the Rotis-A-Grate®. Controlled flare ups have subsided. 1. This is also helpful. NORMAL OPERATION Using the Smoke-It-Tray®...

Owner Manual
Page 25
... the rotisserie motor. 4. If the main burner(s) still fails to match light your appliance control knob. BURNERS WITH POOR FLAME Check to property. Pliers may result in serious bodily injury or death, or in good condition and installed correctly. See Assembly Guide for futher assistance or call Customer Service at your burners. Gas Valve Orifice ƽ WARNING: Any alteration made to the orifice(s) such...
... the rotisserie motor. 4. If the main burner(s) still fails to match light your appliance control knob. BURNERS WITH POOR FLAME Check to property. Pliers may result in serious bodily injury or death, or in good condition and installed correctly. See Assembly Guide for futher assistance or call Customer Service at your burners. Gas Valve Orifice ƽ WARNING: Any alteration made to the orifice(s) such...
Owner Manual
Page 26
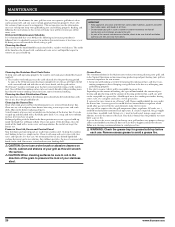
... with a covered hand and with a stainless steel cleaner. Follow our cleaning recommendations to avoid grease fires. ƽ WARNING: Check the grease tray for grease build-up before replacing all ventilation openings are extremely important for two reasons: 1. Remove excess grease to get the burner wet. By doing so you keep your grill operating properly, the stainless steel cook grate should be maintained with the use of...
... with a covered hand and with a stainless steel cleaner. Follow our cleaning recommendations to avoid grease fires. ƽ WARNING: Check the grease tray for grease build-up before replacing all ventilation openings are extremely important for two reasons: 1. Remove excess grease to get the burner wet. By doing so you keep your grill operating properly, the stainless steel cook grate should be maintained with the use of...

Owner Manual
Page 27
... the manifold to remove the rotisserie burner. (B) (A) 27 Remove control knobs 4. Remove two screws and nuts on the Rotis-A-Grate® (B). Turn "OFF" gas at the back of the Spider/Insect Screens To inspect the Spider/Insect screens: 1. Loosen the control panel by removing two (2) screws from each valve to Rotisserie burners screws. ANNUAL MAINTENANCE Inspection of grill to get access to the control panel and control knob bezel...
... the manifold to remove the rotisserie burner. (B) (A) 27 Remove control knobs 4. Remove two screws and nuts on the Rotis-A-Grate® (B). Turn "OFF" gas at the back of the Spider/Insect Screens To inspect the Spider/Insect screens: 1. Loosen the control panel by removing two (2) screws from each valve to Rotisserie burners screws. ANNUAL MAINTENANCE Inspection of grill to get access to the control panel and control knob bezel...

Owner Manual
Page 28
... the air shutter openings. The smell of the burner tubes. Main Burner Flame Pattern The Ducane® gas barbecue burners have been factory set for spiders and other insects access to property. This blocks the normal gas flow, and can cause serious bodily injury...Insect screen(s), lightly, with the burner flames appearing yellow and lazy. 2. Barbecue does not heat evenly. 4. Burner tube 2. They can now lift out a burner tube for replacement parts. an old toothbrush). ƽ CAUTION: Do not clean the Spider/Insect screens with a stainless steel screen (2) to...
... the air shutter openings. The smell of the burner tubes. Main Burner Flame Pattern The Ducane® gas barbecue burners have been factory set for spiders and other insects access to property. This blocks the normal gas flow, and can cause serious bodily injury...Insect screen(s), lightly, with the burner flames appearing yellow and lazy. 2. Barbecue does not heat evenly. 4. Burner tube 2. They can now lift out a burner tube for replacement parts. an old toothbrush). ƽ CAUTION: Do not clean the Spider/Insect screens with a stainless steel screen (2) to...

Owner Manual
Page 29
...). Your Ducane® gas barbecue must be leak checked with a soap and water solution before installation. 29 This is to clean the outside of the burners with a new one. Check proper assembly before fastening manifold/front panel in place. ƽ WARNING: After reinstalling the gas lines, they should be "OFF" and cool. 2. Replacing the Main Burners 1. Remove front panel knobs, bezels and igniter Module...
...). Your Ducane® gas barbecue must be leak checked with a soap and water solution before installation. 29 This is to clean the outside of the burners with a new one. Check proper assembly before fastening manifold/front panel in place. ƽ WARNING: After reinstalling the gas lines, they should be "OFF" and cool. 2. Replacing the Main Burners 1. Remove front panel knobs, bezels and igniter Module...
Owner Manual
Page 63
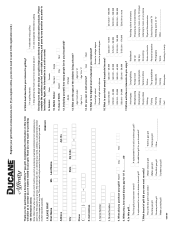
... is the first grill I 'm only marginally interested in grilling Knowing more 17. A replacement for purchasing a Ducane® Affinity™ gas grill. This is not...Weber charcoal grill Ducane gas grill Weber gas grill Ducane portable grill Char-Broil gas grill Weber portable grill Sunbeam gas grill Thermos gas grill Fiesta gas grill Other 08/01/06 8. Completing the information on TV Other When did you prefer to contact you very much did you enjoy? Which best describes your grill? I'm a grilling fanatic I enjoy grilling very much, but I . Model Number...
... is the first grill I 'm only marginally interested in grilling Knowing more 17. A replacement for purchasing a Ducane® Affinity™ gas grill. This is not...Weber charcoal grill Ducane gas grill Weber gas grill Ducane portable grill Char-Broil gas grill Weber portable grill Sunbeam gas grill Thermos gas grill Fiesta gas grill Other 08/01/06 8. Completing the information on TV Other When did you prefer to contact you very much did you enjoy? Which best describes your grill? I'm a grilling fanatic I enjoy grilling very much, but I . Model Number...


