
Owner Manual
Page 1
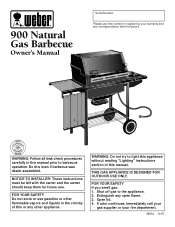
... DESIGNED FOR OUTDOOR USE ONLY. Open lid. 4. Do this or any other flammable vapors and liquids in the vicinity of this manual prior to the appliance. 2. 900 Natural Gas Barbecue Owner's Manual Serial Number Please use this number in registering your fire department. 98654 10/97 Shut off gas to barbecue operation. If odor continues, immediately call your gas supplier or your warranty and any open flame. 3.
... DESIGNED FOR OUTDOOR USE ONLY. Open lid. 4. Do this or any other flammable vapors and liquids in the vicinity of this manual prior to the appliance. 2. 900 Natural Gas Barbecue Owner's Manual Serial Number Please use this number in registering your fire department. 98654 10/97 Shut off gas to barbecue operation. If odor continues, immediately call your gas supplier or your warranty and any open flame. 3.
Owner Manual
Page 2
... use a flame to relight, using . See instructions in operation. ƽ Use heat-resistant barbecue mitts or gloves when operating barbecue. The conversion or attempted use charcoal or lava rock in a fire or an explosion causing damage to correct the problem yourself. 3. Get away from the LP tank: 1. Call your liquid propane supplier. Please carefully follow the Dangers, Warnings and Cautions contained in this manual for gas leaks and burner...
... use a flame to relight, using . See instructions in operation. ƽ Use heat-resistant barbecue mitts or gloves when operating barbecue. The conversion or attempted use charcoal or lava rock in a fire or an explosion causing damage to correct the problem yourself. 3. Get away from the LP tank: 1. Call your liquid propane supplier. Please carefully follow the Dangers, Warnings and Cautions contained in this manual for gas leaks and burner...
Owner Manual
Page 3
... 3 years, Cast Iron Cooking Grates, 5 years, All Remaining Parts, 5 years, when assembled and operated in accordance with the sale, installation, use and service and which on Weber. Weber is not covered by insects within the burner tubes, as set out in this owner's manual. WEBER-STEPHEN PRODUCTS CO. There are no...other obligation or liability in connection with the printed instructions accompanying it. WARRANTY Weber-Stephen Products Co. (Weber) hereby warrants to the ORIGINAL PURCHASER of this Weber Gas Barbecue that it will be free of defects in material and workmanship from the ...
... 3 years, Cast Iron Cooking Grates, 5 years, All Remaining Parts, 5 years, when assembled and operated in accordance with the sale, installation, use and service and which on Weber. Weber is not covered by insects within the burner tubes, as set out in this owner's manual. WEBER-STEPHEN PRODUCTS CO. There are no...other obligation or liability in connection with the printed instructions accompanying it. WARRANTY Weber-Stephen Products Co. (Weber) hereby warrants to the ORIGINAL PURCHASER of this Weber Gas Barbecue that it will be free of defects in material and workmanship from the ...

Owner Manual
Page 5
...-ups. Contents WARNINGS 2 Warranty & Patents 3-4 General Instructions 6 Assembly 7-20 Operating Instructions Lighting 21-22 Cooking 23 Storage and/or Nonuse 23 Cleaning 23 Cast Iron Cooking Grates 24 Troubleshooting & Maintenance Annual Maintenance 25 General Maintenance 26-28 Troubleshooting 29 Parts Listing 31 a g b c d e f a FEATURES: a) Convenient tables and racks. g) Catch pan catches excess grease. 5 d) Heavy gauge steel Flavorizer Bars distribute heat within the grill. e) Separate burners for temperature control.
...-ups. Contents WARNINGS 2 Warranty & Patents 3-4 General Instructions 6 Assembly 7-20 Operating Instructions Lighting 21-22 Cooking 23 Storage and/or Nonuse 23 Cleaning 23 Cast Iron Cooking Grates 24 Troubleshooting & Maintenance Annual Maintenance 25 General Maintenance 26-28 Troubleshooting 29 Parts Listing 31 a g b c d e f a FEATURES: a) Convenient tables and racks. g) Catch pan catches excess grease. 5 d) Heavy gauge steel Flavorizer Bars distribute heat within the grill. e) Separate burners for temperature control.

Owner Manual
Page 6
... easily change its individual shutoff valve must conform to be disconnected from the gas supply piping system by children. s This Weber Gas Barbecue is portable so you must be installed in your Weber Gas Barbecue with indoor kitchen appliances. s Do not use Liquid Propane (LP) bottled gas.The valves, orifices and hose are local codes that are difficult to them. With the Weber Gas Barbecue you can take your yard...
... easily change its individual shutoff valve must conform to be disconnected from the gas supply piping system by children. s This Weber Gas Barbecue is portable so you must be installed in your Weber Gas Barbecue with indoor kitchen appliances. s Do not use Liquid Propane (LP) bottled gas.The valves, orifices and hose are local codes that are difficult to them. With the Weber Gas Barbecue you can take your yard...
Owner Manual
Page 7
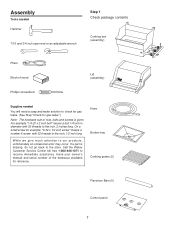
... to the store. Have your owner's manual and serial number of nuts, bolts and screws is missing, do not go back to our products, unfortunately an occasional error may occur. If a part is given. Hose Bottom tray Cooking grates (2) Flavorizer Bars (5) Control panel 7 The hardware size of the barbecue available for example, "6-32 x 1/2 inch screw" means a number 6 screw, with 20 threads to...
... to the store. Have your owner's manual and serial number of nuts, bolts and screws is missing, do not go back to our products, unfortunately an occasional error may occur. If a part is given. Hose Bottom tray Cooking grates (2) Flavorizer Bars (5) Control panel 7 The hardware size of the barbecue available for example, "6-32 x 1/2 inch screw" means a number 6 screw, with 20 threads to...
Owner Manual
Page 12
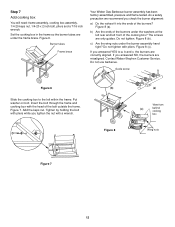
... the keps nut. Set the cooking box in the frame so the burner tubes are misaligned. Do not tighten with the head of the burners? Step 7 Add cooking box You will need: frame assembly, cooking box assembly, 1/4-20 keps nut, 1/4-20 x 2 inch bolt, pliers and a 7/16 inch wrench. Figure 6. Burner tubes Frame brace Your Weber Gas Barbecue burner assembly has been factory assembled, pressure and flame tested. Tighten by holding...
... the keps nut. Set the cooking box in the frame so the burner tubes are misaligned. Do not tighten with the head of the burners? Step 7 Add cooking box You will need: frame assembly, cooking box assembly, 1/4-20 keps nut, 1/4-20 x 2 inch bolt, pliers and a 7/16 inch wrench. Figure 6. Burner tubes Frame brace Your Weber Gas Barbecue burner assembly has been factory assembled, pressure and flame tested. Tighten by holding...

Owner Manual
Page 13
... 10 Install gas supply General Specifications for building codes regulating outdoor gas barbecue installations. WE RECOMMEND THAT THIS INSTALLATION BE DONE BY A PROFESSIONAL. s An additional manual shut-off valve must be installed in the branch fuel line in collecting water and debris. The hose must be installed horizontally, or pointing downward. Frame brace Manifold bracket Figure 9 Step 9 Install frame connector You will need : frame connector, two 1/4-20 x 1 3/4 inch bolts...
... 10 Install gas supply General Specifications for building codes regulating outdoor gas barbecue installations. WE RECOMMEND THAT THIS INSTALLATION BE DONE BY A PROFESSIONAL. s An additional manual shut-off valve must be installed in the branch fuel line in collecting water and debris. The hose must be installed horizontally, or pointing downward. Frame brace Manifold bracket Figure 9 Step 9 Install frame connector You will need : frame connector, two 1/4-20 x 1 3/4 inch bolts...

Owner Manual
Page 14
... of 18" cover. 14 Typical natural gas supply installation. polyethylene plastic tube, with earth, or any other material which may be tin-lined if the gas contains more than 50 feet. This will result in an approved manner. Gas line piping s If the length of line required does not exceed 50 feet, use . tube. s The outdoor connector must have a minimum of gas. s Gas piping may...
... of 18" cover. 14 Typical natural gas supply installation. polyethylene plastic tube, with earth, or any other material which may be tin-lined if the gas contains more than 50 feet. This will result in an approved manner. Gas line piping s If the length of line required does not exceed 50 feet, use . tube. s The outdoor connector must have a minimum of gas. s Gas piping may...

Owner Manual
Page 15
This was done to manifold You will need : the 12 foot natural gas supply hose and a 3/4 inch wrench. Loosen the igniter lock nut and slide the igniter into the small part of hose onto manifold. Tighten the igniter lock nut. If they do not turn they are shipped in the OFF...keyhole. Note - If the igniter works loose, carefully tighten the igniter lock nut with wrench. (a) Keyhole in Igniter lock nut frame brace (c) Frame brace Small part of the keyhole in frame brace Figure 14 15 Valves are off You will need : one burner control knob. Figure 12. Figure 14...
This was done to manifold You will need : the 12 foot natural gas supply hose and a 3/4 inch wrench. Loosen the igniter lock nut and slide the igniter into the small part of hose onto manifold. Tighten the igniter lock nut. If they do not turn they are shipped in the OFF...keyhole. Note - If the igniter works loose, carefully tighten the igniter lock nut with wrench. (a) Keyhole in Igniter lock nut frame brace (c) Frame brace Small part of the keyhole in frame brace Figure 14 15 Valves are off You will need : one burner control knob. Figure 12. Figure 14...
Owner Manual
Page 16
...(b). If it . b) Valves to manifold connection. c) The hose to quick disconnect connection.Figure 16 (c). ƽWARNING: If there is properly engaged. WARNING: Do not ignite burners while leak checking. Check for...gas supply OFF at the hose to manifold connection, Figure 16 (a), retighten the hose fitting with a wrench and recheck for gas leaks. DO NOT OPERATE THE BARBECUE. DO NOT OPERATE THE BARBECUE. Be sure there are complete, turn OFF the gas. The burners have loosened or damaged a gas fitting. ƽWARNING: Perform these leak checks even if your Weber Gas Barbecue...
...(b). If it . b) Valves to manifold connection. c) The hose to quick disconnect connection.Figure 16 (c). ƽWARNING: If there is properly engaged. WARNING: Do not ignite burners while leak checking. Check for...gas supply OFF at the hose to manifold connection, Figure 16 (a), retighten the hose fitting with a wrench and recheck for gas leaks. DO NOT OPERATE THE BARBECUE. DO NOT OPERATE THE BARBECUE. Be sure there are complete, turn OFF the gas. The burners have loosened or damaged a gas fitting. ƽWARNING: Perform these leak checks even if your Weber Gas Barbecue...

Owner Manual
Page 19
... part. Figure 24 (c). (b) (c) Support rod (a) Insert one end of the hinge rod into the hole in frame (view from rear of the bracket is 30 pounds. Figure 25 (a). Push the bracket into the hole in any way cracked or damaged, do not use swing table. Call our Customer Service Center to tap it lightly with... the bracket, you can slide the rod all the way inside the locking tab. Insert the other end into the frame. Figure 25 (c). Step 22 Install swing table You will need: swing table assembly, support rod, support rod holder and swing table end bracket.
... part. Figure 24 (c). (b) (c) Support rod (a) Insert one end of the hinge rod into the hole in frame (view from rear of the bracket is 30 pounds. Figure 25 (a). Push the bracket into the hole in any way cracked or damaged, do not use swing table. Call our Customer Service Center to tap it lightly with... the bracket, you can slide the rod all the way inside the locking tab. Insert the other end into the frame. Figure 25 (c). Step 22 Install swing table You will need: swing table assembly, support rod, support rod holder and swing table end bracket.

Owner Manual
Page 21
... foot away from the matchlight hole when lighting the barbecue. 4) Push Front burner control knob down and turn to START/ HI. 5) Push the Crossover Ignition Button several times, so it clicks. ƽWARNING: Check hose before each use the barbecue. OPERATING INSTRUCTIONS Lighting Summary lighting instructions are turned OFF. (Push each knob down and turn clockwise.) 3) Turn the gas supply valve on. ƽWARNING: Do not lean...
... foot away from the matchlight hole when lighting the barbecue. 4) Push Front burner control knob down and turn to START/ HI. 5) Push the Crossover Ignition Button several times, so it clicks. ƽWARNING: Check hose before each use the barbecue. OPERATING INSTRUCTIONS Lighting Summary lighting instructions are turned OFF. (Push each knob down and turn clockwise.) 3) Turn the gas supply valve on. ƽWARNING: Do not lean...
Owner Manual
Page 23
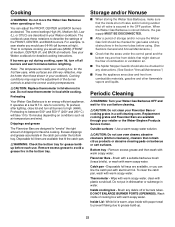
...pan, wash with warm soapy water. Cooking ƽWARNING: Do not move the Weber Gas Barbecue when operating or hot. If burners go out during cooking, open lid, turn all burners at medium). It operates at medium, CENTER off valve is warm, wipe inside your cookbook. Remove excess grease to describe the settings of cooking box...Inside cooking box - For example, to high (HHH). rate for it to grease build-up. 23 Periodic Cleaning ƽWARNING: Turn your Flavorizer Bars or cooking grates in the catch pan under the control panel and the bottom tray are free from ...
...pan, wash with warm soapy water. Cooking ƽWARNING: Do not move the Weber Gas Barbecue when operating or hot. If burners go out during cooking, open lid, turn all burners at medium). It operates at medium, CENTER off valve is warm, wipe inside your cookbook. Remove excess grease to describe the settings of cooking box...Inside cooking box - For example, to high (HHH). rate for it to grease build-up. 23 Periodic Cleaning ƽWARNING: Turn your Flavorizer Bars or cooking grates in the catch pan under the control panel and the bottom tray are free from ...

Owner Manual
Page 24
..., grease very lightly with solid vegetable shortening or vegetable cooking spray, then wipe dry with lid closed. The grates will be used for quick reseasoning. Regular applications of improper or inadequate seasoning or may be reseasoned by turning on the barbecue burner control knobs to rust. Best results are now ready to OFF. If rust occurs, clean with a steel...
..., grease very lightly with solid vegetable shortening or vegetable cooking spray, then wipe dry with lid closed. The grates will be used for quick reseasoning. Regular applications of improper or inadequate seasoning or may be reseasoned by turning on the barbecue burner control knobs to rust. Best results are now ready to OFF. If rust occurs, clean with a steel...
Owner Manual
Page 25
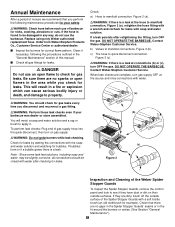
...' seams or in the fit around the burners or valves. (See Section "General Maintenance".) 25 Replace using only Weber authorized replacement hose. s Check all connections should check for gas leaks every time you check for example). This...remove the control panel and look to check for correct flame pattern. Figure 3 (a). ƽWARNING: If there is a leak at the hose to manifold connections. Contact Weber-Stephen Customer Service. Note - When leak checks are dirty, brush off the outside surfaces. If they have dust or dirt on gas supply. ƽWARNING: Do not ignite burners...
...' seams or in the fit around the burners or valves. (See Section "General Maintenance".) 25 Replace using only Weber authorized replacement hose. s Check all connections should check for gas leaks every time you check for example). This...remove the control panel and look to check for correct flame pattern. Figure 3 (a). ƽWARNING: If there is a leak at the hose to manifold connections. Contact Weber-Stephen Customer Service. Note - When leak checks are dirty, brush off the outside surfaces. If they have dust or dirt on gas supply. ƽWARNING: Do not ignite burners...

Owner Manual
Page 26
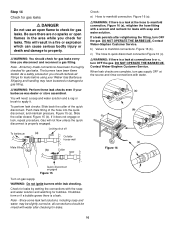
... the valve orifices at least once a year. (See Section "Annual Maintenance".) Also inspect and clean the Spider Stopper Guards if any outdoor gas appliance, is shown in place. Flames Figure 6 Dark blue If the flames do not ignite. ƽ DANGER Failure to flow back out of the burner tubes. Figure 5. Remove the manifold. (See Section "Replacing the main burners".) Look inside cooking box Light blue...
... the valve orifices at least once a year. (See Section "Annual Maintenance".) Also inspect and clean the Spider Stopper Guards if any outdoor gas appliance, is shown in place. Flames Figure 6 Dark blue If the flames do not ignite. ƽ DANGER Failure to flow back out of the burner tubes. Figure 5. Remove the manifold. (See Section "Replacing the main burners".) Look inside cooking box Light blue...

Owner Manual
Page 27
... the guide screw and washer in the corners of the burners and carefully set it down. Figure 11. Remove the burners from the burners. h) To reinstall the burners, reverse steps c) through g). ƽCAUTION: The burner openings must be leak checked with the Venturi fins. Check proper assembly before using the barbecue. (See Step"Check for gas leaks"). 27 Figure 14. Valve (a) orifice Figure 9 e) Remove the manifold bracket...
... the guide screw and washer in the corners of the burners and carefully set it down. Figure 11. Remove the burners from the burners. h) To reinstall the burners, reverse steps c) through g). ƽCAUTION: The burner openings must be leak checked with the Venturi fins. Check proper assembly before using the barbecue. (See Step"Check for gas leaks"). 27 Figure 14. Valve (a) orifice Figure 9 e) Remove the manifold bracket...
Owner Manual
Page 29
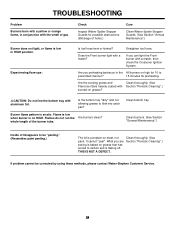
... of the burner tube. What you preheating barbecue in the All burners on grease? whole length of holes.) Cure Clean Weber Spider Stopper Guards. (See Section "Annual Maintenance".) Burner does not light, or flame is baked on grease that has turned to flow into catch pan? Straighten fuel hose. Is the bottom tray "dirty" and not allowing grease to carbon and is erratic. TROUBLESHOOTING Problem Burners burn...
... of the burner tube. What you preheating barbecue in the All burners on grease? whole length of holes.) Cure Clean Weber Spider Stopper Guards. (See Section "Annual Maintenance".) Burner does not light, or flame is baked on grease that has turned to flow into catch pan? Straighten fuel hose. Is the bottom tray "dirty" and not allowing grease to carbon and is erratic. TROUBLESHOOTING Problem Burners burn...
Owner Manual
Page 31
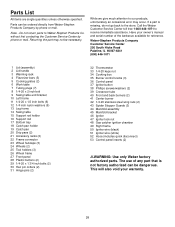
... x 1 3/4 inch bolts (2) 30 Hair pin cotters (2) 31 Hinge pins (2) 32 Thermometer 33 1/4-20 keps nut 34 Cooking box 35 Burner control knobs (3) 36 Control panel 37 Igniter button 38 Phillips screws/washers (2) 39 Crossover tube 40 Front and back burners (2) 41 Center burner 42 1/4-20 stainless steel wing nuts (2) 43 Spider Stopper Guards (3) 44 Manifold assembly 45 Manifold bracket 46 Igniter 47 Igniter lock nut 48 Gas catcher ignition...
... x 1 3/4 inch bolts (2) 30 Hair pin cotters (2) 31 Hinge pins (2) 32 Thermometer 33 1/4-20 keps nut 34 Cooking box 35 Burner control knobs (3) 36 Control panel 37 Igniter button 38 Phillips screws/washers (2) 39 Crossover tube 40 Front and back burners (2) 41 Center burner 42 1/4-20 stainless steel wing nuts (2) 43 Spider Stopper Guards (3) 44 Manifold assembly 45 Manifold bracket 46 Igniter 47 Igniter lock nut 48 Gas catcher ignition...


