
Owner Manual
Page 1
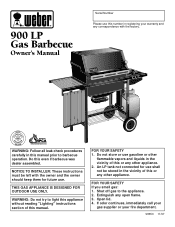
.... 900 LP Gas Barbecue Owner's Manual Serial Number Please use this number in registering your fire department. 98650 11/97 WEBER WEBER ® NationalPROPANEGAS Association WARNING: Follow all leak check procedures carefully in this manual prior to the appliance. 2. THIS GAS APPLIANCE IS DESIGNED FOR OUTDOOR USE ONLY. Shut off gas to barbecue operation. NOTICE TO INSTALLER: These instructions must be stored in the vicinity of this even if barbecue was dealer assembled...
.... 900 LP Gas Barbecue Owner's Manual Serial Number Please use this number in registering your fire department. 98650 11/97 WEBER WEBER ® NationalPROPANEGAS Association WARNING: Follow all leak check procedures carefully in this manual prior to the appliance. 2. THIS GAS APPLIANCE IS DESIGNED FOR OUTDOOR USE ONLY. Shut off gas to barbecue operation. NOTICE TO INSTALLER: These instructions must be stored in the vicinity of this even if barbecue was dealer assembled...
Owner Manual
Page 2
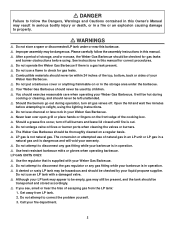
... care when operating your liquid propane supplier. ƽ DANGER Failure to follow the assembly instructions in your barbecue is in a fire or an explosion causing damage to property. ƽ WARNINGS ƽ Do not store a spare or disconnected LP tank under the barbecue. ƽ Your Weber Gas Barbecue should never be used by your Weber Gas Barbecue. The conversion or attempted use a flame to correct the problem yourself. 3. LP GAS UNITS ONLY: ƽ Use...
... care when operating your liquid propane supplier. ƽ DANGER Failure to follow the assembly instructions in your barbecue is in a fire or an explosion causing damage to property. ƽ WARNINGS ƽ Do not store a spare or disconnected LP tank under the barbecue. ƽ Your Weber Gas Barbecue should never be used by your Weber Gas Barbecue. The conversion or attempted use a flame to correct the problem yourself. 3. LP GAS UNITS ONLY: ƽ Use...
Owner Manual
Page 3
... set out in this owner's manual. The phone number is on examination shall indicate, to Weber's satisfaction, they are required to return defective parts, transportation charges must be prepaid. Before returning any special, indirect or consequential damages. Weber will return parts to replace such parts without charge. Weber is not covered by insects within the burner tubes, as set forth herein and any failures or operating...
... set out in this owner's manual. The phone number is on examination shall indicate, to Weber's satisfaction, they are required to return defective parts, transportation charges must be prepaid. Before returning any special, indirect or consequential damages. Weber will return parts to replace such parts without charge. Weber is not covered by insects within the burner tubes, as set forth herein and any failures or operating...

Owner Manual
Page 5
... temperature control. b) Heavy gauge porcelain-on-steel lid seals in heat. The connection of the barbecue to help prevent flare-ups. Contents WARNINGS 2 Warranty & Patents 3-4 General Instructions 6 Assembly 7-21 Operating Instructions Lighting 22-23 Cooking 24 Storage and/or Nonuse 24 Cleaning 24 Cast Iron Cooking Grates 25 LP Tank Information 26-28 Troubleshooting & Maintenance Annual Maintenance 29 General Maintenance 30-32 Troubleshooting 33 Parts Listing...
... temperature control. b) Heavy gauge porcelain-on-steel lid seals in heat. The connection of the barbecue to help prevent flare-ups. Contents WARNINGS 2 Warranty & Patents 3-4 General Instructions 6 Assembly 7-21 Operating Instructions Lighting 22-23 Cooking 24 Storage and/or Nonuse 24 Cleaning 24 Cast Iron Cooking Grates 25 LP Tank Information 26-28 Troubleshooting & Maintenance Annual Maintenance 29 General Maintenance 30-32 Troubleshooting 33 Parts Listing...

Owner Manual
Page 6
... any heated surface. s If there are for Propane Burning Appliances and Equipment). s Check that might obstruct the flow of the National Fuel Gas Code: ANSI Z 223.1. The Weber Gas Barbecue is set for use with piping above and below ground. The valves, orifices, hose and regulator are local codes that "outdoor" flavor in or on your Weber Gas Barbecue. Disconnected LP tanks must be installed in the food. s Your Weber Gas Barbecue is a portable outdoor...
... any heated surface. s If there are for Propane Burning Appliances and Equipment). s Check that might obstruct the flow of the National Fuel Gas Code: ANSI Z 223.1. The Weber Gas Barbecue is set for use with piping above and below ground. The valves, orifices, hose and regulator are local codes that "outdoor" flavor in or on your Weber Gas Barbecue. Disconnected LP tanks must be installed in the food. s Your Weber Gas Barbecue is a portable outdoor...

Owner Manual
Page 7
... the inch, 1/2 inch long. LP tank Bottom tray Cooking grates (2) LP tank filler adapter Control panel 7 After setting the LP fuel scale you will need to fill it. (See Step "Fill LP tank.") You will need a soap and water solution to our products, unfortunately an occasional error may occur. For example "1/4-20 x 2 inch bolt" means a bolt 1/4 inch in diameter with 32 threads to the inch, 2 inches long. Assembly Tools...
... the inch, 1/2 inch long. LP tank Bottom tray Cooking grates (2) LP tank filler adapter Control panel 7 After setting the LP fuel scale you will need to fill it. (See Step "Fill LP tank.") You will need a soap and water solution to our products, unfortunately an occasional error may occur. For example "1/4-20 x 2 inch bolt" means a bolt 1/4 inch in diameter with 32 threads to the inch, 2 inches long. Assembly Tools...

Owner Manual
Page 12
... hose. Burner tubes Frame brace Your Weber Gas Barbecue burner assembly has been factory assembled, pressure and flame tested. The screws are under the frame brace. Figure 8 (a). Figure 8 (b). Do not tighten with a wrench. (b) Figure 8 (a) View from behind cooking box (c) Wing nuts Figure 7 12 Put washer on bolt. Tighten by holding the bolt with the head of the cooking box? Do not tighten. Set...
... hose. Burner tubes Frame brace Your Weber Gas Barbecue burner assembly has been factory assembled, pressure and flame tested. The screws are under the frame brace. Figure 8 (a). Figure 8 (b). Do not tighten with a wrench. (b) Figure 8 (a) View from behind cooking box (c) Wing nuts Figure 7 12 Put washer on bolt. Tighten by holding the bolt with the head of the cooking box? Do not tighten. Set...

Owner Manual
Page 15
... performance of the tanks we receive have a question regarding the tank, call Weber-Stephen Products Co., Customer Service Center. We utilize various LP tank manufacturers. These types of tanks mounts with scale setting (top) wing nut. Your LP tank is the metal protective ring around the valve.) One series of tanks are not compatible with an empty tank. for LP gas". Loosen the tank lock wing nut...
... performance of the tanks we receive have a question regarding the tank, call Weber-Stephen Products Co., Customer Service Center. We utilize various LP tank manufacturers. These types of tanks mounts with scale setting (top) wing nut. Your LP tank is the metal protective ring around the valve.) One series of tanks are not compatible with an empty tank. for LP gas". Loosen the tank lock wing nut...

Owner Manual
Page 17
... leaks by turning the tank valve handwheel counterclockwise. Figure 19 (a). DO NOT OPERATE THE BARBECUE. Contact Weber-Stephen Customer Service. This will need: a soap and water solution and a rag or brush to regulator connection. Note - You will result in the area while you check for leaks. ƽWARNING: Do not ignite burners when leak checking. d) The hose to apply it...
... leaks by turning the tank valve handwheel counterclockwise. Figure 19 (a). DO NOT OPERATE THE BARBECUE. Contact Weber-Stephen Customer Service. This will need: a soap and water solution and a rag or brush to regulator connection. Note - You will result in the area while you check for leaks. ƽWARNING: Do not ignite burners when leak checking. d) The hose to apply it...

Owner Manual
Page 20
...not use swing table. Push the support rod into the hole in the frame. Swing the rod up so you may have to see that the lower tab of the bracket is 30 pounds. Insert the other end into the lower support ...assembly, support rod, support rod holder and swing table end bracket. Call our Customer Service Center to hang down. Figure 28 (d). Check to tap it lightly with a hammer. ƽWARNING: If swing table end bracket is inside the locking tab. Figure 28 (a). Figure 27 (b). Figure 28 (b). Install support rod holder on leg. Allow the slide bar to order a new part...
...not use swing table. Push the support rod into the hole in the frame. Swing the rod up so you may have to see that the lower tab of the bracket is 30 pounds. Insert the other end into the lower support ...assembly, support rod, support rod holder and swing table end bracket. Call our Customer Service Center to hang down. Figure 28 (d). Check to tap it lightly with a hammer. ƽWARNING: If swing table end bracket is inside the locking tab. Figure 28 (a). Figure 27 (b). Figure 28 (b). Install support rod holder on leg. Allow the slide bar to order a new part...

Owner Manual
Page 22
... until it clicks each time. 7) Check that the fuel scale reads more than "E". OPERATING INSTRUCTIONS Lighting Summary lighting instructions are turned OFF. (Push each knob down and turn clockwise.) ƽWARNING: The burner control knobs must be damaged in any way, do so may result in an explosive flame-up which can cause serious bodily injury or death. Replace using only Weber authorized replacement manifold assembly.
... until it clicks each time. 7) Check that the fuel scale reads more than "E". OPERATING INSTRUCTIONS Lighting Summary lighting instructions are turned OFF. (Push each knob down and turn clockwise.) ƽWARNING: The burner control knobs must be damaged in any way, do so may result in an explosive flame-up which can cause serious bodily injury or death. Replace using only Weber authorized replacement manifold assembly.

Owner Manual
Page 23
... least one foot away from the matchlight hole when lighting the barbecue. 6) Push Front burner control knob down and turn on the LP tank valve. Figure 2. 2) Check that the burner is lit by turning the tank valve counterclockwise. 5) Strike a match and put the flame into the matchlight hole in the front of the cooking box. ƽWARNING: Do not lean over . ƽ DANGER When...
... least one foot away from the matchlight hole when lighting the barbecue. 6) Push Front burner control knob down and turn on the LP tank valve. Figure 2. 2) Check that the burner is lit by turning the tank valve counterclockwise. 5) Strike a match and put the flame into the matchlight hole in the front of the cooking box. ƽWARNING: Do not lean over . ƽ DANGER When...
Owner Manual
Page 24
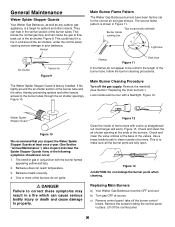
... adjustment of burners tubes. You can line the catch pan with warm soapy water. See your Flavorizer Bars or cooking grates in a well- It operates at high). Remove excess grease to describe the settings of children. s LP tanks must be DISCONNECTED and the LP tank stored outdoors in a building, garage or any obstructions. (See Section "Annual Maintenance.") Periodic Cleaning ƽWARNING: Turn your Weber Gas Barbecue OFF...
... adjustment of burners tubes. You can line the catch pan with warm soapy water. See your Flavorizer Bars or cooking grates in a well- It operates at high). Remove excess grease to describe the settings of children. s LP tanks must be DISCONNECTED and the LP tank stored outdoors in a building, garage or any obstructions. (See Section "Annual Maintenance.") Periodic Cleaning ƽWARNING: Turn your Weber Gas Barbecue OFF...

Owner Manual
Page 25
... Iron Cooking Grates ƽWARNING: Follow all burners to OFF. Do not drop cast iron grates, they are now ready to use the barbecue. Be certain the entire surface, including all cast iron, the more the use to remove the wax coating used as margarine or butter.) Preheat grill for quick reseasoning. If rust occurs, clean with a steel wool scouring...
... Iron Cooking Grates ƽWARNING: Follow all burners to OFF. Do not drop cast iron grates, they are now ready to use the barbecue. Be certain the entire surface, including all cast iron, the more the use to remove the wax coating used as margarine or butter.) Preheat grill for quick reseasoning. If rust occurs, clean with a steel wool scouring...

Owner Manual
Page 28
... should not be replaced with the specifications for LP gas cylinders of dirt, grease, bugs etc. s To fill, take the LP tank to hold by Weber satisfy the requirements. s The LP tank must be removed from a new LP tank before disconnecting. s Never store or transport the LP tank where temperatures can reach 125° F (too hot to an RV center, or look up gas-propane in accordance with...
... should not be replaced with the specifications for LP gas cylinders of dirt, grease, bugs etc. s To fill, take the LP tank to hold by Weber satisfy the requirements. s The LP tank must be removed from a new LP tank before disconnecting. s Never store or transport the LP tank where temperatures can reach 125° F (too hot to an RV center, or look up gas-propane in accordance with...

Owner Manual
Page 29
... dirt on gas supply. Replace using only Weber authorized replacement manifold assembly. Check: c) Valves to manifold connection. Check for leaks. ƽ DANGER Do not use the barbecue. d) The hose to tank connection. Since some leak test solutions, including soap and water, may be slightly corrosive, all burners are no gaps in the Spider Stopper Guards' seams or in the OFF position. b) Regulator to regulator connection. s Inspect...
... dirt on gas supply. Replace using only Weber authorized replacement manifold assembly. Check: c) Valves to manifold connection. Check for leaks. ƽ DANGER Do not use the barbecue. d) The hose to tank connection. Since some leak test solutions, including soap and water, may be slightly corrosive, all burners are no gaps in the Spider Stopper Guards' seams or in the OFF position. b) Regulator to regulator connection. s Inspect...
Owner Manual
Page 30
... the control panel, causing serious damage to the burner tubes through the air shutter openings. Remove the manifold. (See Section "Replacing the main burners".) Look inside cooking box Light blue Air shutter Venturi fin Figure 9 The Weber Spider Stopper Guard is a target for the correct air and gas mixture. One or more of the burners. Barbecue heats unevenly. 4. Check and clean the valve orifices at the...
... the control panel, causing serious damage to the burner tubes through the air shutter openings. Remove the manifold. (See Section "Replacing the main burners".) Look inside cooking box Light blue Air shutter Venturi fin Figure 9 The Weber Spider Stopper Guard is a target for the correct air and gas mixture. One or more of the burners. Barbecue heats unevenly. 4. Check and clean the valve orifices at the...

Owner Manual
Page 31
... the crossover tube from the burners. Figure 16 g) Lift and twist the burner assembly slightly, to the cooking box. Crossover tube Venturi fin Check fit around valve Check fit around the burners and valves. Figure 14. Check proper assembly before using the barbecue. (See Step"Check for gas leaks"). 31 Pull the manifold and valve assembly out of the cooking box. d) Unlatch the Spider Stopper Guards and remove.
... the crossover tube from the burners. Figure 16 g) Lift and twist the burner assembly slightly, to the cooking box. Crossover tube Venturi fin Check fit around valve Check fit around the burners and valves. Figure 14. Check proper assembly before using the barbecue. (See Step"Check for gas leaks"). 31 Pull the manifold and valve assembly out of the cooking box. d) Unlatch the Spider Stopper Guards and remove.

Owner Manual
Page 33
... the tank valve OFF. Turn tank valve on -steel, not paint. Is fuel hose bent or kinked? Is the bottom tray "dirty" and not allowing grease to the tank. Turn burner control knobs OFF. Straighten fuel hose. Flames do not light. -orBurners have activated. Burner does not light, or flame is porcelain-on slowly. Reconnect the regulator to flow into catch pan? Is LP fuel low or empty? Refill LP tank. TROUBLESHOOTING Problem Check Cure Burners...
... the tank valve OFF. Turn tank valve on -steel, not paint. Is fuel hose bent or kinked? Is the bottom tray "dirty" and not allowing grease to the tank. Turn burner control knobs OFF. Straighten fuel hose. Flames do not light. -orBurners have activated. Burner does not light, or flame is porcelain-on slowly. Reconnect the regulator to flow into catch pan? Is LP fuel low or empty? Refill LP tank. TROUBLESHOOTING Problem Check Cure Burners...
Owner Manual
Page 35
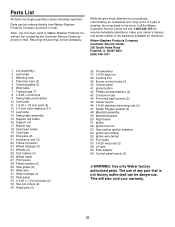
... hubcaps (2) 32 Tank panel 33 1/4-20 x 1 3/4 inch bolts (2) 34 Hair pin cotters (2) 35 Hinge pins (2) 36 Thermometer 37 1/4-20 keps nut 38 Cooking box 39 Burner control knobs (3) 40 Control panel 41 Igniter button 42 Phillips screws/washers (2) 43 Crossover tube 44 Front and back burners (2) 45 Center burner 46 1/4-20 stainless steel wing nuts (2) 47 Spider Stopper Guards (3) 48 Manifold assembly 49 Manifold bracket 50...
... hubcaps (2) 32 Tank panel 33 1/4-20 x 1 3/4 inch bolts (2) 34 Hair pin cotters (2) 35 Hinge pins (2) 36 Thermometer 37 1/4-20 keps nut 38 Cooking box 39 Burner control knobs (3) 40 Control panel 41 Igniter button 42 Phillips screws/washers (2) 43 Crossover tube 44 Front and back burners (2) 45 Center burner 46 1/4-20 stainless steel wing nuts (2) 47 Spider Stopper Guards (3) 48 Manifold assembly 49 Manifold bracket 50...


