

Owner Manual
Page 1
... barbecue was dealer assembled. THIS GAS APPLIANCE IS DESIGNED FOR OUTDOOR USE ONLY. Extinguish any correspondence with the owner and the owner should keep them for future use. Open lid. 4. NOTICE TO INSTALLER: These instructions must be left with the factory. FOR YOUR SAFETY Do not store or use gasoline or other appliance. FOR YOUR SAFETY If you smell gas: 1. 1100 Natural Gas Barbecue Owner's Manual Serial Number Please use...
... barbecue was dealer assembled. THIS GAS APPLIANCE IS DESIGNED FOR OUTDOOR USE ONLY. Extinguish any correspondence with the owner and the owner should keep them for future use. Open lid. 4. NOTICE TO INSTALLER: These instructions must be left with the factory. FOR YOUR SAFETY Do not store or use gasoline or other appliance. FOR YOUR SAFETY If you smell gas: 1. 1100 Natural Gas Barbecue Owner's Manual Serial Number Please use...
Owner Manual
Page 2
... conversion or attempted use an LP tank with your Weber Gas Barbecue. ƽ Do not attempt to disconnect the gas regulator or any gas fitting while your barbecue is out. ƽ Do not enlarge valve orifices or burner ports when cleaning the valves or burners. ƽ The Weber Gas Barbecue should be checked by children. ƽ You should exercise reasonable care when operating your Weber Gas Barbecue. ƽ Never lean over open grill or...
... conversion or attempted use an LP tank with your Weber Gas Barbecue. ƽ Do not attempt to disconnect the gas regulator or any gas fitting while your barbecue is out. ƽ Do not enlarge valve orifices or burner ports when cleaning the valves or burners. ƽ The Weber Gas Barbecue should be checked by children. ƽ You should exercise reasonable care when operating your Weber Gas Barbecue. ƽ Never lean over open grill or...
Owner Manual
Page 3
... to the ORIGINAL PURCHASER of this Weber Gas Barbecue that it will be free of defects in material and workmanship from the date of purchase as follows: Aluminum Castings, 10 years, Flavorizer Bars, 3 years, Cast Iron Cooking Grates, 5 years, All Remaining Parts, 5 years, when assembled and operated in accordance with the sale, installation, use and service and which on examination shall...
... to the ORIGINAL PURCHASER of this Weber Gas Barbecue that it will be free of defects in material and workmanship from the date of purchase as follows: Aluminum Castings, 10 years, Flavorizer Bars, 3 years, Cast Iron Cooking Grates, 5 years, All Remaining Parts, 5 years, when assembled and operated in accordance with the sale, installation, use and service and which on examination shall...

Owner Manual
Page 5
... Ignition System with Gas Catcher Ignition Chamber. Flavorizer Bars heat just the right amount of drippings for temperature control. Contents WARNINGS 2 Warranty & Patents 3-4 General Instructions 6 Assembly 7-21 Operating Instructions Lighting 22-23 Cooking 24 Storage and/or Nonuse 24 Cleaning 25 Cast Iron Cooking Grates 26 Troubleshooting & Maintenance Annual Maintenance 27 General Maintenance 28-30 Troubleshooting 31 Parts Listing 33 e a h i a b c d f g FEATURES: a) Convenient tables and trays. f) Separate burners...
... Ignition System with Gas Catcher Ignition Chamber. Flavorizer Bars heat just the right amount of drippings for temperature control. Contents WARNINGS 2 Warranty & Patents 3-4 General Instructions 6 Assembly 7-21 Operating Instructions Lighting 22-23 Cooking 24 Storage and/or Nonuse 24 Cleaning 25 Cast Iron Cooking Grates 26 Troubleshooting & Maintenance Annual Maintenance 27 General Maintenance 28-30 Troubleshooting 31 Parts Listing 33 e a h i a b c d f g FEATURES: a) Convenient tables and trays. f) Separate burners...
Owner Manual
Page 6
.... Please read the instructions carefully before using your Weber Gas Barbecue under the control panel and the bottom tray are local codes that apply to them. s Never use . s Keep the cooking area clear of the grill. Storage s The gas must be turned OFF at high pressures. s If there are free from the gas supply piping system by children. s This Weber Gas Barbecue is a portable outdoor cooking appliance. This...
.... Please read the instructions carefully before using your Weber Gas Barbecue under the control panel and the bottom tray are local codes that apply to them. s Never use . s Keep the cooking area clear of the grill. Storage s The gas must be turned OFF at high pressures. s If there are free from the gas supply piping system by children. s This Weber Gas Barbecue is a portable outdoor cooking appliance. This...
Owner Manual
Page 7
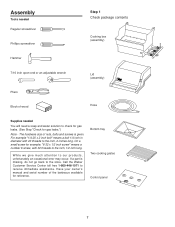
.... Call the Weber Customer Service Center toll free 1-800-446-1071 to the inch, 1/2 inch long. Have your owner's manual and serial number of wood Lid (assembly) ® ® Hose Supplies needed Regular screwdriver Phillips screwdriver Step 1 Check package contents Cooking box (assembly) Hammer 7/16 inch open-end or an adjustable wrench Pliers Block of the barbecue available for reference. Bottom tray Two cooking grates Control panel...
.... Call the Weber Customer Service Center toll free 1-800-446-1071 to the inch, 1/2 inch long. Have your owner's manual and serial number of wood Lid (assembly) ® ® Hose Supplies needed Regular screwdriver Phillips screwdriver Step 1 Check package contents Cooking box (assembly) Hammer 7/16 inch open-end or an adjustable wrench Pliers Block of the barbecue available for reference. Bottom tray Two cooking grates Control panel...
Owner Manual
Page 13
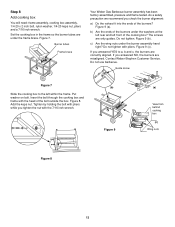
Figure 7. Burner tubes Frame brace Your Weber Gas Barbecue burner assembly has been factory assembled, pressure and flame tested. Figure 9 (b). Add the keps nut. Guide screw Figure 7 Slide the cooking box to a, b and c, the burners are misaligned. Do not tighten. c) Are the wing nuts under the frame brace. If you answered YES to the left front of the burners? Do not use barbecue. Insert the bolt...
Figure 7. Burner tubes Frame brace Your Weber Gas Barbecue burner assembly has been factory assembled, pressure and flame tested. Figure 9 (b). Add the keps nut. Guide screw Figure 7 Slide the cooking box to a, b and c, the burners are misaligned. Do not tighten. c) Are the wing nuts under the frame brace. If you answered YES to the left front of the burners? Do not use barbecue. Insert the bolt...

Owner Manual
Page 15
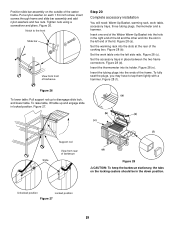
... the 12' hose under a deck. The quick disconnect fitting is a hand-operated device that automatically shuts OFF the flow of the quick disconnect. s Underground piping must conform to ANSI Z223.1 latest edition for outdoor, underground use a 5/8" O.D. Step 11 Install gas supply General Specifications for building codes regulating outdoor gas barbecue installations. WE RECOMMEND THAT THIS INSTALLATION BE DONE BY A PROFESSIONAL. Typical natural gas supply installation. tube. One size...
... the 12' hose under a deck. The quick disconnect fitting is a hand-operated device that automatically shuts OFF the flow of the quick disconnect. s Underground piping must conform to ANSI Z223.1 latest edition for outdoor, underground use a 5/8" O.D. Step 11 Install gas supply General Specifications for building codes regulating outdoor gas barbecue installations. WE RECOMMEND THAT THIS INSTALLATION BE DONE BY A PROFESSIONAL. Typical natural gas supply installation. tube. One size...

Owner Manual
Page 17
... check for gas leaks. To barbecue (a) Locking shut off Outside house wall Check: a) Hose to manifold connections. Figure 16 (a). ƽWARNING: If there is a leak at the source and rinse connections with soap and water solution. b) Valves to manifold connection. DO NOT OPERATE THE BARBECUE. Contact Weber-Stephen Customer Service. When leak checks are no sparks or open flame to apply...
... check for gas leaks. To barbecue (a) Locking shut off Outside house wall Check: a) Hose to manifold connections. Figure 16 (a). ƽWARNING: If there is a leak at the source and rinse connections with soap and water solution. b) Valves to manifold connection. DO NOT OPERATE THE BARBECUE. Contact Weber-Stephen Customer Service. When leak checks are no sparks or open flame to apply...

Owner Manual
Page 20
...The rod should swing freely inside the frame tube. Push the bracket into the lower support bracket. Figure 25 (a). Call our Customer Service Center to tap it lightly with a hammer. ƽWARNING: If...use swing table. To fully seat the bracket, you can slide the rod all the way inside the locking tab. Swing the rod up so you may have to order a new part...Support rod (a) Figure 24 View from below) (c) Figure 25 20 Figure 24 (c). Step 19 Install swing table You will need: swing table end bracket, two 10-24 hex nuts, two 10-24 x 1 3/4 inch machine screws, slide bar assembly...
...The rod should swing freely inside the frame tube. Push the bracket into the lower support bracket. Figure 25 (a). Call our Customer Service Center to tap it lightly with a hammer. ƽWARNING: If...use swing table. To fully seat the bracket, you can slide the rod all the way inside the locking tab. Swing the rod up so you may have to order a new part...Support rod (a) Figure 24 View from below) (c) Figure 25 20 Figure 24 (c). Step 19 Install swing table You will need: swing table end bracket, two 10-24 hex nuts, two 10-24 x 1 3/4 inch machine screws, slide bar assembly...
Owner Manual
Page 21
... box. Notch to tap them lightly with a hammer. Figure 28 (b). Figure 27. (b) (c) (a) (e) Slide Support rod View from front of barbecue Step 20 Complete accessory installation You will need: Warm-Up Basket, warming rack, work table onto the left end of the Weber Warm-Up Basket into the hole in locked position. Set the work table, accessory trays, three tubing...
... box. Notch to tap them lightly with a hammer. Figure 28 (b). Figure 27. (b) (c) (a) (e) Slide Support rod View from front of barbecue Step 20 Complete accessory installation You will need: Warm-Up Basket, warming rack, work table onto the left end of the Weber Warm-Up Basket into the hole in locked position. Set the work table, accessory trays, three tubing...

Owner Manual
Page 22
... an explosive flame-up which can turn on the other burners ignite from the igniter electrode inside the Gas Catcher Ignition Chamber. Replace using only Weber authorized replacement hose. Order from the matchlight hole when lighting the barbecue. 4) Push Front burner control knob down and turn each use the barbecue. You generate the energy for nicks, cracking, abrasions or cuts. OPERATING INSTRUCTIONS Lighting Summary lighting instructions are turned OFF. (Push each burner control knob down and...
... an explosive flame-up which can turn on the other burners ignite from the igniter electrode inside the Gas Catcher Ignition Chamber. Replace using only Weber authorized replacement hose. Order from the matchlight hole when lighting the barbecue. 4) Push Front burner control knob down and turn each use the barbecue. You generate the energy for nicks, cracking, abrasions or cuts. OPERATING INSTRUCTIONS Lighting Summary lighting instructions are turned OFF. (Push each burner control knob down and...

Owner Manual
Page 24
... thermometer in the bottom tray. It operates at high). Remove excess grease to high (HHH). Storage and/or Nonuse s When storing the Weber Gas Barbecue, make sure that fit the catch pan. ƽWARNING: Check the bottom tray for any obstructions in the burner tubes before relighting. s The Spider Stopper Guards should be checked for detailed cooking instructions. rate for flavorful cooking...
... thermometer in the bottom tray. It operates at high). Remove excess grease to high (HHH). Storage and/or Nonuse s When storing the Weber Gas Barbecue, make sure that fit the catch pan. ƽWARNING: Check the bottom tray for any obstructions in the burner tubes before relighting. s The Spider Stopper Guards should be checked for detailed cooking instructions. rate for flavorful cooking...
Owner Manual
Page 25
...WARNING: Turn your Weber Gas Barbecue OFF and wait for it to grease build-up. 25 Remove excess grease and then wash with a suitable brass bristle brush. Clean with warm soapy water. Inside cooking box - Inside Lid - Bottom tray - Thermometer - ...remove from grill and wash with plastic scrub ball. Brush any debris off of cooking box with paper towel to prevent flaking due to cool before cleaning. ƽCAUTION: Do not clean your retailer or the Weber-Stephen Customer Service Center. Replacement cooking grates and Flavorizer Bars are available, or you can line the catch pan...
...WARNING: Turn your Weber Gas Barbecue OFF and wait for it to grease build-up. 25 Remove excess grease and then wash with a suitable brass bristle brush. Clean with warm soapy water. Inside cooking box - Inside Lid - Bottom tray - Thermometer - ...remove from grill and wash with plastic scrub ball. Brush any debris off of cooking box with paper towel to prevent flaking due to cool before cleaning. ƽCAUTION: Do not clean your retailer or the Weber-Stephen Customer Service Center. Replacement cooking grates and Flavorizer Bars are available, or you can line the catch pan...

Owner Manual
Page 26
...reseasoned by turning on the barbecue burner control knobs to heat for 10 minutes. Store in barbecue until it is recommended for quick reseasoning. A solid vegetable shortening is cool. Your cast iron cooking grates are obtained with all cast iron, the more the use . A vegetable cooking spray... iron will be used for protection in grill until they will not need to use , the easier the maintenance. ƽWARNING: Do not apply vegetable cooking spray to medium-high heat. First Time Use - Turn burners to storing, grease very lightly with solid vegetable shortening...
...reseasoned by turning on the barbecue burner control knobs to heat for 10 minutes. Store in barbecue until it is recommended for quick reseasoning. A solid vegetable shortening is cool. Your cast iron cooking grates are obtained with all cast iron, the more the use . A vegetable cooking spray... iron will be used for protection in grill until they will not need to use , the easier the maintenance. ƽWARNING: Do not apply vegetable cooking spray to medium-high heat. First Time Use - Turn burners to storing, grease very lightly with solid vegetable shortening...

Owner Manual
Page 28
... damage to make sure all the burner ports are fully open. Figure 4. Venturi Main Burner Flame Pattern The Weber Gas Barbecue burners have been factory set for spiders and other insects access to your barbecue. Main Burner Cleaning Procedure Turn off the gas supply. Remove the manifold. (See Section "Replacing the main burners".) Look inside of the burner tube and the valve, thereby preventing spiders and other insects...
... damage to make sure all the burner ports are fully open. Figure 4. Venturi Main Burner Flame Pattern The Weber Gas Barbecue burners have been factory set for spiders and other insects access to your barbecue. Main Burner Cleaning Procedure Turn off the gas supply. Remove the manifold. (See Section "Replacing the main burners".) Look inside of the burner tube and the valve, thereby preventing spiders and other insects...

Owner Manual
Page 29
... that hold the manifold to separate the crossover tube from the cooking box. Guide screw Figure 11 (b) Figure 13 29 Replacing Main Burners a) Your Weber Gas Barbecue must be OFF and cool. b) Turn gas OFF at source. c) Remove control panel: take off the control panel. Check proper assembly before fastening manifold in place. d) Unlatch the Spider Stopper Guards and remove. Pull the manifold and valve assembly out of the...
... that hold the manifold to separate the crossover tube from the cooking box. Guide screw Figure 11 (b) Figure 13 29 Replacing Main Burners a) Your Weber Gas Barbecue must be OFF and cool. b) Turn gas OFF at source. c) Remove control panel: take off the control panel. Check proper assembly before fastening manifold in place. d) Unlatch the Spider Stopper Guards and remove. Pull the manifold and valve assembly out of the...

Owner Manual
Page 30
...; s Check to see Step "Install igniter" for gas leaks".) Crossover Ignition System Operations If the Crossover Ignition System fails to ignite the Front burner, light the Front burner with a match. White wire Black wire Figure 15 30 Figure 14. s Check that the Crossover Ignition button pushes the igniter (button) down, and returns to light, See Section "Manual Lighting", and contact Weber-Stephen Customer Service. Slightly rotate the Spider...
...; s Check to see Step "Install igniter" for gas leaks".) Crossover Ignition System Operations If the Crossover Ignition System fails to ignite the Front burner, light the Front burner with a match. White wire Black wire Figure 15 30 Figure 14. s Check that the Crossover Ignition button pushes the igniter (button) down, and returns to light, See Section "Manual Lighting", and contact Weber-Stephen Customer Service. Slightly rotate the Spider...
Owner Manual
Page 31
...-on-steel, not paint. Does the Front burner light with aluminum foil. Are the cooking grates and Flavorizer Bars heavily coated with a match, then check the Crossover Ignition System. THIS IS NOT A DEFECT. Clean thoroughly. (See Section "Periodic Cleaning".) Is the bottom tray "dirty" and not allowing grease to prescribed manner? 15 minutes for possible obstructions. (Blockage of gas. Flame...
...-on-steel, not paint. Does the Front burner light with aluminum foil. Are the cooking grates and Flavorizer Bars heavily coated with a match, then check the Crossover Ignition System. THIS IS NOT A DEFECT. Clean thoroughly. (See Section "Periodic Cleaning".) Is the bottom tray "dirty" and not allowing grease to prescribed manner? 15 minutes for possible obstructions. (Blockage of gas. Flame...
Owner Manual
Page 33
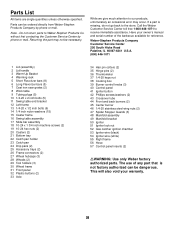
... box 39 Burner control knobs (3) 40 Control panel 41 Igniter button 42 Phillips screws/washers (2) 43 Crossover tube 44 Front and back burners (2) 45 Center burner 46 1/4-20 stainless steel wing nuts (2) 47 Spider Stopper Guards (3) 48 Manifold assembly 49 Manifold bracket 50 Igniter 51 Igniter lock nut 52 Gas catcher ignition chamber 53 Igniter wire (black) 54 Igniter wire (white) 55 Right frame 56 Hose 57 Control panel inserts (2) ƽWARNING: Use...
... box 39 Burner control knobs (3) 40 Control panel 41 Igniter button 42 Phillips screws/washers (2) 43 Crossover tube 44 Front and back burners (2) 45 Center burner 46 1/4-20 stainless steel wing nuts (2) 47 Spider Stopper Guards (3) 48 Manifold assembly 49 Manifold bracket 50 Igniter 51 Igniter lock nut 52 Gas catcher ignition chamber 53 Igniter wire (black) 54 Igniter wire (white) 55 Right frame 56 Hose 57 Control panel inserts (2) ƽWARNING: Use...


