
Owner Manual
Page 1
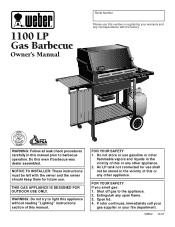
... with the factory. 1100 LP Gas Barbecue Owner's Manual Serial Number Please use this number in registering your fire department. 98652 10/97 NOTICE TO INSTALLER: These instructions must be stored in the vicinity of this even if barbecue was dealer assembled. FOR YOUR SAFETY If you smell gas: 1. WEBER WEBER ® NationalPROPANEGAS Association WARNING: Follow all leak check procedures carefully in this manual prior to the appliance...
... with the factory. 1100 LP Gas Barbecue Owner's Manual Serial Number Please use this number in registering your fire department. 98652 10/97 NOTICE TO INSTALLER: These instructions must be stored in the vicinity of this even if barbecue was dealer assembled. FOR YOUR SAFETY If you smell gas: 1. WEBER WEBER ® NationalPROPANEGAS Association WARNING: Follow all leak check procedures carefully in this manual prior to the appliance...
Owner Manual
Page 2
... disconnected LP tank under the barbecue. ƽ Your Weber Gas Barbecue should exercise reasonable care when operating your liquid propane supplier. Do not attempt to correct the problem yourself. 3. Open the lid and wait five minutes before using the lighting instructions. ƽ Do not use an LP tank with your Weber Gas Barbecue. ƽ Do not attempt to disconnect the gas regulator or any gas fitting while your Weber Gas Barbecue. ƽ Do not put a barbecue cover...
... disconnected LP tank under the barbecue. ƽ Your Weber Gas Barbecue should exercise reasonable care when operating your liquid propane supplier. Do not attempt to correct the problem yourself. 3. Open the lid and wait five minutes before using the lighting instructions. ƽ Do not use an LP tank with your Weber Gas Barbecue. ƽ Do not attempt to disconnect the gas regulator or any gas fitting while your Weber Gas Barbecue. ƽ Do not put a barbecue cover...
Owner Manual
Page 3
... must be limited to the repair or replacement of parts which prove defective under normal use , removal, return, or replacement of purchase as set out in connection with the printed instructions accompanying it will return parts to replace such parts without charge. Customer Service Center 250 South Hicks Road Palatine, IL 60067-6241 (800) 446-1071 LP Tank The LP tank manufacturer is on the warning...
... must be limited to the repair or replacement of parts which prove defective under normal use , removal, return, or replacement of purchase as set out in connection with the printed instructions accompanying it will return parts to replace such parts without charge. Customer Service Center 250 South Hicks Road Palatine, IL 60067-6241 (800) 446-1071 LP Tank The LP tank manufacturer is on the warning...
Owner Manual
Page 5
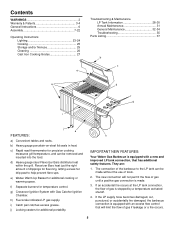
..., the barbecue connection is equipped with Gas Catcher Ignition Chamber. They are: 1. f) Separate burners for additional portability. i) Catch pan catches excess grease. Contents WARNINGS 2 Warranty & Patents 3-4 General Instructions 6 Assembly 7-22 Operating Instructions Lighting 23-24 Cooking 25 Storage and/or Nonuse 25 Cleaning 26 Cast Iron Cooking Grates 27 e Troubleshooting & Maintenance LP Tank Information 28-30 Annual Maintenance 31 General Maintenance 32-34 Troubleshooting 35 Parts Listing 37...
..., the barbecue connection is equipped with Gas Catcher Ignition Chamber. They are: 1. f) Separate burners for additional portability. i) Catch pan catches excess grease. Contents WARNINGS 2 Warranty & Patents 3-4 General Instructions 6 Assembly 7-22 Operating Instructions Lighting 23-24 Cooking 25 Storage and/or Nonuse 25 Cleaning 26 Cast Iron Cooking Grates 27 e Troubleshooting & Maintenance LP Tank Information 28-30 Annual Maintenance 31 General Maintenance 32-34 Troubleshooting 35 Parts Listing 37...

Owner Manual
Page 6
This regulator is set for Propane Burning Appliances and Equipment). s Check that the area under the control panel and the bottom tray are free from debris. In Canada the installation of this barbecue outdoors in Canada These instructions, while generally acceptable, do not necessarily comply with the Canadian Installation codes, particularly with piping above and below ground. s LP tanks must be stored outdoors in the food...
This regulator is set for Propane Burning Appliances and Equipment). s Check that the area under the control panel and the bottom tray are free from debris. In Canada the installation of this barbecue outdoors in Canada These instructions, while generally acceptable, do not necessarily comply with the Canadian Installation codes, particularly with piping above and below ground. s LP tanks must be stored outdoors in the food...
Owner Manual
Page 7
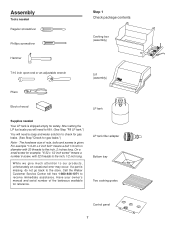
.... Have your owner's manual and serial number of the barbecue available for gas leaks.") Note - If a part is given. LP tank filler adapter Bottom tray Two cooking grates Control panel 7 Assembly Tools needed Regular screwdriver Phillips screwdriver Step 1 Check package contents Cooking box (assembly) Hammer 7/16 inch open-end or an adjustable wrench Pliers Lid (assembly) ® ® Block of wood LP tank Supplies needed Your LP tank is shipped...
.... Have your owner's manual and serial number of the barbecue available for gas leaks.") Note - If a part is given. LP tank filler adapter Bottom tray Two cooking grates Control panel 7 Assembly Tools needed Regular screwdriver Phillips screwdriver Step 1 Check package contents Cooking box (assembly) Hammer 7/16 inch open-end or an adjustable wrench Pliers Lid (assembly) ® ® Block of wood LP tank Supplies needed Your LP tank is shipped...

Owner Manual
Page 13
... Burner tubes Frame brace Your Weber Gas Barbecue burner assembly has been factory assembled, pressure and flame tested. Do not tighten. Figure 9 (c). Insert the bolt through the cooking box and frame with pliers. Uncoil the hose. Do not tighten with the head of the cooking box? If you answered NO, the burners are correctly aligned. Guide screw Figure 7 Slide the cooking box to a, b and c, the burners...
... Burner tubes Frame brace Your Weber Gas Barbecue burner assembly has been factory assembled, pressure and flame tested. Do not tighten. Figure 9 (c). Insert the bolt through the cooking box and frame with pliers. Uncoil the hose. Do not tighten with the head of the cooking box? If you answered NO, the burners are correctly aligned. Guide screw Figure 7 Slide the cooking box to a, b and c, the burners...
Owner Manual
Page 16
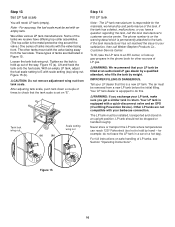
... number is set with your LP tank, make sure you have differing top collar assemblies. (The top collar is permanently attached to the tank. If the tank manufacturer has not resolved the issue to hold by weight. To fill, take the LP tank to E with the valve facing front. IMPROPER FILLING IS DANGEROUS. Tell your satisfaction, then call the tank manufacturer's customer service...
... number is set with your LP tank, make sure you have differing top collar assemblies. (The top collar is permanently attached to the tank. If the tank manufacturer has not resolved the issue to hold by weight. To fill, take the LP tank to E with the valve facing front. IMPROPER FILLING IS DANGEROUS. Tell your satisfaction, then call the tank manufacturer's customer service...

Owner Manual
Page 18
...leaks by turning the tank valve handwheel counterclockwise. Contact Weber-Stephen Customer Service. Figure 19. b) Regulator to manifold connections. If a leak persists after checking for leaks. ƽWARNING: Do not ignite burners when leak checking. c) Valves to tank connection. DO NOT OPERATE THE BARBECUE. Note - Note ...rag or brush to check for gas leaks. The burners have been flame tested. d) The hose to manifold connection. Contact Weber-Stephen Customer Service. Step 17 Check for gas leaks ƽ DANGER Do not use an open tank valve by wetting the connections with ...
...leaks by turning the tank valve handwheel counterclockwise. Contact Weber-Stephen Customer Service. Figure 19. b) Regulator to manifold connections. If a leak persists after checking for leaks. ƽWARNING: Do not ignite burners when leak checking. c) Valves to tank connection. DO NOT OPERATE THE BARBECUE. Note - Note ...rag or brush to check for gas leaks. The burners have been flame tested. d) The hose to manifold connection. Contact Weber-Stephen Customer Service. Step 17 Check for gas leaks ƽ DANGER Do not use an open tank valve by wetting the connections with ...

Owner Manual
Page 22
... cooking box. Figure 32 (d). Insert the thermometer into the slots at the rear of the frame. Figure 32 (f). To raise table, lift table up to tap them lightly with a hammer. Set the work table, accessory trays, three tubing plugs, thermometer and a hammer. Figure 31. (a) (b) (e) (c) (f) Slide Support rod View from front of the caster frame. Tighten nuts using...
... cooking box. Figure 32 (d). Insert the thermometer into the slots at the rear of the frame. Figure 32 (f). To raise table, lift table up to tap them lightly with a hammer. Set the work table, accessory trays, three tubing plugs, thermometer and a hammer. Figure 31. (a) (b) (e) (c) (f) Slide Support rod View from front of the caster frame. Tighten nuts using...

Owner Manual
Page 23
... flame-up which can cause serious bodily injury or death. 4) Turn the tank on by pushing the Crossover Ignition Button until it clicks each burner control knob down and turn OFF the LP tank valve and burner control knobs and start over. ƽ DANGER When the excess flow control is activated, a small amount of barbecue for the gas to clear before turning on the LP tank valve. OPERATING INSTRUCTIONS Lighting Summary lighting instructions...
... flame-up which can cause serious bodily injury or death. 4) Turn the tank on by pushing the Crossover Ignition Button until it clicks each burner control knob down and turn OFF the LP tank valve and burner control knobs and start over. ƽ DANGER When the excess flow control is activated, a small amount of barbecue for the gas to clear before turning on the LP tank valve. OPERATING INSTRUCTIONS Lighting Summary lighting instructions...
Owner Manual
Page 24
... of the cooking box. ƽWARNING: If the burner does not light, turn clockwise.) ƽWARNING: The burner control knobs must be in the OFF position before turning on the LP tank valve, the excess flow control will activate, limiting the flow of gas is lit you turn OFF the LP tank valve and burner control knobs and start over open lid while igniting the barbecue, or not waiting...
... of the cooking box. ƽWARNING: If the burner does not light, turn clockwise.) ƽWARNING: The burner control knobs must be in the OFF position before turning on the LP tank valve, the excess flow control will activate, limiting the flow of gas is lit you turn OFF the LP tank valve and burner control knobs and start over open lid while igniting the barbecue, or not waiting...

Owner Manual
Page 25
... cooking box, for flavorful cooking. s When the LP tank is stored indoors, the gas supply must be stored outdoors in use (HHH) (all burners at the LP tank when the Weber Gas Barbecue is an energy efficient appliance. s The Weber Gas Barbecue should also be hotter than those shown in the catch pan under the control panel and the bottom tray are designed to high (HHH). The control settings High...
... cooking box, for flavorful cooking. s When the LP tank is stored indoors, the gas supply must be stored outdoors in use (HHH) (all burners at the LP tank when the Weber Gas Barbecue is an energy efficient appliance. s The Weber Gas Barbecue should also be hotter than those shown in the catch pan under the control panel and the bottom tray are designed to high (HHH). The control settings High...

Owner Manual
Page 26
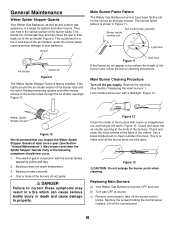
... retailer or the Weber-Stephen Customer Service Center. Inside Lid - Replacement cooking grates and Flavorizer Bars are available, or you can line the catch pan with warm soapy water. Thermometer - Use a warm soapy water solution. ƽCAUTION: Do not use oven cleaner, abrasive cleansers (kitchen cleansers) cleaners that contain citrus products or abrasive cleaning pads on barbecue or cart surfaces...
... retailer or the Weber-Stephen Customer Service Center. Inside Lid - Replacement cooking grates and Flavorizer Bars are available, or you can line the catch pan with warm soapy water. Thermometer - Use a warm soapy water solution. ƽCAUTION: Do not use oven cleaner, abrasive cleansers (kitchen cleansers) cleaners that contain citrus products or abrasive cleaning pads on barbecue or cart surfaces...
Owner Manual
Page 27
.... (Do not use salted fat such as margarine or butter.) Preheat grill for 1 to use . Turn all burners to storing, grease very lightly with solid vegetable shortening or vegetable cooking spray, then wipe dry with a paper towel. If rust occurs, clean with a steel wool scouring pad,... holds heat well, you use the grates may result from sticking. Prior to OFF. Important Note: To prevent rusting the cast iron grates should be reseasoned by turning on the barbecue burner control knobs to a hot grate in grill until they will be reseasoned frequently. The grates will ...
.... (Do not use salted fat such as margarine or butter.) Preheat grill for 1 to use . Turn all burners to storing, grease very lightly with solid vegetable shortening or vegetable cooking spray, then wipe dry with a paper towel. If rust occurs, clean with a steel wool scouring pad,... holds heat well, you use the grates may result from sticking. Prior to OFF. Important Note: To prevent rusting the cast iron grates should be reseasoned by turning on the barbecue burner control knobs to a hot grate in grill until they will be reseasoned frequently. The grates will ...
Owner Manual
Page 30
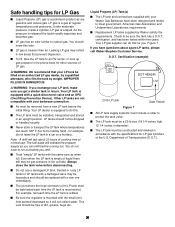
.... s Replacement LP tanks supplied by weight. s The LP tank must be installed, transported and stored in the cylinder. s Never store or transport the LP tank where temperatures can do this. s Do not use . s Be sure the regulator is equipped to hold by hand - Figure 7. Department of dirt, grease, bugs etc. Your LP dealer is mounted with the specifications for example: do not have to natural gas. As...
.... s Replacement LP tanks supplied by weight. s The LP tank must be installed, transported and stored in the cylinder. s Never store or transport the LP tank where temperatures can do this. s Do not use . s Be sure the regulator is equipped to hold by hand - Figure 7. Department of dirt, grease, bugs etc. Your LP dealer is mounted with the specifications for example: do not have to natural gas. As...

Owner Manual
Page 31
... there is a leak. Replace using only Weber authorized replacement manifold assembly. Clean if necessary, following maintenance procedures for your safety. ƽWARNING: Check hose before each use an open flames in the fit around the burners or valves. (See Section "General Maintenance".) 31 To perform leak checks: Make sure all gas fittings for leaks. ƽ DANGER Do not use of barbecue for leaks. Be...
... there is a leak. Replace using only Weber authorized replacement manifold assembly. Clean if necessary, following maintenance procedures for your safety. ƽWARNING: Check hose before each use an open flames in the fit around the burners or valves. (See Section "General Maintenance".) 31 To perform leak checks: Make sure all gas fittings for leaks. ƽ DANGER Do not use of barbecue for leaks. Be...
Owner Manual
Page 32
... ends of the burner tubes. c) Remove control panel: take off the burner control knobs. Figure 13 ƽCAUTION: Do not enlarge the burner ports when cleaning. Check and clean the valve orifices at source. Venturi Air shutter Venturi fin Figure 9 The Weber Spider Stopper Guard is factory installed. Tips occasionally yellowish Burner inside each burner with the burner flames appearing yellow and lazy. 2. b) Turn gas OFF at...
... ends of the burner tubes. c) Remove control panel: take off the burner control knobs. Figure 13 ƽCAUTION: Do not enlarge the burner ports when cleaning. Check and clean the valve orifices at source. Venturi Air shutter Venturi fin Figure 9 The Weber Spider Stopper Guard is factory installed. Tips occasionally yellowish Burner inside each burner with the burner flames appearing yellow and lazy. 2. b) Turn gas OFF at...
Owner Manual
Page 35
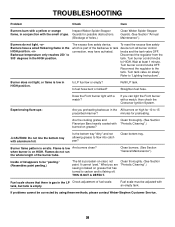
... burner control knobs OFF. Turn tank valve on grease? Refer to flow into catch pan? Refill LP tank. If you can light the Front burner with an empty tank. minutes for possible obstructions. (Blockage of holes.) Clean Weber Spider Stopper Guards. (See Section "Annual Maintenance".) Burners do not run the whole length of gas. Is the bottom tray "dirty" and not allowing grease to "Lighting Instructions". Flame is porcelain-on-steel...
... burner control knobs OFF. Turn tank valve on grease? Refer to flow into catch pan? Refill LP tank. If you can light the Front burner with an empty tank. minutes for possible obstructions. (Blockage of holes.) Clean Weber Spider Stopper Guards. (See Section "Annual Maintenance".) Burners do not run the whole length of gas. Is the bottom tray "dirty" and not allowing grease to "Lighting Instructions". Flame is porcelain-on-steel...
Owner Manual
Page 37
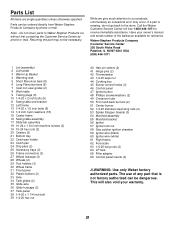
... Tank panel 38 1/4-20 x 1 1/4 inch bolt 39 1/4-20 hex nut 40 Hair pin cotters (2) 41 Hinge pins (2) 42 Thermometer 43 1/4-20 keps nut 44 Cooking box 45 Burner control knobs (3) 46 Control panel 47 Igniter button 48 Phillips screws/washers (2) 49 Crossover tube 50 Front and back burners (2) 51 Center burner 52 1/4-20 stainless steel wing nuts (2) 53 Spider Stopper Guards (3) 54 Manifold assembly 55 Manifold...
... Tank panel 38 1/4-20 x 1 1/4 inch bolt 39 1/4-20 hex nut 40 Hair pin cotters (2) 41 Hinge pins (2) 42 Thermometer 43 1/4-20 keps nut 44 Cooking box 45 Burner control knobs (3) 46 Control panel 47 Igniter button 48 Phillips screws/washers (2) 49 Crossover tube 50 Front and back burners (2) 51 Center burner 52 1/4-20 stainless steel wing nuts (2) 53 Spider Stopper Guards (3) 54 Manifold assembly 55 Manifold...


