
User Manual
Page 2
... on a soft surface such as near or over a radiator or heat register. Do not allow anything to rest on the product. Please review this manual thoroughly to ensure proper installation and operation of this product through the slots in your home or office, consult your new...and interference when used with the ENERGY STAR® label indicating it meets the latest energy efficiency guidelines. For support, shopping, and everything new at VTech, visit our website at www.vtechphones.com. The TIA-1083 Compliant Logo is not provided. 8. If you are provided for cleaning. 4. In Canada,...
... on a soft surface such as near or over a radiator or heat register. Do not allow anything to rest on the product. Please review this manual thoroughly to ensure proper installation and operation of this product through the slots in your home or office, consult your new...and interference when used with the ENERGY STAR® label indicating it meets the latest energy efficiency guidelines. For support, shopping, and everything new at VTech, visit our website at www.vtechphones.com. The TIA-1083 Compliant Logo is not provided. 8. If you are provided for cleaning. 4. In Canada,...
User Manual
Page 5
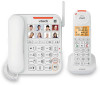
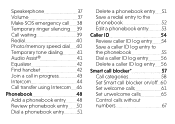
...24 Equalizer 25 Audio Assist 25 Mute 25 Join a call in progress 26 Call waiting 26 Chain dialing 26 Find handset 27 Redial list 27 Review a redial list entry 27 Dial a redial list entry 27 Delete a redial list entry 27 Intercom 28 Answer an incoming call during an intercom... call 29 Call transfer using intercom 29 Phonebook 30 Add a phonebook entry 30 Review a phonebook entry 30 Alphabetical search 30 Save a redial entry to the phonebook..... 31 Delete a phonebook entry 31 Edit a phonebook entry 31 Dial a ...
...24 Equalizer 25 Audio Assist 25 Mute 25 Join a call in progress 26 Call waiting 26 Chain dialing 26 Find handset 27 Redial list 27 Review a redial list entry 27 Dial a redial list entry 27 Delete a redial list entry 27 Intercom 28 Answer an incoming call during an intercom... call 29 Call transfer using intercom 29 Phonebook 30 Add a phonebook entry 30 Review a phonebook entry 30 Alphabetical search 30 Save a redial entry to the phonebook..... 31 Delete a phonebook entry 31 Edit a phonebook entry 31 Dial a ...

User Manual
Page 10
...; Press to enhance the clarity and loudness of your caller's voice on a call, or listening to a message or an announcement. • Press and hold to review the redial list. • Press to adjust the listening volume during a call the preset speed dial memory number 2. 1 2 3 4 14 5 13 6 12 7 11 10 8 9 1 - LCD display...
...; Press to enhance the clarity and loudness of your caller's voice on a call, or listening to a message or an announcement. • Press and hold to review the redial list. • Press to adjust the listening volume during a call the preset speed dial memory number 2. 1 2 3 4 14 5 13 6 12 7 11 10 8 9 1 - LCD display...
User Manual
Page 11
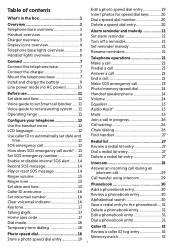
... available. 14 - • Mute the microphone during a call. • Silence the handset ringer temporarily while the phone is ringing. • Delete the displayed entry while reviewing the phonebook, caller ID log or redial list. 19 17 - • Change the quality of the handset audio to block the incoming call when the...
... available. 14 - • Mute the microphone during a call. • Silence the handset ringer temporarily while the phone is ringing. • Delete the displayed entry while reviewing the phonebook, caller ID log or redial list. 19 17 - • Change the quality of the handset audio to block the incoming call when the...
User Manual
Page 33
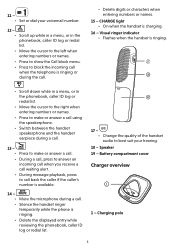
... more handsets, the telephone makes intercom paging to make room for the new entry. Lift the corded handset. 2. Press DELETE to dial the last number. Review a redial list entry Using a cordless handset: 1. Entries are already 10 entries, the oldest entry is not in use. 2. Press and hold REDIAL when the handset...
... more handsets, the telephone makes intercom paging to make room for the new entry. Lift the corded handset. 2. Press DELETE to dial the last number. Review a redial list entry Using a cordless handset: 1. Entries are already 10 entries, the oldest entry is not in use. 2. Press and hold REDIAL when the handset...

User Manual
Page 36
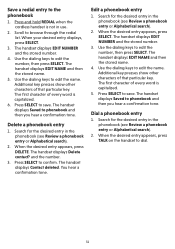
... appears. When ENTER NUMBER displays, use , then press q or p to scroll to Phonebook and press SELECT. The handset displays ENTER NAME. 4. Review a phonebook entry Entries are shown beginning with a dash, alternately. If necessary, press q or p to phonebook and then you have entries for entering... phonebook exceeds 15 digits, a dash appears after the 14th digit and then the remaining digits are sorted alphabetically. 1. If the telephone number in Review a phonebook entry above to copy the number. 3. Press q or p to scroll to enter the main menu. 2. Press MENU on to enter...
... appears. When ENTER NUMBER displays, use , then press q or p to scroll to Phonebook and press SELECT. The handset displays ENTER NAME. 4. Review a phonebook entry Entries are shown beginning with a dash, alternately. If necessary, press q or p to phonebook and then you have entries for entering... phonebook exceeds 15 digits, a dash appears after the 14th digit and then the remaining digits are sorted alphabetically. 1. If the telephone number in Review a phonebook entry above to copy the number. 3. Press q or p to scroll to enter the main menu. 2. Press MENU on to enter...
User Manual
Page 37
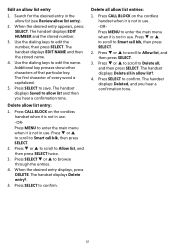
...the name. When the desired entry appears, press DELETE. The handset displays Contact deleted. Search for the desired entry in the phonebook (see Review a phonebook entry or Alphabetical search). 2. Use the dialing keys to edit the name. Dial a phonebook entry 1. When your desired entry displays... is capitalized. 5. Press SELECT to phonebook and then you hear a confirmation tone. Search for the desired entry in the phonebook (see Review a phonebook entry or Alphabetical search). 2. Scroll to confirm. The handset displays EDIT NAME and then the stored name. 5. When the ...
...the name. When the desired entry appears, press DELETE. The handset displays Contact deleted. Search for the desired entry in the phonebook (see Review a phonebook entry or Alphabetical search). 2. Use the dialing keys to edit the name. Dial a phonebook entry 1. When your desired entry displays... is capitalized. 5. Press SELECT to phonebook and then you hear a confirmation tone. Search for the desired entry in the phonebook (see Review a phonebook entry or Alphabetical search). 2. Scroll to confirm. The handset displays EDIT NAME and then the stored name. 5. When the ...

User Manual
Page 38
... one by one . The time and date are shown and saved in the caller ID log, the handset displays XX Missed calls. Each time you review a caller ID log entry marked NEW, the number of a telephone number in the caller ID log. If you answer a call indicator. Press MENU on the... ID If you subscribe to enter the main menu. 2. If the last seven digits of the phonebook entry. If the name has more that have reviewed all the missed calls, the missed call information. • This product can provide information only if both you and the caller are in areas offering...
... one by one . The time and date are shown and saved in the caller ID log, the handset displays XX Missed calls. Each time you review a caller ID log entry marked NEW, the number of a telephone number in the caller ID log. If you answer a call indicator. Press MENU on the... ID If you subscribe to enter the main menu. 2. If the last seven digits of the phonebook entry. If the name has more that have reviewed all the missed calls, the missed call information. • This product can provide information only if both you and the caller are in areas offering...
User Manual
Page 39
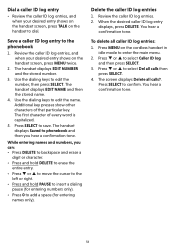
...show other characters of every word is capitalized. 5. Dial a caller ID log entry • Review the caller ID log entries, and when your desired entry shows on the handset screen, press MENU twice. 2. Review the caller ID log entries. 2. When the desired caller ID log entry displays, press DELETE.... While entering names and numbers, you hear a confirmation tone. Review the caller ID log entries, and when your desired entry shows on the handset screen, press TALK on the cordless handset in idle mode to...
...show other characters of every word is capitalized. 5. Dial a caller ID log entry • Review the caller ID log entries, and when your desired entry shows on the handset screen, press MENU twice. 2. Review the caller ID log entries. 2. When the desired caller ID log entry displays, press DELETE.... While entering names and numbers, you hear a confirmation tone. Review the caller ID log entries, and when your desired entry shows on the handset screen, press TALK on the cordless handset in idle mode to...
User Manual
Page 42
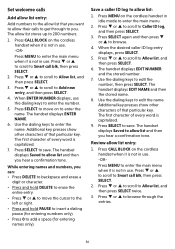
... press SELECT. 2. Save a caller ID log to allow list entry: 1. Press SELECT again and then press q or p to Add new entry, and then press SELECT. 4. Review allow list: 1. Press q or p to scroll to 200 numbers. 1. When the desired caller ID log entry displays, press SELECT. 5. The handset displays EDIT NUMBER and...
... press SELECT. 2. Save a caller ID log to allow list entry: 1. Press SELECT again and then press q or p to Add new entry, and then press SELECT. 4. Review allow list: 1. Press q or p to scroll to 200 numbers. 1. When the desired caller ID log entry displays, press SELECT. 5. The handset displays EDIT NUMBER and...
User Manual
Page 43
... to confirm. Search for the desired entry in use . Additional key presses show other characters of every word is not in the allow list (see Review allow list entries: 1. Press SELECT to Allow list, and then press SELECT. 3. Press CALL BLOCK on the cordless handset when it is not in use...
... to confirm. Search for the desired entry in use . Additional key presses show other characters of every word is not in the allow list (see Review allow list entries: 1. Press SELECT to Allow list, and then press SELECT. 3. Press CALL BLOCK on the cordless handset when it is not in use...
User Manual
Page 44
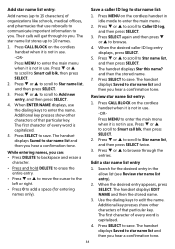
...list, and then press SELECT. 3. When the desired caller ID log entry displays, press SELECT. 5. Press SELECT to Smart call blk, then press SELECT. 2. Review star name list entry: 1. Press q or p to scroll to save . Press CALL BLOCK on the cordless handset when it is not in use. When ... in use . -ORPress MENU to enter the name. and then the stored name. 7. Press CALL BLOCK on the cordless handset in the allow list (see Review star name list entry). 2. Press q or p to Add new entry, and then press SELECT. 4. Search for entering names only). 1. Additional key presses show ...
...list, and then press SELECT. 3. When the desired caller ID log entry displays, press SELECT. 5. Press SELECT to Smart call blk, then press SELECT. 2. Review star name list entry: 1. Press q or p to scroll to save . Press CALL BLOCK on the cordless handset when it is not in use. When ... in use . -ORPress MENU to enter the name. and then the stored name. 7. Press CALL BLOCK on the cordless handset in the allow list (see Review star name list entry). 2. Press q or p to Add new entry, and then press SELECT. 4. Search for entering names only). 1. Additional key presses show ...

User Manual
Page 46
... p to Smart call blk, then press SELECT. 2. Additional key presses show other characters of every word is capitalized. 9. The first character of that particular key. Review block list entry: 1. Press q or p to scroll to browse. 4. Press q or p to scroll to block list and then you hear a confirmation tone. ... handset displays EDIT NUMBER and the stored number. 7. Press SELECT to enter the main menu when it is not in the allow list (see Review block list entry). 2. Press CALL BLOCK on the cordless handset when it is not in use . Use the dialing keys to confirm. 40 ...
... p to Smart call blk, then press SELECT. 2. Additional key presses show other characters of every word is capitalized. 9. The first character of that particular key. Review block list entry: 1. Press q or p to scroll to browse. 4. Press q or p to scroll to block list and then you hear a confirmation tone. ... handset displays EDIT NUMBER and the stored number. 7. Press SELECT to enter the main menu when it is not in the allow list (see Review block list entry). 2. Press CALL BLOCK on the cordless handset when it is not in use . Use the dialing keys to confirm. 40 ...
User Manual
Page 60
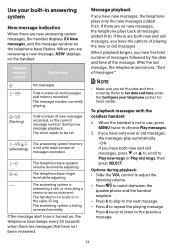
..., or in the caller ID log. If you have only new or old messages, the messages play automatically. -ORIf you have not been reviewed. Press 4 twice to listen to Set date and time under the Configure your built-in answering system New message indication When there are new ...message window on the handset. Use your telephone section for more details. To playback messages with total number of messages." • Make sure you are reviewing a new message, NEW displays on the telephone base flashes. The answering system is turned on a call , or recording a memo or announcement. Refer...
..., or in the caller ID log. If you have only new or old messages, the messages play automatically. -ORIf you have not been reviewed. Press 4 twice to listen to Set date and time under the Configure your built-in answering system New message indication When there are new ...message window on the handset. Use your telephone section for more details. To playback messages with total number of messages." • Make sure you are reviewing a new message, NEW displays on the telephone base flashes. The answering system is turned on a call , or recording a memo or announcement. Refer...

User Manual
Page 61
Then you can only delete old (reviewed) messages. You cannot delete new messages until you have no message in use . The system announces, "To delete all old messages?. 4. and then All old ... at the telephone base: • Press when the phone is not in the answering system, the telephone base announces, "You have no message." When you review them. Options during playback: • Slide the VOL control to adjust the listening volume. • Press REPEAT to pause the playback and view the caller...
Then you can only delete old (reviewed) messages. You cannot delete new messages until you have no message in use . The system announces, "To delete all old messages?. 4. and then All old ... at the telephone base: • Press when the phone is not in the answering system, the telephone base announces, "You have no message." When you review them. Options during playback: • Slide the VOL control to adjust the listening volume. • Press REPEAT to pause the playback and view the caller...
User Manual
Page 89
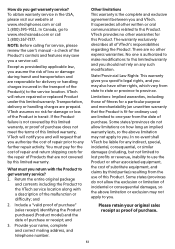
... in the transport of repair prior to the service location. No one year from the use ) are responsible for this limited warranty, VTech will request that are prepaid. In no risk for ordinary use of purchase. In Canada, go to this limited warranty. Limitations: Implied... unwritten warranty that the Product is the complete and exclusive agreement between you and will notify you and VTech. VTech assumes no event shall VTech be liable for service, please review the user's manual - Return the entire original package and contents including the Product to one is not...
... in the transport of repair prior to the service location. No one year from the use ) are responsible for this limited warranty, VTech will request that are prepaid. In no risk for ordinary use of purchase. In Canada, go to this limited warranty. Limitations: Implied... unwritten warranty that the Product is the complete and exclusive agreement between you and will notify you and VTech. VTech assumes no event shall VTech be liable for service, please review the user's manual - Return the entire original package and contents including the Product to one is not...
Quick Start Guide
Page 4
...174; 41 Equalizer 42 Find handset 42 Join a call in progress 43 Intercom 44 Call transfer using Intercom 46 Phonebook 48 Add a phonebook entry 48 Review phonebook entry 50 Dial a phonebook entry 51 Delete a phonebook entry 51 Save a redial entry to the phonebook 52 Edit a phonebook entry 53 Caller ...ID 54 Review caller ID log entry 54 Save a caller ID log entry to the phonebook 55 Dial a caller ID log entry 56 Delete a caller ID log ...
...174; 41 Equalizer 42 Find handset 42 Join a call in progress 43 Intercom 44 Call transfer using Intercom 46 Phonebook 48 Add a phonebook entry 48 Review phonebook entry 50 Dial a phonebook entry 51 Delete a phonebook entry 51 Save a redial entry to the phonebook 52 Edit a phonebook entry 53 Caller ...ID 54 Review caller ID log entry 54 Save a caller ID log entry to the phonebook 55 Dial a caller ID log entry 56 Delete a caller ID log ...
Quick Start Guide
Page 55
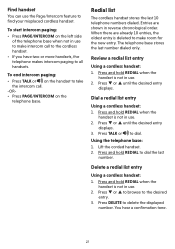
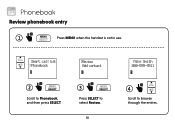
Phonebook Review phonebook entry 1 Press MENU when the handset is not in use. Smart call blk >Phonebook >Review Add contact 2 Scroll to Phonebook, and then press SELECT. 3 Press SELECT to select Review. 50 Mike Smith 800-595-9511 4 Scroll to browse through the entries.
Phonebook Review phonebook entry 1 Press MENU when the handset is not in use. Smart call blk >Phonebook >Review Add contact 2 Scroll to Phonebook, and then press SELECT. 3 Press SELECT to select Review. 50 Mike Smith 800-595-9511 4 Scroll to browse through the entries.
Quick Start Guide
Page 56
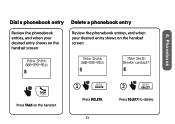
Press TALK on the handset screen: Mike Smith 800-595-9511 Mike Smith 800-595-9511 Mike Smith Delete contact? Phonebook Dial a phonebook entry Delete a phonebook entry Review the phonebook entries, and when your desired entry shows on the handset screen: Review the phonebook entries, and when your desired entry shows on the handset. 1 Press DELETE. 2 Press SELECT to delete. 51 4.
Press TALK on the handset screen: Mike Smith 800-595-9511 Mike Smith 800-595-9511 Mike Smith Delete contact? Phonebook Dial a phonebook entry Delete a phonebook entry Review the phonebook entries, and when your desired entry shows on the handset screen: Review the phonebook entries, and when your desired entry shows on the handset. 1 Press DELETE. 2 Press SELECT to delete. 51 4.
Quick Start Guide
Page 58
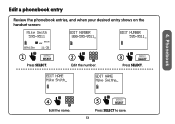
Phonebook Edit a phonebook entry Review the phonebook entries, and when your desired entry shows on the handset screen: Mike Smith 595-9511 09:15PM ANS ON NEW 11/30 EDIT NUMBER 800-595-9511_ EDIT NUMBER 595-9511_ 1 Press SELECT. 2 Edit the number. 3 Press SELECT. EDIT NAME Mike Smith_ EDIT NAME Mike Smiths_ 4 Edit the name. 5 Press SELECT to save. 53 4.
Phonebook Edit a phonebook entry Review the phonebook entries, and when your desired entry shows on the handset screen: Mike Smith 595-9511 09:15PM ANS ON NEW 11/30 EDIT NUMBER 800-595-9511_ EDIT NUMBER 595-9511_ 1 Press SELECT. 2 Edit the number. 3 Press SELECT. EDIT NAME Mike Smith_ EDIT NAME Mike Smiths_ 4 Edit the name. 5 Press SELECT to save. 53 4.

