User Manual
Page 3
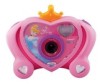
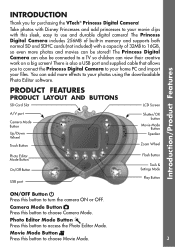
.../Off Button USB port Flash Button Tools & Settings Mode Play Button ON/OFF Button Press this button to choose Movie Mode. 3 Movie Mode Button Press this button to turn the camera ON or OFF. The Princess Digital Camera can also be stored! You can view their creative work on a big screen! Introduction/Product Features INTRODUCTION Thank you to connect the Princess Digital Camera to your home PC and import your photos using the downloadable Photo Editor software. The Princess Digital Camera...
.../Off Button USB port Flash Button Tools & Settings Mode Play Button ON/OFF Button Press this button to choose Movie Mode. 3 Movie Mode Button Press this button to turn the camera ON or OFF. The Princess Digital Camera can also be stored! You can view their creative work on a big screen! Introduction/Product Features INTRODUCTION Thank you to connect the Princess Digital Camera to your home PC and import your photos using the downloadable Photo Editor software. The Princess Digital Camera...
User Manual
Page 4
... will use flash when it detects that it is necessary. INCLUDED IN THIS PACKAGE • 1 VTech® Princess Digital Camera • 1 A/V cable • 1 USB cable • 1 user's manual • 1 wrist strap WARNING: All packing materials, such as tape, plastic sheets, packaging locks and tags are not part of the screen in and out while previewing pictures or movies. Trash Button Press this button to take a photo, start/stop...
... will use flash when it detects that it is necessary. INCLUDED IN THIS PACKAGE • 1 VTech® Princess Digital Camera • 1 A/V cable • 1 USB cable • 1 user's manual • 1 wrist strap WARNING: All packing materials, such as tape, plastic sheets, packaging locks and tags are not part of the screen in and out while previewing pictures or movies. Trash Button Press this button to take a photo, start/stop...
User Manual
Page 5
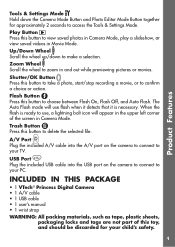
... the Princess Digital Camera). Operating Temperature: 0 to 40 oC (32 to 16GB. SD cards of video, max. 5 minutes per file. Product Specifications PRODUCT SPECIFICATIONS Display: 1.8" color LCD screen Photo Resolution : 1600 x 1200 (JPEG format) Video Resolution: 320 x 240 (Motion JPEG format) Focus Range Flash Range : 1.5 feet - ∞ : 1.5 - 8 feet Batteries : 4 "AA" (LR6) alkaline batteries Internal Memory : 256MB built-in memory (approximately 196MB free memory for PC connection (included). USB cable...
... the Princess Digital Camera). Operating Temperature: 0 to 40 oC (32 to 16GB. SD cards of video, max. 5 minutes per file. Product Specifications PRODUCT SPECIFICATIONS Display: 1.8" color LCD screen Photo Resolution : 1600 x 1200 (JPEG format) Video Resolution: 320 x 240 (Motion JPEG format) Focus Range Flash Range : 1.5 feet - ∞ : 1.5 - 8 feet Batteries : 4 "AA" (LR6) alkaline batteries Internal Memory : 256MB built-in memory (approximately 196MB free memory for PC connection (included). USB cable...

User Manual
Page 6
... performance.) • Replace the battery covers and tighten the screws. BATTERY NOTICE • The use of new alkaline batteries is recommended for battery installation. • Make sure the camera is turned OFF. • Locate the battery covers on the bottom of new alkaline batteries is recommended for maximum performance. • Non-rechargeable batteries are not to be recharged. • Rechargeable batteries are to be removed from the toy before being...
... performance.) • Replace the battery covers and tighten the screws. BATTERY NOTICE • The use of new alkaline batteries is recommended for battery installation. • Make sure the camera is turned OFF. • Locate the battery covers on the bottom of new alkaline batteries is recommended for maximum performance. • Non-rechargeable batteries are not to be recharged. • Rechargeable batteries are to be removed from the toy before being...

User Manual
Page 7
... Movie Mode, press the Movie Mode button. To access the Tools & Settings Mode, hold down the Play button and Flash button together for approximately 2 seconds. • To connect to a TV or PC, follow the instructions in the 'Connecting to a TV' or 'Connecting to a PC' illustrations. • Press the ON/OFF Button again to use. Automatic Shut-Off To preserve battery life, the Princess Digital Camera will automatically turn the unit off...
... Movie Mode, press the Movie Mode button. To access the Tools & Settings Mode, hold down the Play button and Flash button together for approximately 2 seconds. • To connect to a TV or PC, follow the instructions in the 'Connecting to a TV' or 'Connecting to a PC' illustrations. • Press the ON/OFF Button again to use. Automatic Shut-Off To preserve battery life, the Princess Digital Camera will automatically turn the unit off...
User Manual
Page 8
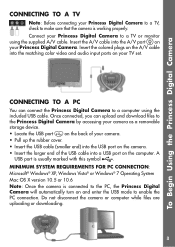
... Using the Princess Digital Camera Connecting to a PC You can upload and download files to the Princess Digital Camera by accessing your camera as a removable storage device. • Locate the USB port on the back of your TV set. A USB port is connected to the PC, the Princess Digital Camera will automatically turn on your camera. • Pull up the rubber cover. • Insert the USB cable (smaller end) into the USB port on the camera...
... Using the Princess Digital Camera Connecting to a PC You can upload and download files to the Princess Digital Camera by accessing your camera as a removable storage device. • Locate the USB port on the back of your TV set. A USB port is connected to the PC, the Princess Digital Camera will automatically turn on your camera. • Pull up the rubber cover. • Insert the USB cable (smaller end) into the USB port on the camera...
User Manual
Page 9
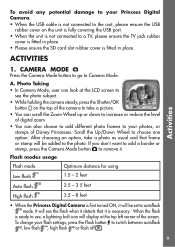
... the flash is necessary. To change your flash settings, press the Flash button to remove it will be set to autoflash mode. Flash modes usage: Flash mode Optimum distance for using Low flash 1.5 - 2 feet Auto flash 2.5 - 3.5 feet High flash 3.5 - 8 feet • When the Princess Digital Camera is first turned ON, it . To avoid any potential damage to your Princess Digital Camera: • When the USB cable is not connected to the unit, please ensure the USB rubber cover on the...
... the flash is necessary. To change your flash settings, press the Flash button to remove it will be set to autoflash mode. Flash modes usage: Flash mode Optimum distance for using Low flash 1.5 - 2 feet Auto flash 2.5 - 3.5 feet High flash 3.5 - 8 feet • When the Princess Digital Camera is first turned ON, it . To avoid any potential damage to your Princess Digital Camera: • When the USB cable is not connected to the unit, please ensure the USB rubber cover on the...

User Manual
Page 10
... digital zoom. • To add a frame to the movie before starting to record, scroll the Up/Down Wheel to choose a frame for the video. If you can scroll the Zoom Wheel to delete Activities Note: Photos taken with the Princess Digital Camera. to adjust the volume. 10 The Princess Digital Camera only supports Standard Baseline JPEG. 2. To return to Camera Mode, press the Shutter/OK button or Camera Mode button...
... digital zoom. • To add a frame to the movie before starting to record, scroll the Up/Down Wheel to choose a frame for the video. If you can scroll the Zoom Wheel to delete Activities Note: Photos taken with the Princess Digital Camera. to adjust the volume. 10 The Princess Digital Camera only supports Standard Baseline JPEG. 2. To return to Camera Mode, press the Shutter/OK button or Camera Mode button...

User Manual
Page 11
Note: Movies taken with the Princess Digital Camera. Scroll the Up/Down Wheel again to change in the VIDEO folder of the internal memory or on the SD card (not included) if one is inserted. 3. Tools & Settings MODE Hold the Play button and the Flash button together for about 2 seconds to start editing the selected photo. Scroll the Up/Down Wheel to select one...
Note: Movies taken with the Princess Digital Camera. Scroll the Up/Down Wheel again to change in the VIDEO folder of the internal memory or on the SD card (not included) if one is inserted. 3. Tools & Settings MODE Hold the Play button and the Flash button together for about 2 seconds to start editing the selected photo. Scroll the Up/Down Wheel to select one...
User Manual
Page 12
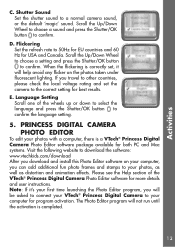
... button to confirm. Note: If it will not run until the activation is a VTech® Princess Digital Camera Photo Editor software package available for both PC and Mac systems. Visit the following website to download the software: www.vtechkids.com/download After you download and install this Photo Editor software on the photos taken under fluorescent lighting. Language Setting Scroll one of the VTech® Princess Digital Camera Photo Editor software...
... button to confirm. Note: If it will not run until the activation is a VTech® Princess Digital Camera Photo Editor software package available for both PC and Mac systems. Visit the following website to download the software: www.vtechkids.com/download After you download and install this Photo Editor software on the photos taken under fluorescent lighting. Language Setting Scroll one of the VTech® Princess Digital Camera Photo Editor software...

User Manual
Page 13
...® 7 Operating System For Macintosh Users: • Macintosh Computer with the images as such use images generated by the Software. SOFTWARE RESTRICTIONS If the Software provides you with the ability to download, print and/or save images containing Disney's copyrighted characters and/or artwork, this License. 13 Use of images generated by the Software for any purpose not specifically permitted by...
...® 7 Operating System For Macintosh Users: • Macintosh Computer with the images as such use images generated by the Software. SOFTWARE RESTRICTIONS If the Software provides you with the ability to download, print and/or save images containing Disney's copyrighted characters and/or artwork, this License. 13 Use of images generated by the Software for any purpose not specifically permitted by...
User Manual
Page 14
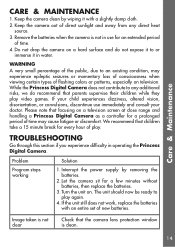
... screen at close range and handling a Princess Digital Camera as a controller for every hour of time. 4. TROUBLESHOOTING Go through this section if you experience difficulty in water. Interrupt the power supply by wiping it with an entire set of flashing colors or patterns, especially on television. Let the camera sit for an extended period of play again. 4. If the unit still does not work, replace the batteries...
... screen at close range and handling a Princess Digital Camera as a controller for every hour of time. 4. TROUBLESHOOTING Go through this section if you experience difficulty in water. Interrupt the power supply by wiping it with an entire set of flashing colors or patterns, especially on television. Let the camera sit for an extended period of play again. 4. If the unit still does not work, replace the batteries...
User Manual
Page 15
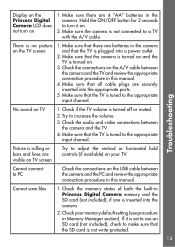
Display on the Princess Digital Camera LCD does not turn it is set to use an SD card (not included), check to the appropriate input channel. Make sure there are batteries in Princess Digital Camera memory and the SD card (not included), if one is turned on the A/V cable between the camera and the TV and review the appropriate connection procedure in this manual. 4. There is tuned to make sure that...
Display on the Princess Digital Camera LCD does not turn it is set to use an SD card (not included), check to the appropriate input channel. Make sure there are batteries in Princess Digital Camera memory and the SD card (not included), if one is turned on the A/V cable between the camera and the TV and review the appropriate connection procedure in this manual. 4. There is tuned to make sure that...
User Manual
Page 16
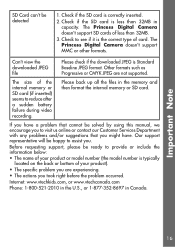
... SD card (if inserted) seems to reduce after a sudden battery failure during video recording. The Princess Digital Camera doesn't support MMC or other formats. The size of less than 32MB in capacity. Before requesting support, please be solved by using this manual, we encourage you to provide or include the information below: • The name of your product). • The specific problem...
... SD card (if inserted) seems to reduce after a sudden battery failure during video recording. The Princess Digital Camera doesn't support MMC or other formats. The size of less than 32MB in capacity. Before requesting support, please be solved by using this manual, we encourage you to provide or include the information below: • The name of your product). • The specific problem...

User Manual
Page 17
..., IL, 60004 USA Phone: 1-800-521-2010 in the U.S., or 1-877-352-8697 in a particular installation. It is encouraged to try to call our Consumer Services Department at VTech® take very seriously. These limits are designed to ensure the accuracy of malfunction, dead battery, or repairs. Company: VTech® Electronics North America, L.L.C. We make every effort to provide...
..., IL, 60004 USA Phone: 1-800-521-2010 in the U.S., or 1-877-352-8697 in a particular installation. It is encouraged to try to call our Consumer Services Department at VTech® take very seriously. These limits are designed to ensure the accuracy of malfunction, dead battery, or repairs. Company: VTech® Electronics North America, L.L.C. We make every effort to provide...

User Manual
Page 18
... COMPLIES WITH PART 15 OF THE FCC RULES. Caution: Changes or modifications not expressly approved by the party responsible for compliance could void the user's authority to which the receiver is connected. • Consult the dealer or an experienced radio/TV technician for help. THIS CLASS B DIGITAL APPARATUS COMPLIES WITH CANADIAN ICES-003. OPERATION IS SUBJECT TO...
... COMPLIES WITH PART 15 OF THE FCC RULES. Caution: Changes or modifications not expressly approved by the party responsible for compliance could void the user's authority to which the receiver is connected. • Consult the dealer or an experienced radio/TV technician for help. THIS CLASS B DIGITAL APPARATUS COMPLIES WITH CANADIAN ICES-003. OPERATION IS SUBJECT TO...

User Manual
Page 19
Insert it into the groove behind the bar and then push it all the way through . Step 3 Make sure the loop is securely tightened around the bar. Step 2 Feed the end of the strap. Wrist Strap Attachment Instructions Step 1 Locate the thread loop on the end of the strap up through the loop and pull it through .
Insert it into the groove behind the bar and then push it all the way through . Step 3 Make sure the loop is securely tightened around the bar. Step 2 Feed the end of the strap. Wrist Strap Attachment Instructions Step 1 Locate the thread loop on the end of the strap up through the loop and pull it through .

