

User Manual
Page 1
User's Manual © 2016 VTech All rights reserved Printed in China 91-003216-006 US
User's Manual © 2016 VTech All rights reserved Printed in China 91-003216-006 US
User Manual
Page 2
... fun om day one! To help prepare preschoolers for this important event, VTech® has developed the Preschool Learning™ series interactive t s. at VTech® To learn to do great things. Sincerely, Your iends at 's why all our electronic learning products are taught in a way that use technology to capture a child's a ention and teach important preschool skills like spelling, counting and the alphabet...
... fun om day one! To help prepare preschoolers for this important event, VTech® has developed the Preschool Learning™ series interactive t s. at VTech® To learn to do great things. Sincerely, Your iends at 's why all our electronic learning products are taught in a way that use technology to capture a child's a ention and teach important preschool skills like spelling, counting and the alphabet...
User Manual
Page 3
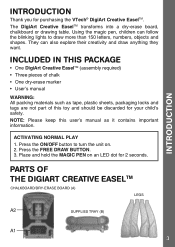
... the MAGIC PEN on . 2. Press the ON/OFF button to draw more than 150 letters, numbers, objects and shapes. They can follow the blinking lights to turn the unit on an LED dot for purchasing the VTech® DigiArt Creative EaselTM. ACTIVATING NORMAL PLAY 1. Press the FREE DRAW BUTTON. 3. Parts of this user's manual as it contains important information. Using the magic pen, children can also explore their creativity and draw...
... the MAGIC PEN on . 2. Press the ON/OFF button to draw more than 150 letters, numbers, objects and shapes. They can follow the blinking lights to turn the unit on an LED dot for purchasing the VTech® DigiArt Creative EaselTM. ACTIVATING NORMAL PLAY 1. Press the FREE DRAW BUTTON. 3. Parts of this user's manual as it contains important information. Using the magic pen, children can also explore their creativity and draw...
User Manual
Page 4
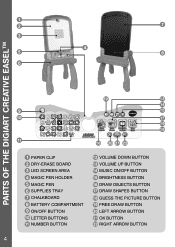
1 2 7 3 4 5 8 6 PARTS OF THE DIGIART CREATIVE EASELtm 12 13 14 9 15 10 17 19 18 11 16 20 21 22 1 PAPER CLIP 2 DRY-ERASE BOARD 3 LED SCREEN AREA 4 MAGIC PEN HOLDER 5 MAGIC PEN 6 SUPPLIES TRAY 7 CHALKBOARD 8 BATTERY COMPARTMENT 9 ON/OFF BUTTON 10 LETTER BUTTONS 11 NUMBER BUTTON 12 VOLUME DOWN BUTTON 13 VOLUME UP BUTTON 14 MUSIC ON/OFF BUTTON 15 BRIGHTNESS BUTTON 16 DRAW OBJECTS BUTTON 17 DRAW SHAPES BUTTON 18 GUESS THE PICTURE BUTTON 19 FREE DRAW BUTTON 20 LEFT ARROW BUTTON 21 OK BUTTON 22 RIGHT ARROW BUTTON 4
1 2 7 3 4 5 8 6 PARTS OF THE DIGIART CREATIVE EASELtm 12 13 14 9 15 10 17 19 18 11 16 20 21 22 1 PAPER CLIP 2 DRY-ERASE BOARD 3 LED SCREEN AREA 4 MAGIC PEN HOLDER 5 MAGIC PEN 6 SUPPLIES TRAY 7 CHALKBOARD 8 BATTERY COMPARTMENT 9 ON/OFF BUTTON 10 LETTER BUTTONS 11 NUMBER BUTTON 12 VOLUME DOWN BUTTON 13 VOLUME UP BUTTON 14 MUSIC ON/OFF BUTTON 15 BRIGHTNESS BUTTON 16 DRAW OBJECTS BUTTON 17 DRAW SHAPES BUTTON 18 GUESS THE PICTURE BUTTON 19 FREE DRAW BUTTON 20 LEFT ARROW BUTTON 21 OK BUTTON 22 RIGHT ARROW BUTTON 4
User Manual
Page 5
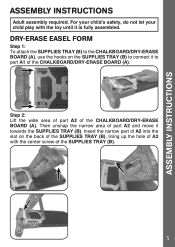
... up the hole of A2 with the toy until it is fully assembled. Step 2: Lift the wide area of part A2 of the SUPPLIES TRAY (B). 5 Then unsnap the narrow area of the CHALKBOARD/DRY-ERASE BOARD (A). ASSEMBLY INSTRUCTIONS Assembly Instructions Adult assembly required. For your child's safety, do not let your child play with the center screw of the CHALKBOARD/DRY-ERASE...
... up the hole of A2 with the toy until it is fully assembled. Step 2: Lift the wide area of part A2 of the SUPPLIES TRAY (B). 5 Then unsnap the narrow area of the CHALKBOARD/DRY-ERASE BOARD (A). ASSEMBLY INSTRUCTIONS Assembly Instructions Adult assembly required. For your child's safety, do not let your child play with the center screw of the CHALKBOARD/DRY-ERASE...

User Manual
Page 6
ASSEMBLY INSTRUCTIONS Step 3: Tighten the center screw by pushing it in and turning it clockwise to fix it in position. Step 4: Insert two LEGS into part A2 of the CHALKBOARD/DRY-ERASE BOARD (A) and two LEGS into place. 6 The LEGS will lock into the bottom of the SUPPLIES TRAY (B).
ASSEMBLY INSTRUCTIONS Step 3: Tighten the center screw by pushing it in and turning it clockwise to fix it in position. Step 4: Insert two LEGS into part A2 of the CHALKBOARD/DRY-ERASE BOARD (A) and two LEGS into place. 6 The LEGS will lock into the bottom of the SUPPLIES TRAY (B).
User Manual
Page 7
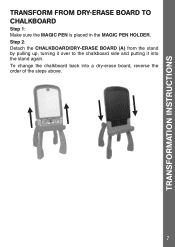
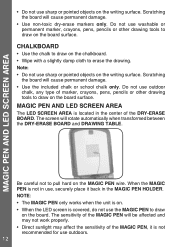
Step 2: Detach the CHALKBOARD/DRY-ERASE BOARD (A) from the stand by pulling up, turning it over to the chalkboard side and putting it into a dry-erase board, reverse the order of the steps above. 7 To change the chalkboard back into the stand again. TRANSFORMATION INSTRUCTIONS TRANSFORM FROM DRY-ERASE BOARD TO CHALKBOARD Step 1: Make sure the MAGIC PEN is placed in the MAGIC PEN HOLDER.
Step 2: Detach the CHALKBOARD/DRY-ERASE BOARD (A) from the stand by pulling up, turning it over to the chalkboard side and putting it into a dry-erase board, reverse the order of the steps above. 7 To change the chalkboard back into the stand again. TRANSFORMATION INSTRUCTIONS TRANSFORM FROM DRY-ERASE BOARD TO CHALKBOARD Step 1: Make sure the MAGIC PEN is placed in the MAGIC PEN HOLDER.
User Manual
Page 8
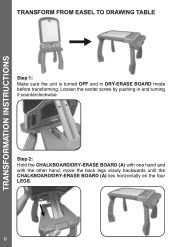
Loosen the center screw by pushing in DRY-ERASE BOARD mode before transforming. TRANSFORMATION INSTRUCTIONS TRANSFORM FROM EASEL TO DRAWING TABLE Step 1: Make sure the unit is turned OFF and in and turning it counterclockwise. Step 2: Hold the CHALKBOARD/DRY-ERASE BOARD (A) with one hand and with the other hand, move the back legs slowly backwards until the CHALKBOARD/DRY-ERASE BOARD (A) lies horizontally on the four LEGS. 8
Loosen the center screw by pushing in DRY-ERASE BOARD mode before transforming. TRANSFORMATION INSTRUCTIONS TRANSFORM FROM EASEL TO DRAWING TABLE Step 1: Make sure the unit is turned OFF and in and turning it counterclockwise. Step 2: Hold the CHALKBOARD/DRY-ERASE BOARD (A) with one hand and with the other hand, move the back legs slowly backwards until the CHALKBOARD/DRY-ERASE BOARD (A) lies horizontally on the four LEGS. 8
User Manual
Page 9
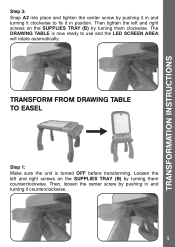
... TABLE is turned OFF before transforming. TRANSFORM FROM DRAWING TABLE TO EASEL Step 1: Make sure the unit is now ready to fix it in position. Loosen the left and right screws on the SUPPLIES TRAY (B) by turning them clockwise. TRANSFORMATION INSTRUCTIONS Step 3: Snap A2 into place and tighten the center screw by pushing it in and turning it clockwise to use and the LED SCREEN...
... TABLE is turned OFF before transforming. TRANSFORM FROM DRAWING TABLE TO EASEL Step 1: Make sure the unit is now ready to fix it in position. Loosen the left and right screws on the SUPPLIES TRAY (B) by turning them clockwise. TRANSFORMATION INSTRUCTIONS Step 3: Snap A2 into place and tighten the center screw by pushing it in and turning it clockwise to use and the LED SCREEN...
User Manual
Page 10
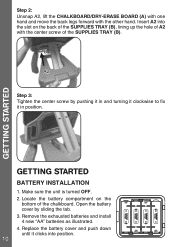
...-ERASE BOARD (A) with one hand and move the back legs forward with the center screw of the chalkboard. Insert A2 into position. 10 GETTING STARTED BATTERY INSTALLATION 1. Make sure the unit is turned OFF. 2. Locate the battery compartment on the back of the SUPPLIES TRAY (B), lining up the hole of A2 with the other hand. Remove the exhausted batteries and install 4 new "AA" batteries...
...-ERASE BOARD (A) with one hand and move the back legs forward with the center screw of the chalkboard. Insert A2 into position. 10 GETTING STARTED BATTERY INSTALLATION 1. Make sure the unit is turned OFF. 2. Locate the battery compartment on the back of the SUPPLIES TRAY (B), lining up the hole of A2 with the other hand. Remove the exhausted batteries and install 4 new "AA" batteries...
User Manual
Page 11
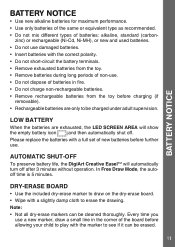
... replace the batteries with a full set of batteries in the corner of batteries: alkaline, standard (carbon- In Free Draw Mode, the autooff time is 5 minutes. zinc) or rechargeable (Ni-Cd, Ni-MH), or new and used batteries. • Do not use . AUTOMATIC SHUT-OFF To preserve battery life, the DigiArt Creative EaselTM will show the empty battery icon and then automatically shut off after 3 minutes without operation...
... replace the batteries with a full set of batteries in the corner of batteries: alkaline, standard (carbon- In Free Draw Mode, the autooff time is 5 minutes. zinc) or rechargeable (Ni-Cd, Ni-MH), or new and used batteries. • Do not use . AUTOMATIC SHUT-OFF To preserve battery life, the DigiArt Creative EaselTM will show the empty battery icon and then automatically shut off after 3 minutes without operation...
User Manual
Page 12
... pull hard on the chalkboard. • Wipe with a slightly damp cloth to erase the drawing. When the MAGIC PEN is not in the center of marker, crayons, pens, pencils or other drawing tools to draw on the board surface. NOTE: • The MAGIC PEN only works when the unit is on. • When the LED screen is covered, do not use...
... pull hard on the chalkboard. • Wipe with a slightly damp cloth to erase the drawing. When the MAGIC PEN is not in the center of marker, crayons, pens, pencils or other drawing tools to draw on the board surface. NOTE: • The MAGIC PEN only works when the unit is on. • When the LED screen is covered, do not use...
User Manual
Page 13
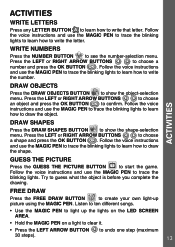
... BUTTON . GUESS THE PICTURE Press the GUESS THE PICTURE BUTTON to create your own light-up the lights on the LED SCREEN AREA. • Hold the MAGIC PEN on a light to draw the object. ACTIVITIES WRITE LETTERS Press any LETTER BUTTON to learn how to write the number. DRAW OBJECTS Press the DRAW OBJECTS BUTTON to write the letter. Follow the voice instructions and use the MAGIC PEN to trace the blinking lights to learn...
... BUTTON . GUESS THE PICTURE Press the GUESS THE PICTURE BUTTON to create your own light-up the lights on the LED SCREEN AREA. • Hold the MAGIC PEN on a light to draw the object. ACTIVITIES WRITE LETTERS Press any LETTER BUTTON to learn how to write the number. DRAW OBJECTS Press the DRAW OBJECTS BUTTON to write the letter. Follow the voice instructions and use the MAGIC PEN to trace the blinking lights to learn...
User Manual
Page 14
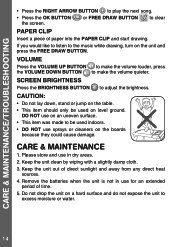
... the FREE DRAW BUTTON. Keep the unit clean by wiping with a slightly damp cloth. 3. Remove the batteries when the unit is not in dry areas. 2. SCREEN BRIGHTNESS Press the BRIGHTNESS BUTTON to make the volume louder, press the VOLUME DOWN BUTTON to adjust the brightness. Please store and use in use on an uneven surface. • This item was made to the music while drawing, turn on...
... the FREE DRAW BUTTON. Keep the unit clean by wiping with a slightly damp cloth. 3. Remove the batteries when the unit is not in dry areas. 2. SCREEN BRIGHTNESS Press the BRIGHTNESS BUTTON to make the volume louder, press the VOLUME DOWN BUTTON to adjust the brightness. Please store and use in use on an uneven surface. • This item was made to the music while drawing, turn on...
User Manual
Page 15
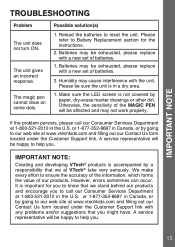
... under the Customer Support link. IMPORTANT NOTE Troubleshooting Problem The unit does not turn ON. Possible solution(s) 1. We make every effort to our web site at www.vtechkids.com and filling out our Contact Us form located under the Customer Support link with a new set of our products. A service representative will be sure the unit is important for the instructions. 2. Make sure the LED screen is...
... under the Customer Support link. IMPORTANT NOTE Troubleshooting Problem The unit does not turn ON. Possible solution(s) 1. We make every effort to our web site at www.vtechkids.com and filling out our Contact Us form located under the Customer Support link with a new set of our products. A service representative will be sure the unit is important for the instructions. 2. Make sure the LED screen is...

User Manual
Page 16
... comply with the instructions, may cause harmful interference to radio communications. This equipment generates, uses and can be determined by turning the equipment off and on, the user is encouraged to try to correct the interference by the party responsible for a Class B digital device, pursuant to operate the equipment. CAN ICES-3 (B)/NMB-3(B) Caution: changes or modifications...
... comply with the instructions, may cause harmful interference to radio communications. This equipment generates, uses and can be determined by turning the equipment off and on, the user is encouraged to try to correct the interference by the party responsible for a Class B digital device, pursuant to operate the equipment. CAN ICES-3 (B)/NMB-3(B) Caution: changes or modifications...

User Manual
Page 17
... at our discretion replace the product with a new unit or product of VTech. or (h) if any breach of the product; Any disputes resulting from the original purchase date, under normal use , immersion in water, neglect, abuse, battery leakage, or improper installation, improper service, or other external causes; (e) damage caused by operating the product outside the United States of replacement, whichever provides...
... at our discretion replace the product with a new unit or product of VTech. or (h) if any breach of the product; Any disputes resulting from the original purchase date, under normal use , immersion in water, neglect, abuse, battery leakage, or improper installation, improper service, or other external causes; (e) damage caused by operating the product outside the United States of replacement, whichever provides...


