
User Manual
Page 3
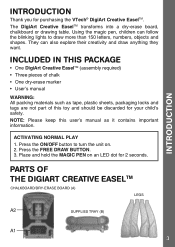
Place and hold the MAGIC PEN on . 2. They can follow the blinking lights to turn the unit on an LED dot for purchasing the VTech® DigiArt Creative EaselTM. ACTIVATING NORMAL PLAY 1. Press the FREE DRAW BUTTON. 3. The DigiArt Creative EaselTM transforms into a dry-erase board, chalkboard or drawing table. Press the ON/OFF button to draw...
Place and hold the MAGIC PEN on . 2. They can follow the blinking lights to turn the unit on an LED dot for purchasing the VTech® DigiArt Creative EaselTM. ACTIVATING NORMAL PLAY 1. Press the FREE DRAW BUTTON. 3. The DigiArt Creative EaselTM transforms into a dry-erase board, chalkboard or drawing table. Press the ON/OFF button to draw...
User Manual
Page 4
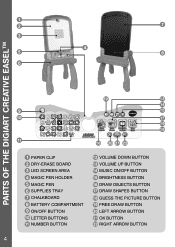
1 2 7 3 4 5 8 6 PARTS OF THE DIGIART CREATIVE EASELtm 12 13 14 9 15 10 17 19 18 11 16 20 21 22 1 PAPER CLIP 2 DRY-ERASE BOARD 3 LED SCREEN AREA 4 MAGIC PEN HOLDER 5 MAGIC PEN 6 SUPPLIES TRAY 7 CHALKBOARD 8 BATTERY COMPARTMENT 9 ON/OFF BUTTON 10 LETTER BUTTONS 11 NUMBER BUTTON 12 VOLUME DOWN BUTTON 13 VOLUME UP BUTTON 14 MUSIC ON/OFF BUTTON 15 BRIGHTNESS BUTTON 16 DRAW OBJECTS BUTTON 17 DRAW SHAPES BUTTON 18 GUESS THE PICTURE BUTTON 19 FREE DRAW BUTTON 20 LEFT ARROW BUTTON 21 OK BUTTON 22 RIGHT ARROW BUTTON 4
1 2 7 3 4 5 8 6 PARTS OF THE DIGIART CREATIVE EASELtm 12 13 14 9 15 10 17 19 18 11 16 20 21 22 1 PAPER CLIP 2 DRY-ERASE BOARD 3 LED SCREEN AREA 4 MAGIC PEN HOLDER 5 MAGIC PEN 6 SUPPLIES TRAY 7 CHALKBOARD 8 BATTERY COMPARTMENT 9 ON/OFF BUTTON 10 LETTER BUTTONS 11 NUMBER BUTTON 12 VOLUME DOWN BUTTON 13 VOLUME UP BUTTON 14 MUSIC ON/OFF BUTTON 15 BRIGHTNESS BUTTON 16 DRAW OBJECTS BUTTON 17 DRAW SHAPES BUTTON 18 GUESS THE PICTURE BUTTON 19 FREE DRAW BUTTON 20 LEFT ARROW BUTTON 21 OK BUTTON 22 RIGHT ARROW BUTTON 4
User Manual
Page 7
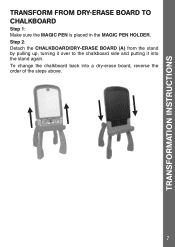
Step 2: Detach the CHALKBOARD/DRY-ERASE BOARD (A) from the stand by pulling up, turning it over to the chalkboard side and putting it into a dry-erase board, reverse the order of the steps above. 7 To change the chalkboard back into the stand again. TRANSFORMATION INSTRUCTIONS TRANSFORM FROM DRY-ERASE BOARD TO CHALKBOARD Step 1: Make sure the MAGIC PEN is placed in the MAGIC PEN HOLDER.
Step 2: Detach the CHALKBOARD/DRY-ERASE BOARD (A) from the stand by pulling up, turning it over to the chalkboard side and putting it into a dry-erase board, reverse the order of the steps above. 7 To change the chalkboard back into the stand again. TRANSFORMATION INSTRUCTIONS TRANSFORM FROM DRY-ERASE BOARD TO CHALKBOARD Step 1: Make sure the MAGIC PEN is placed in the MAGIC PEN HOLDER.
User Manual
Page 12
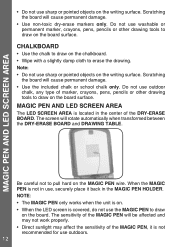
... , securely place it is not in use outdoors. 12 The sensitivity of the MAGIC PEN will cause permanent damage. • Use non-toxic dry-erase markers only. Do not... slightly damp cloth to draw on the writing surface. Do not use the MAGIC PEN to draw on the board. NOTE: • The MAGIC PEN only works when the unit is on. • When the LED screen is located... AREA is covered, do not use washable or permanent marker, crayons, pens, pencils or other drawing tools to draw on the board surface. MAGIC PEN AND LED SCREEN AREA • Do not use sharp or pointed objects...
... , securely place it is not in use outdoors. 12 The sensitivity of the MAGIC PEN will cause permanent damage. • Use non-toxic dry-erase markers only. Do not... slightly damp cloth to draw on the writing surface. Do not use the MAGIC PEN to draw on the board. NOTE: • The MAGIC PEN only works when the unit is on. • When the LED screen is located... AREA is covered, do not use washable or permanent marker, crayons, pens, pencils or other drawing tools to draw on the board surface. MAGIC PEN AND LED SCREEN AREA • Do not use sharp or pointed objects...
User Manual
Page 13
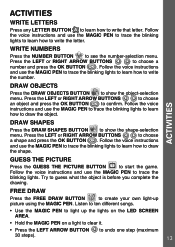
... LETTERS Press any LETTER BUTTON to learn how to choose a number and press the OK BUTTON . Follow the voice instructions and use the MAGIC PEN to trace the blinking lights to learn how to show the shape-selection menu. Press the LEFT or RIGHT ARROW BUTTONS to write that letter.... Follow the voice instructions and use the MAGIC PEN to trace the blinking lights to learn how to draw the object. GUESS THE PICTURE Press the GUESS THE PICTURE BUTTON to clear it. &#...
... LETTERS Press any LETTER BUTTON to learn how to choose a number and press the OK BUTTON . Follow the voice instructions and use the MAGIC PEN to trace the blinking lights to learn how to show the shape-selection menu. Press the LEFT or RIGHT ARROW BUTTONS to write that letter.... Follow the voice instructions and use the MAGIC PEN to trace the blinking lights to learn how to draw the object. GUESS THE PICTURE Press the GUESS THE PICTURE BUTTON to clear it. &#...
User Manual
Page 15
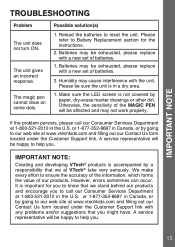
...our web site at 1-800-521-2010 in a dry area. 1. Humidity may be exhausted, please replace with the unit. The magic pen cannot draw on some dots. IMPORTANT NOTE Troubleshooting Problem The unit does not turn ON. Batteries may cause interference with a new set of ...batteries. 2. Otherwise, the sensitivity of our products. IMPORTANT NOTE: Creating and developing VTech® products is important for the instructions. 2. It is accompanied by going to reset the unit. A service representative will be sure ...
...our web site at 1-800-521-2010 in a dry area. 1. Humidity may be exhausted, please replace with the unit. The magic pen cannot draw on some dots. IMPORTANT NOTE Troubleshooting Problem The unit does not turn ON. Batteries may cause interference with a new set of ...batteries. 2. Otherwise, the sensitivity of our products. IMPORTANT NOTE: Creating and developing VTech® products is important for the instructions. 2. It is accompanied by going to reset the unit. A service representative will be sure ...


